Lesson summary on the topic: “Orientation in the spatial arrangement of body parts.”
Topic: Orientation on your own body: right-left, up-down, forward-back.
Goal: developing skills of orientation in the diagram of one’s own body. Tasks: 1. Form orientation in the diagram of your own body; 2. Reinforce verbal designations for the right and left parts of the body; 3. Develop students’ coherent speech; 4. Cultivate diligence and perseverance. Progress of the lesson. I. Organizational moment. Psychological mood for the lesson. Every day - always, everywhere, in class, in games. We speak boldly, clearly and sit quietly. — Today the doll Katya came to visit us for class. Look at her carefully and tell me what kind of clothes Katya is wearing? And why? Because it's autumn now! What happens to nature in autumn? Why do we dress warmer? Who will tell Katya and me what day of the week, month, time of year it is? II. Main part. Doing exercises. 1. “My body” Goal: developing skills of orientation in the diagram of one’s own body. Content: the teacher shows the child’s body parts (torso, head, arms, legs) and names them. It turns out where a person’s head is located on the body (top), legs (bottom), arms (on the sides - right and left). Then the child is asked to show the right and left parts of the body: right eye, right ear, left cheek, right arm, left leg, etc. To provide greater clarity, you can tie a ribbon on the child's right hand. 2. “Show it correctly” Goal: developing skills of orientation in the diagram of one’s own body. Equipment: doll. Content: the teacher quickly shows parts of the body on the doll (left leg, right arm, left cheek, etc.). Children show the same part on themselves. Children can also be asked to choose a driver who shows body parts, and the rest of the participants name them. Another option is possible: the driver names one of the body parts, the children show it on themselves. 3. “What can your hands do?” The teacher explains: A person has two hands, and in order not to confuse them, each of them was given its own name - right and left. There are only two hands, but they can do a lot. What can your hands do? Goal: developing skills of orientation in the diagram of one’s own body. Content: the following questions and tasks are used to differentiate the right and left hands: Show with which hand you draw, write, eat. In which hand do you hold a pen, pencil, spoon? Show. What is this hand called? (show follows). Put the bracelet on your right (left) hand. Place your right hand behind your head first, and then your left. Throw the ball with your right hand. Move the cube with your left hand. Etc. Physical exercise. Suddenly clouds covered the sky. The prickly rain began to fall. Children stand on their toes, raise their crossed arms up. The rain will cry for a long time, It will spread slush everywhere. They jump on their toes, holding their hands on their belts. Mud and puddles on the road, Raise your legs higher. They walk in a circle, raising their legs high 4. “Find a pair” Goal: distinguish between the right and left sides of the body. Equipment: several pairs of mittens, gloves, boots, shoes, etc. Content: the child is asked to find pairs of objects for the right and left hands (legs). 5. “Show” Goal: orientation in your own body based on differentiation of the right and left parts of the body using the Head test. Contents: - show your left eye with your right hand - show your left ear with your right hand - show your left leg with your right hand - show your right eye with your left hand - show your right ear with your left hand - show your right leg with your left hand III. Final part. — what did we do in class? — evaluation of the student’s work.
Target: strengthen children’s ability to navigate the space of the playroom and on a sheet of paper; exercise children in reading diagrams of the arrangement of objects in a limited space; improve the ability to move in a given direction; develop voluntary attention, memory, fine motor skills.Progress of the lesson
Presenter (V.). Guys, do you like to travel? Me too. Let us go on a journey through our group today and perhaps we will be able to see something new, interesting in ordinary objects, and maybe we will find new friends.
Updating knowledge about modes of transport.
Let's remember what you can travel on? What type of transport do you like best? Let's choose a train. What parts does the train consist of? (Locomotive and carriages.) Who wants to be a locomotive? Who can drive our train best?
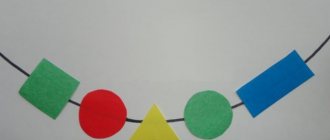
Game "Shadow Domino".
Q. To build a train, everyone must take one domino card and build a chain by placing a colored image of an object on its shadow. Now, guys, stand behind each other in the same order as your cards are. Tell me who is behind whom. Remember your seats and you can go your separate ways. So we have a train. Now we need to choose our route. What does that require? (Map.)
Reading a diagram (repetition of graphic symbols).
B. For this we will use the game room plan that we drew up in the last lesson. Let's imagine that we have just joined the group. What's to your left? (Windows.) What color are the windows on our plan? (Blue.) What is in front of the windows? (Table.) What shape is it? (Rectangular.) What color is the table top? (White.) Show where this table is marked on our plan. What's to your right? (Drawing tables.) How many are there? (Three.) Are they the same? (No, there’s a big one in the middle and small ones on the sides.) What shape is the big table? (Trapezoid.) What color is it? (White.) What shape are small tables? (Square.) What color are they? (Yellow.) Show where they are located on our plan. What is located in the middle of our plan? (Carpet.) What color is it indicated? (Red.)
What is shown on our plan in the upper right corner? (Theater corner.) Guys, on the plan arrows indicate our route and stops where amazing adventures await us. Where does our journey begin? (From the door.) Do you remember who stood behind whom? So, let's go!
Game "Train" (movement according to a pattern in a given direction).
Children receive a map in their hands and follow the arrows to the first stop indicated on the diagram. The train stops, the cars randomly scatter.
Q. Guys, who is sitting in Pavlik’s place? (Monkey.) Look at it. What kind of fur does she have? (Fluffy, brown, smooth, warm, soft, etc.) What sad eyes she has! I understood why she was so sad: she has no home. Guys, can we help the monkey? How? (Let's build a house.) But to build a house, you need to draw a drawing.
Orientation on a sheet of paper (verbal dictation).
B. Take the leaves and arrange them so that the red stripe is to your left. Grab your pens and get ready. From the point, draw a line 5 cells down, 5 cells to the right, 5 cells up, etc. (Children complete the task.)
Well done! What beautiful houses you have created! Now the monkey can build himself a house. And our journey continues.
A task to change the direction of movement according to verbal instructions.
B. Walk forward to the carpet, turn left. Go to the corner of the carpet and turn right. Walk forward to the next corner of the carpet and walk forward 3 more steps. (Second stop.)
Guys, where have we arrived? (To the theater corner.) Who lives here? (Fairy-tale heroes.) That's right, this is Cheburashka - a fairy-tale character. But he's also sad. He has a house, but no carpet for playing. Can we help him? (Yes, we will give him a carpet.)
Orientation on a sheet of paper (creating an applique).
Q. What shape is our leaf? (Square.) Roma, put a yellow square in the middle of the carpet. Katya, put an oval on top in the middle, a second oval on the bottom, etc. Glue triangles in the corners of the carpet. How many triangles do you need? (Four.) What color are they? (Blue.) Glue circles between the ovals. Did we do it well? What a colorful carpet! Cheburashka liked him, so he will sing us a song, and let us follow him with our eyes.
Gymnastics for the eyes, relieving visual tension (using a sounding toy).
Q. Guys, where did our plan go? And what is this letter? (They read the letter.) Yes, this is a letter from a mole. He invites you to play hide and seek. He hid himself and left only a hint letter. Do you know who the mole is? What does he look like? Where could he be hiding? Let's look.
Game “Find the toy” (a diagram of the play corner or verbal instructions are offered). (Children complete the task.)
Q. Where was the mole hiding? Let's play hide and seek together. Where is the mole hiding? (On the table, under the table, behind the closet, in the closet, etc.)
The mole told me where our map is, it's under the blue box. Bring it, please. But this is not a map, these are images of dancing men. Let's dance to the music too.
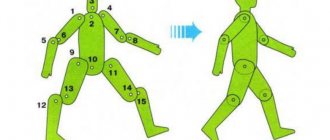
Physical education lesson (children perform exercises based on visual symbols).
V. It’s time for us to hit the road! Steam locomotive, give the signal to depart! We are heading to the last stop.
Game "Labyrinth".
Q. Guys, the animals lost their cubs in the labyrinths. What to do? (We will take them to their mother.) Then sort out the cards and help the cubs. (Children complete the task.)
Well, our journey has come to an end. Where have we been today? Who did you meet? Did you enjoy the trip? Thank you for your attention!