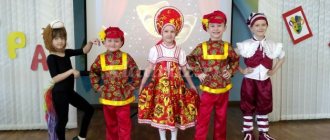
Abstract of GCD for application on the topic: "New Year tree"
Summary of GCD on manual labor
in the preparatory group on the topic: “New Year tree.”
Goal: creating conditions for the development of children's creativity.
Tasks:
expand your understanding of winter holidays and the traditions of celebrating the New Year in Russia;
teach how to make a Christmas tree from strips of paper according to a pattern, reinforcing skills in using scissors;
develop artistic skills, fine motor skills;
cultivate a love of manual labor, promote cooperation, and the ability to work cohesively in a team of peers.
Materials: prepared squares of green double-sided paper, scissors, glue sticks, glitter and confetti to decorate the craft.
Preliminary work: reading the fairy tale “The Ugly Christmas Tree” by Evgeny Permyak, looking at illustrations on the topics “Winter”, “New Year”, watching the video presentation “Traditions of celebrating the New Year in Russia”.
GCD move:
Educator: The long-awaited winter holiday, magical and wonderful, is approaching.
What's it called, guys? (children's answers)
What date does it happen? (children's answers)
What is the main attribute of the New Year's holiday?
Children: New Year tree.
Educator: That's right, guys.
Not a single New Year's holiday is complete without the green beauty of the Christmas tree.
But it was not always so. Many years ago, the New Year came in autumn or spring. In Ancient Rus' this holiday was celebrated in March. The celebration was like a tribute to spring, warmth, sun and a future good harvest.
When did the beautiful Christmas tree become a symbol of the New Year?
The tradition of decorating the Christmas tree on Christmas Eve existed in the distant country of Germany.
Why was spruce chosen as the New Year's tree?
Our ancestors in Rus' treated trees as living beings. In Rus', birch has always been considered such a particularly revered tree. Among the ancient Germans, the green, fragrant beauty spruce was considered the tree of the world from ancient times. They believed that good “spirits of the forests” lived in its branches - defenders of justice and all living things. It is no coincidence that before battles, warriors gathered for council near the spruce tree in the hope of receiving protection from the “spirits of the forests.” The spruce tree is also the personification of immortality, fidelity, fearlessness, and eternal youth. The custom of appeasing the good spirits that hibernate in the branches of the evergreen beauty by decorating the fluffy branches with gifts has existed since ancient times. This custom was born in Germany and was later borrowed by other countries.
In Russia, the custom of celebrating the New Year with a New Year tree dates back to the Petrine era. In Russia, a royal decree was issued, which henceforth ordered to celebrate the New Year on January 1. The decree provided recommendations for organizing the New Year's holiday. It was ordered to launch rockets on the New Year, light fires and decorate the capital with pine needles: “Decorate Moscow houses with spruce and pine branches and cones, and everyone was supposed to celebrate this day with a celebration with congratulations to all relatives and friends, dancing and shooting, launching rockets into the night sky "
This is how the custom of celebrating this magical and long-awaited New Year holiday appeared here in Russia.
And today, guys, I propose to make a green Christmas tree with your own hands and decorate it.
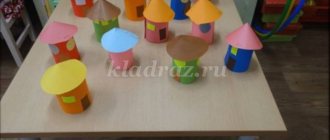
We cut several strips, cut each strip in half and glue with loops. There is no need to cut a lot of workpieces at once, because their quantity cannot be immediately determined accurately. It’s better to do more later if it’s not enough.
Glue the loops onto the template in rows, starting from the bottom. We decorate the finished Christmas tree with rhinestones and sequins.
“Herringbone” applique made of paper: production sequence
Step 1
Cut pieces of corrugated (crepe) paper into different sizes and different colors. The baby can do this with you, because the resulting piece of paper is not necessarily even. Use this craft to teach your child how to use scissors correctly and with pleasure.
Step 2
Take ¼ sheet of white office paper, apply glue to the surface with a pencil and stick multi-colored pieces of corrugated paper onto it. If you want one color to overlap another, apply additional adhesive stick to these areas.
Step 3
This way you need to cover the entire piece of white paper.
Step 4
Turn our workpiece over so that its colored side “looks” down.
Draw triangular Christmas trees and trunks on the wrong side of the resulting workpiece (white side) with a simple pencil and cut out the Christmas trees.
Step 5
For the card, fold ½ sheet of white cardstock in half. Unfold the card horizontally and glue the cut out Christmas trees onto the card.
Or you can unfold the cardboard vertically and stick the Christmas trees on the top and bottom sides of the card cover like this.
You can stick shiny decorations on the Christmas trees: sequins, rhinestones, half-beads and other decorative elements - whatever you have in your home.
Look how the Christmas trees sparkled in this outfit!
Creative task and ideas for inspiration:
- Glue colorful pieces of crepe (corrugated) paper onto a white sheet. Cut out triangular Christmas trees from the resulting paper.
— Prepare for the background not white, but colored cardboard of several colors. Conduct an experiment: first place the cut out Christmas trees on cardboard, for example, yellow, then on green, blue cardboard, etc. Choose the color on which you liked the way your Christmas trees look best. Justify your choice.
- Glue Christmas trees onto the background of the card. Use your imagination and decorate the Christmas trees as your imagination tells you!
- Think about how else you can decorate your card?
— What if, instead of crepe paper, we glue small scraps of fabric? How about gluing lace or braid onto the background of the postcard using special glue?
Create, everything is in your hands! Good luck in your creativity!!!
Summary of a lesson on appliqué in the middle group “Christmas trees - prickly needles”
Evgeniya Khamzina
Summary of a lesson on appliqué in the middle group “Christmas trees - prickly needles”
Lesson topic : “Christmas trees, prickly needles ”
.
1. Continue to develop in children the ability to cut triangles from
squares, make an applique of two items , placing them side by side
center of the sheet, starting from the bottom.
2. Strengthen in children the ability to use scissors and hold them correctly
brush, spread glue, press on the sheet with a napkin, enjoy the result
your work, recognize and name the color green.
3. To develop in children the ability to hear and understand the teacher, to cultivate curiosity and interest in the application .
Reading winter tales, poems, asking riddles, looking at snowflakes
on a walk. Drawing snowflakes with paints and pencils. On a walk
looking at the branches of a Christmas tree.
Bunny – soft toy; "Snowman" envelope
;
sample application ; three triangles decreasing in size
3 green squares (5*5, 4*4, 3*3 cm,
sheets of blue landscape paper with a white strip pasted on
paper at the bottom of the sheet (snow)
.
Narrow white stripes for falling snow
(0.5*10 cm, glue, scissors, napkins, brushes.
a guest came to our . Who is it you need to guess.
Riddle about the hare:
Educator: Who is this?
Educator: That's right, today a hare came running from the forest to our lesson .
He brought us a letter. Now we will open the envelope and find out who sent it
(I open the envelope, take it out and read
Hello my good children!
Grandfather Frost is writing to you.
There are not enough Christmas trees in our forest for the holiday , could you please
help - make a lot of Christmas trees so that they
there was enough for everyone for the New Year holiday.
Sincerely, Grandfather Frost.
Educator: Guys, let's help Santa Claus and make a lot of Christmas trees .
Let's make these beautiful Christmas trees
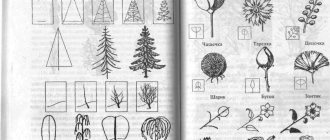
Educator: Look, what geometric shapes is the Christmas tree made of?
Children: Christmas trees are made of triangles.
Educator: Are the triangles the same size?
Children: Triangles are different in size: large, smaller and small.
Educator: -Where are the big branches located and where are the small ones?
Children: Large branches are at the bottom, and small ones are at the top.
Educator: Guys. What kind of Christmas tree do we have?
Children: beautiful, fluffy, green, prickly, big.
Looking at an illustration on TV.
Educator: What geometric shape does the Christmas tree look like?
Children: the Christmas tree looks like a triangle.
Educator: -That's right, the triangles gradually decrease in size
size, and the Christmas tree becomes like a pyramid. Every next
finds it on the corner of the bottom.
Educator: How would we lay out triangles?
Children: First you need to put the largest triangle below, a little
above (above him)
a little smaller, the smallest one at the top.
I show the children a square and ask: “What is the name of this geometric figure?”
Children: This is a square.
Educator: -What color is it?
Children: green square.
Educator: We will cut out Christmas tree branches from these squares. Every
the square must be cut into 2 triangles. To do this you need to take a square like this:
so that one of its corners is at the bottom and the opposite is at the top. Necessary
look at the top corner and point the scissors there. Like this! (explanations are accompanied by a demonstration)
.
Do you remember everything well? Now let’s rest: (Children stand behind their chairs)
.
Here under the Christmas tree
Here under the green Christmas tree (Stand up.)
The crows are jumping merrily: (We jump.)
Kar-kar-kar! (Loudly.)
(Clapping hands above their heads.)
All day long they shouted, (Turns the body left and right.)
The boys were not allowed to sleep: (Tilting the torso left and right.)
Kar-kar-kar! (Loudly.)
(Clapping hands overhead.)
Only towards night they fall silent (Waving their arms like wings.)
And everyone falls asleep together: (They squat down, hands under their cheeks - fall asleep.)
Educator: Now we will cut out the branches of the fir trees.
During work, individual work is carried out.
I watch my posture, TB with scissors. Glue.
At the end, finger gymnastics is performed.
Finger gymnastics “Herringbone”
In the morning, the children were surprised (spread their arms to the sides, raising their shoulders)
What miracles happened
This New Year's night.
We expected anything (they clench and unclench their fingers)
And we saw the parade:
Snowmen stand in a row (they draw three circles in the air with their hands)
The eyes are shining merrily, (close and open the eyes with the palms)
And in front of them is a Christmas tree (clap their hands)
Fluffy, with needles .
Educator: -Now we will stick our Christmas trees on a sheet of paper, starting
from below the strip of snow, placing the Christmas trees in the center of the sheet.
Turn on calm music. (Children work to music)
.
During the lesson , I suggest that the children cope with the task faster than others to depict falling snow. (I explain individually how to do this)
.
Educator: - You need to tear off small pieces from the white paper and apply glue with a brush in the place where the snowflake will be, and then glue it
put it in this place, remove excess glue with a napkin.
Snowflakes should not be glued close to each other; they can also be glued to Christmas trees. After all, when snow falls in nature. It covers everything around.
(At the end, each child places his work on the stand)
.
Lesson summary : Tell me, what did we do today?
Child: We cut the square into triangles, pointing the scissors at the top corner.
We glued Christmas trees from triangles of different sizes, starting with the largest. We made an applique of 2 items .
Educator: Look, it’s a big spruce forest. All the Christmas trees grew straight , there are enough of them for everyone. When Grandfather Frost comes, we will all be ours
Application "Traffic light". Summary of educational activities for children of the senior group Program content: To consolidate children’s knowledge about the rules of the road and behavior on the street in the game - quiz “Rules of the Road.
Long-term planning of the “Workshop of Miracles” club for middle group children. October “Screen with vegetables” Expand children’s knowledge about vegetables; consolidate the techniques of applying glue with a brush to the back side of the figure; continue.