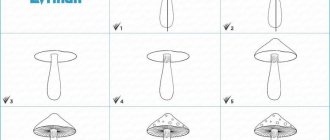
Adding details
- Under the body, draw pear-shaped legs. Draw oval handles on the sides.
- Now take a black felt-tip pen and trace all the details of the image.
- Erase the pencil sketch and start converting the image to color.
- A black felt-tip pen is perfect for coloring in part of the pupils.
- A purple pencil or felt-tip pen will be needed to color the needles.
- The mouth and glasses will be blue.
- You can color the Hedgehog's eyebrows and nose with a brown felt-tip pen.
- Red pencil or felt-tip pen for coloring the character’s torso, arms and legs.
- Apply an additional layer to the legs and lower body. Smesharik is ready! You can put it in a frame.
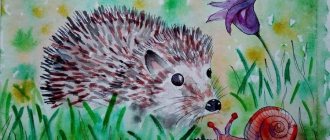
There are many ways to draw a hedgehog, and you can use a wide variety of materials - paints, pencils and felt-tip pens, and also choose a technique that is appropriate for any age, both for preschool children, schoolchildren, and adults.
Hedgehog from your favorite cartoon
Surely your child likes the animated series “Smeshariki”. Then he will be delighted with the idea of drawing one of the characters from this cartoon - the Hedgehog.
You will learn how easy it is to draw such a picture by following the step-by-step instructions.
- Prepare a landscape sheet, markers of different colors and a simple pencil. Draw a circle in the center of the sheet.
- Divide the resulting circle into four equal parts, first drawing a vertical line, then a horizontal one.
- In those areas where the lines and the circle touch, draw inclined segments. In the center from the point of intersection of the lines, draw upward oblique lines.
- Step back a little from the top of the circle and, focusing on the vertical line, draw the forehead.
- Draw your eyebrows a little lower; they are rectangular in shape and slightly inclined.
- Draw the eyes, they should be large, around them draw glasses in the form of circles, inside the eyes add pupils and highlights.
- Complete the glasses by drawing the arms.
- It is better to depict the nose and mouth in a triangular shape.
Add color to your work
Take colored pencils.
- A light brown pencil is perfect for adding color to the face and paws.
- A gray pencil will be used for coloring the needles, and a blue pencil will be used for coloring the eyes.
- You can color your tongue red.
- To give the picture completeness, make a pattern of needles in the form of ticks.
If you wish, you can decorate the hedgehog with a butterfly or leaf, and complete the background.
Drawing the main elements
- Draw the hedgehog’s head, elongated, with a transition to an oval-shaped nose, and ears in the form of semicircles.
- Draw zigzags between the ears. A small arc is the mouth.
- Two ovals are eyes; inside them draw pea-shaped pupils.
- Now draw the lower needles and tummy. When drawing the belly, leave gaps for the legs. Draw the paws in the gaps.
- You can color your creation!
You can paint the body, legs and head of the hedgehog with a yellowish-orange color; give the nose and needles a dark gray color.
Image of painting details
- Complete this line with a rounded nose. Draw an oval from the nose, slightly lengthening it.
- Also draw two semi-ovals under it - one slightly smaller. This will be the mouth. Above the nose, draw oval-shaped eyes. The pupils will be round.
- From the mouth, draw the cheeks, which turn into semi-ovals above the eyes.
- Move on to drawing the needles. Start under the chin in a zigzag line, then trace it around the entire body of the hedgehog.
- Draw the front paws with toes, then the hind legs.
- Proceed to coloring your masterpiece.
Draw all the details with a black felt-tip pen, and also color the nose, the area of the mouth above the tongue, and draw the eyebrows. Once you have traced all the elements, erase the pencil lines with an eraser.
Simple technique for beginners
This is a fairly simple drawing technique that even a preschool child can handle.
- In order to draw a hedgehog step by step, the young artist will need pencils and paper.
- Place the sheet of paper horizontally, and then from the center draw a zigzag line that runs along the entire body of the hedgehog.
Hedgehog, step by step instructions
If you are wondering how to draw a hedgehog beautifully with a pencil, this technique of drawing this character in stages with a pencil will help you.
Take a landscape sheet and put a couple of dots on it, there should be about two centimeters between them. Draw the segment vertically.
Mark the middle and a little lower draw a line of the same length in the horizontal direction.
Drawing needles
Above your head, start drawing a triangle, but do not extend it to a circle. Draw a line to the right of the intersection of the inclined line and the edge of the circle, then connect it to the next inclined line.
On the left, repeat the same thing, so you get the “needles” of a hedgehog. In the gaps formed between the needles, put a mark and, focusing on it, add another needle on each side.
Theme of the week: “Autumn trees and bushes”
Lesson 6. Autumn leaf fall
(Painting with a brush using the “dipping” method. Gouache)
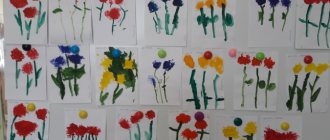
Target. Teach children to paint with a brush using the “dipping” method, changing the color of the paint; strengthen the ability to hold a brush correctly, pick up paint on the bristles, and rinse the brush. Learn to distinguish and name colors. Develop speech and thinking.
Demonstration material. Basket, multi-colored tree leaves cut out of cardboard (yellow, green, red, orange).
Handout. A landscape sheet on which a tree is drawn, gouache, a brush, a jar of water.
Progress of the lesson
Start your lesson with a physical education session.
Read the poem to the children and ask them to perform the appropriate movements:
The wind blows in our faces
The tree swayed.
The wind is quieter, quieter, quieter,
The tree is getting higher and higher.
On the first two lines of the poem, children raise their arms and swing their bodies in different directions, on the third line they quietly squat, and on the last line they slowly stand up.
Ask the guys: “What falls from the trees in the fall?” (Leaves.)
Scatter colorful leaves cut out of cardboard on the floor and invite the children to collect only yellow leaves in a basket, then green, red, orange. Leaves can also be collected into four boxes of matching colors. Then place a landscape sheet with a tree on it in front of each child and ask them to draw falling leaves. Remember to hold the brush with your thumb and middle finger, holding it on top with your index finger, not too close to the sharpened end.
Show the children how to draw paint onto the pile and apply it sideways to the sheet. First, you can practice the guys in the technique of “dipping” with a dry brush.
Encourage little ones to spread the leaves all over the leaf. Remind that in order to change the color, you need to thoroughly rinse the brush in water and pick up another paint.