Summary of experimental lessons in the middle group
Lesson notes for experiments
in the middle group
- Topic: Let's plant a tree.
Purpose: to help determine the properties of sand and clay (flowability, friability).
Material: sand, clay.
Equipment: containers, sticks.
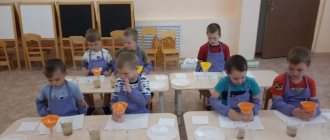
Progress of the experimentation lesson:
- Statement of the research problem.
The teacher and the children try to plant a tree first in a container with sand, then in a container with dry clay.
- Predicting the result.
The teacher presents the children with a problematic situation: “Where is it easier to plant a tree - in sand or in clay, and where will it hold better?” (Children's guesses)
- Performing an experiment and recording its results.
Educator: Guys, you can’t put dirty fingers in your mouth. Don't rub your eyes with dirty hands.
Children stick a stick first into the sand, then into the clay.
– Where is it easier to stick a stick? (Into the sand)
- Why? (It is loose, loose)
– Where is the best place to hold the wand and why? (It holds better in clay, it is denser)
CONCLUSION: The sand is loose and loose, the clay is dense.
- Topic: Where is the water?
Purpose: to help determine that sand and clay absorb water differently.
Material: dry sand, dry clay, water.
Equipment: transparent containers, measuring cups.
Progress of the experimentation lesson:
- Statement of the research problem.
The teacher invites the children to find out the properties of sand and clay by testing them by touch (loose, dry).
- Predicting the result.
The teacher poses a problematic situation to the children: “Do sand and clay absorb water equally?”
- Performing the experiment.
Children, under the guidance of a teacher, pour the same amount of water into cups at the same time (just enough water is poured so that it completely goes into the sand).
Educator: What happened in the container with sand and clay? (All the water has gone in the sand, but stands on the surface of the clay)
- Why? (Clay particles are closer to each other and do not allow water to pass through)
—Where are there more puddles after the rain? (On asphalt, on clay soil, since they do not let water in; on the ground, in the sandbox there are no puddles)
— Why are the paths in the garden sprinkled with sand? (To absorb water)
CONCLUSION: Sand absorbs water better.
- Topic: Magic material.
Purpose: to help identify the properties that sand and clay acquire when wetted.
Material: sand, clay, planks, sticks, ceramics.
Equipment: container.
Progress of the experimentation lesson:
- Statement of the research problem.
The teacher invites the children to make balls, sausages, figures from sand and clay.
- Predicting the result.
The teacher poses the problem situation to the children: “What are the dishes made of – sand or clay?” (children's assumptions)
3.Performing the experiment.
Educator: Do not put dirty fingers in your mouth and do not rub your eyes with your hands.
The made figures are allowed to dry, after which the strength of the buildings is checked. Children draw conclusions about the viscosity of wet clay and the retention of its shape after drying. They find out that dry sand does not retain its shape.
— Is it possible to make dishes from sand and clay?
Children test the properties of sand and clay by making dishes from them and drying them. They name what the dishes are made of, why they pour water into it and check the material according to the results.
CONCLUSION: The “sand dish” does not hold water and breaks. Clay retains its shape for some time.
- Topic: Coloring water.
Purpose: to help identify the properties of water.
Material: water (cold and warm), crystalline flavored dye.
Equipment: container, stirring sticks, measuring cups.
Progress of the experimentation lesson:
- Statement of the research problem.
Children, under the guidance of a teacher, examine 2–3 objects in the water.
Educator: Why are objects clearly visible? (The water is clear)
- Predicting the result.
Educator: What happens if you put a drawing painted with paints into water? (Children's guesses)
- Performing the experiment.
Educator: Children, you cannot put dirty fingers in your mouth.
Under the guidance of the teacher, children lower the drawing, painted with paints, into the water.
- What will happen to the drawing? (The picture blurred and the water changed color)
- Why did this happen? (Particles of paint got into the water)
- How else can you color water? (Add dye)
The teacher invites the children to color the water themselves (in cups with warm and cold water at once), touch both cups first, guess why one is warm and the other cold, touch the water with their hands, smell it (it is odorless). The teacher sets a task for the children - to find out in which glass the paint will dissolve faster, for which he suggests putting one spoon of dye in each glass; how the color and smell of water will change if there is more dye (the water will become more colored, the smell will be stronger). Children complete the task and tell what happened. The teacher suggests putting another spoonful of dye into a warm glass and sketching the results of the experiments. Then water in different containers (for further making colored ice floes), considering what color you get.
- Recording the results of the experiment.
Children sketch the results of the experiment.
CONCLUSION: Water is transparent, but it can change its color and smell when colored odorous substances dissolve in it: the more of this substance, the more intense the color and smell: the warmer the water, the faster the substance dissolves. Can be warm or cold. May heat other substances. Some substances dissolve in water.
- Topic: Water scales.
Purpose: to introduce the manufacture and operation of water scales; consolidate the knowledge that when objects are immersed in water, the water level rises.
Equipment: tall glass jar, round stick 20-30 cm long made of light wood (pine, linden, aspen), nut, cardboard.
Progress of the experimentation lesson:
- Statement of the research problem.
The teacher invites the children to make and see how water scales work.
- Performing the experiment.
Educator: Handle the glass jar carefully.
The teacher places a stick in a jar of water (to make it stand vertically, tie a nut to its end). A circle of cardboard is attached to the top - a scale. Mark the water level on the side of the jar. Places a coin on the “scale” and again notes the water level.
- Recording the results of the experiment.
Children, under the guidance of a teacher, sketch the result of the experiment.
CONCLUSION: The water level has changed.
- Topic: Friends.
Purpose: to introduce the composition of water (oxygen); develop ingenuity, observation, curiosity.
Material: water.
Equipment: glass, bottle, capped, cloth napkin, sheet of paper, pencils (for each child).
Progress of the experimentation lesson:
- Statement of the research problem.
Educator: Do you know what water consists of? (Children's guesses)
- Performing the experiment.
Educator: Use glass objects carefully.
Children, under the guidance of a teacher, place a glass of water in the sun for a few minutes.
- What's happening? (Bubbles form on the walls of the glass)
- This is oxygen.
— They shake the water bottle with all their might.
- What's happening? (A large number of bubbles have formed)
3. Recording the results of the experiment.
Children, under the guidance of a teacher, make sketches.
CONCLUSION: Water contains oxygen. It “appears” in the form of small bubbles. As water moves, more bubbles appear. Oxygen is needed by those who live in water.
- Topic: Dance of the peas.
Objectives: to introduce the concept of “force of movement”; develop observation, curiosity, ingenuity.
Material: water, peas.
Equipment: jar, tube, napkin, sheet of paper, pencils (for each child).
Progress of the experimentation lesson:
- Statement of the research problem.
The teacher invites the children to teach the peas to swim and perform manipulations with the peas, like in a circus.
- Performing the experiment.
Educator: Handle all materials carefully.
Children, under the guidance of a teacher, put four peas and a straw into a jar of water. Blow into the jar through a straw. At first weakly, then with greater force.
- Why do peas move faster and then slower? (When air flowed slowly through the tube, the peas moved slowly; the force of the air increased - and the speed of the peas increased.)
- This means that the force of movement of objects depends on the force of influence on them.
3. Recording the results of the experiment.
Children sketch the progress of the experiment.
CONCLUSION: The force of movement of objects depends on the force of impact on them.
- Topic: Finding air.
Goal: Help children discover the air around them.
Material: water.
Equipment: plumes, ribbons, flags, bag, balloons, cocktail straws, container.
Progress of the experimentation lesson:
- Statement of the research problem.
The teacher invites the children to prove with the help of objects that there is air around us.
- Predicting the result.
The teacher creates a problematic situation: “How can you prove that there is air around?” (Children's guesses)
- Performing the experiment.
Educator: Guys, do not swing objects too much, especially when other children are nearby.
Children choose any objects and demonstrate experiments independently or according to the chosen model. Explain the ongoing processes based on the result of actions with the proposed equipment (for example, blow into a tube, the end of which is lowered into water; inflate a balloon or a plastic bag, etc.).
CONCLUSION: Air is everywhere around us.
- Topic: Making a cloud.
Purpose: to demonstrate how clouds are made; explain how rain is formed.
Material: hot water, pieces of ice.
Equipment: three-liter jar, baking tray.
Progress of the experimentation lesson:
- Statement of the research problem.
The teacher invites the children to make a cloud themselves.
- Clarification of safety rules.
During class:
- handle glass objects carefully;
- do not put ice in your mouth;
- Do not touch the jar of hot water.
3. Predicting the result.
Educator: How can you make a cloud yourself? (Children's guesses)
- Performing the experiment.
The teacher pours hot water (about 2.5 cm) into a three-liter jar. Places a few ice cubes on a baking sheet and places it on top of the jar. The air inside the can rises and begins to cool. The water vapor it contains will condense to form a cloud. This experiment simulates the process of cloud formation as warm air cools. Where does rain come from? It turns out that the drops heat up on the ground and rise up. There they get cold, and they huddle together, forming clouds. When they meet together, they increase in size, become heavy and fall to the ground as rain.
- Recording the experiment.
Children, under the guidance of a teacher, make sketches.
CONCLUSION: The rising air cools, the water vapor condenses and forms a cloud; when the droplets meet together, they become heavy and fall to the ground as rain.
- Topic: What plants love.
Purpose: to help establish the dependence of the growth and condition of plants on their care.
Material: two to three identical plants.
Equipment: care items, observation diary, activity algorithm.
Progress of the experimentation lesson:
- Statement of the research problem.
The teacher invites the children to conduct an experiment with plants. The essence of the experiment is different care for plants.
- Predicting the result.
The teacher, according to the children, makes drawings - predictions of the result of the experiment: what will happen if one plant is weeded, watered, loosened in a timely manner, the second - weeded, watered in a timely manner, without loosening, the third - only watered.
- Performing the experiment.
Children, under the guidance of a teacher, care for three identical plants in different ways: first, they weed, water, and loosen in a timely manner; second - water in a timely manner, weed without loosening; third - just water it. They monitor growth, condition, and fruiting for a long time.
- Recording the result of the experiment.
Children, under the guidance of a teacher, sketch each result. Compare with forecast drawings.
CONCLUSION: Plants require care: weeding, watering, loosening the soil.
- Topic: Where do grains live?
Purpose: to introduce the structure of the spikelet.
Material: spikelets.
Equipment: trays.
Progress of the experimentation lesson:
- Statement of the research problem.
The teacher shows the grains.
Educator: Do you know where their houses are? (Children's answers)
- Performing the experiment.
The teacher invites the children to take apart the spikelets themselves and find the grains in them.
CONCLUSION: The spikelet consists of grains. The grains live in the spikelet.
- Topic: Which flowers last longer: cut flowers or left on the plant?
Purpose: to help determine that cut plants open later than those left with the roots.
Material: plant with buds.
Progress of the experimentation lesson:
- Statement of the research problem.
Educator: Which flowers last longer: cut ones or left on the plant? (Children's guesses)
- Performing the experiment.
Children choose two flowers that are at the bud opening stage. One of the flowers is cut off and immediately placed in water, the other is left on the plant and marked by tying a bright thread at the base.
- Recording the results of the experiment.
The safety of flowers is noted visually or using an observation calendar.
The results obtained depend on many factors, so the teacher must be able to explain the actual results obtained.
- Topic: Loss of water during breathing.
Purpose: to make it clear that a person loses water during breathing.
Equipment: cold glass.
Progress of the experimentation lesson:
- Statement of the research problem.
Educator: How does a person lose water? (Children's guesses)
- Performing the experiment.
The teacher invites the children to breathe on the cold glass.
Educator: What do you see? (The glass became covered with droplets of water and fogged up)
-Where did the water come from? We release it during exhalation. A person loses about ten glasses of water per day. Therefore, he needs to drink or consume the same amount with food. It is useful to remember: a glass contains 200-250 grams of water. In any food - meat, vegetables, bread - there is much more water than solid matter.
CONCLUSION: A person needs to drink water so that the body does not become dehydrated.
- Topic: Guess by smell.
Purpose: to show the relationship between the organs of taste and smell.
Material: products – lemon, chocolate, bread, etc.
Progress of the experimentation lesson:
- Statement of the research problem.
Educator: There are four main tastes: sweet, bitter, sour and salty.
The teacher asks the children to name what can be sweet, salty, sour or bitter. (Options: looking at pictures of products, name the taste of each of them.)
- Predicting the result.
The teacher creates a problematic situation: “Is it possible to determine the smell of a product if you inhale air only through your mouth?” (children's assumptions)
- Performing the experiment.
The teacher asks the child, blindfolded, to identify a product (lemon, bread, chocolate, etc.) by smell. Then the child closes his nose and, inhaling air only through his mouth, performs a similar task. As a result, the child comes to the conclusion that by inhaling air only through the mouth, it is impossible to determine the smell of the product. You need to taste it.
CONCLUSION: If the sense of smell is impaired, the taste of the product also changes. Whereas with a normal sense of smell, the taste of the product is felt much better.
- Topic: Box of sensations.
Goal: to develop tactile sensitivity.
Equipment: a box that can be closed on all sides, various items of natural origin.
Progress of the experimentation lesson:
- Statement of the research problem.
Educator: Keep a “box of sensations” for yourself.
- Performing an experiment
In order to make such a box, you need to take a tightly closed cardboard box and cut a hole in the wall so that a child’s hand can fit through it. To help children identify objects in the box only by touch, you can sew a sleeve from an old children's sweater or part of an old thick woolen sock into the hole.
Every day, put some object of natural origin into the “box of sensations”, removing yesterday’s. Children identify the object lying in the box by touch. Check whether the children correctly identified what kind of object was in the box. You can organize competitions, rewarding the winners.
CONCLUSION: Tactile sensations help identify objects.
- Theme: Black and white.
Purpose: to introduce the influence of sunlight on black and white colors; develop observation and ingenuity.
Equipment: black and white cloth napkins, a sheet of paper, pencils (for each child).
Progress of the experimentation lesson:
- Statement of the research problem.
The teacher reads the couplet:
The white rag looks like a bunny
A black rag is for a garden crow.
Educator: Touch the napkins. Tell me, what are they? (Children's answers)
- Predicting the result.
The teacher creates a problematic situation: “Which color - white or black - attracts heat more strongly and retains it longer?” (Children's guess)
- Performing the experiment.
Children, under the guidance of a teacher, place white and black napkins on the window and leave them in the sun for several minutes.
Educator: Touch with your hand. What happened? (the white napkin became cold, and the black napkin became warm).
- Recording the results of the experiment.
Children make sketches.
CONCLUSION: White color repels the sun's rays - a white napkin heats up slightly. Black color absorbs the sun's rays - a black napkin becomes hot. In spring, dirty snow melts faster than clean, white snow. Clothes made from dark fabric are warmer than clothes made from light fabric.
- Topic: Sunny bunnies.
Objectives: to introduce the origin of sunbeams, their movement, the objects from which they are reflected; develop ingenuity and curiosity.
Material: water.
Equipment: mirror, jar, stainless steel plate (for each child).
Progress of the experimentation lesson:
- Statement of the research problem.
The teacher reads a poem:
Loose snow darkens in March,
The ice on the window is melting.
Bunny running around the desk
And according to the map on the wall. (S. Marshak)
The teacher invites the children to play with the mirror, look into it and say what they see.
- Predicting the experiment.
The teacher creates a problematic situation: “What objects will the sunbeams reflect from?” (Children's guesses)
- Performing the experiment.
Educator: Handle the mirror carefully so as not to drop it.
The teacher tells the children that mirrors are made of glass and invites them to touch the surface of the mirror.
— What does the surface feel like? (Smooth)
— Shiny objects reflect the sun's rays.
Children, under the guidance of a teacher, “catch” a ray of sun with a mirror and direct its reflection in any direction.
- What's happening? (The mirror reflects the sun's rays)
— Change the tilt of the mirror, play with a ray of sunlight.
Children take a jar of water and “catch” the sun’s rays.
- What's happening? (The water reflects them)
- Move your hand. What's happening? (The surface of the water begins to move, the “bunnies” begin to jump.) Children take a stainless steel plate and repeat the experiment.
- What's happening? (The plate has a shiny surface that reflects the sun's rays well.)
4. Recording the results of the experiment.
Children make sketches of an experiment.
CONCLUSION: All shiny objects reflect light and sunlight.
- Theme: Rainbow.
Purpose: to show a way to see a rainbow in a room.
Material: water.
Equipment: bowl, mirror, white sheet of paper.
Progress of the experimentation lesson:
- Educator: Is it possible to see a rainbow in the room? (Children's guesses)
- Performing the experiment.
Educator: Use the mirror carefully.
Children, under the guidance of a teacher, place a mirror on the edge of a bowl of water. They catch a ray of sunlight with a mirror and direct its reflection onto a sheet of paper.
- Recording the results of the experiment.
Children, under the guidance of a teacher, sketch the results of the experiment.
CONCLUSION: The rainbow can be seen in the room.
- Subject: Guess.
Purpose: to help understand that objects have weight, which depends on the material and size, to establish the dependence of the weight of an object on its size.
Equipment: objects made of the same material of different sizes: large and small cars, nesting dolls, balls, etc., a bag, opaque boxes of the same size.
Progress of the experimentation lesson:
- Statement of the research problem.
The teacher shows the children a pair of balls, slightly different in size. Children look at pairs of objects, find out how they are similar and how they differ.
- Predicting the result.
The teacher poses a problematic question: “Does the weight of an object depend on its size and material?” (Children's guesses)
- Performing the experiment.
The teacher invites the children to play the “Guess” game. The teacher places all the toys in a box and, taking out one at a time, offers to determine by touch whether this toy is large or small. Then the teacher puts the items in one bag. The teacher invites the child to take out a heavy or light object and finds out how they guessed it.
CONCLUSION: If the object is large, then it is heavy, and if it is small, then it is light.
- Topic: Magic mirrors or 1? 3? 5?
Purpose: to introduce the property of a mirror.
Material: apple.
Equipment: two mirrors.
Progress of the experimentation lesson:
- Statement of the research problem.
Educator: Is it possible to make 3, 5, 7 from one apple without using cutting objects? (Children's guesses)
- Performing the experiment.
Educator: Use the mirror carefully.
The teacher installs two mirrors at an angle greater than 90%. Children put one apple in the corner. There are three apples. And if you gradually decrease the angle between the mirrors, the number of apples begins to increase.
- Recording the results of the experiment.
Children, under the guidance of a teacher, sketch the results.
CONCLUSION: The smaller the angle of approach of the mirrors, the more objects will be reflected.
- Topic: Natural Magnifying Glass.
Purpose: to show a way to magnify insects without the help of a magnifying glass.
Material: insect.
Equipment: three-liter jar, cling film.
Progress of the experimentation lesson:
- Statement of the research problem.
Educator: Do you know a way to enlarge an insect for viewing without a magnifying glass? (Children's guesses)
- Performing the experiment.
Educator: Use glass objects carefully.
Children, under the guidance of a teacher, plant an insect in a three-liter jar. The neck of the jar is tightened from above (but not pulled with cling film, but pressed through so that a small container is formed). Tie the film with a rope or elastic band, and pour water into the recess. The result is a “magnifying glass” through which you can see the smallest details. The same effect can be achieved if you look at an object through a jar of water, securing it to the back wall of the jar with transparent tape.
- Recording the results of the experiment
Children sketch the results of the experiment.
CONCLUSION: Water has the property of magnification.