Application helps develop creative skills and hand motor skills. This kind of art is relevant for all ages and problems, but most often, educators practice this process in kindergartens and primary grades.
To keep the boys busy for a few hours or to spend fun and useful time with them, they make car panels from scrap materials. Now we need to look at machine templates for appliqué for children of different ages.
Applique technique
One of the most attractive activities for children is appliqué. Kids are delighted with the brightness of the paper used and the variety of materials; they really enjoy cutting out figures, laying them out and gluing them. There are quite a lot of types of applique according to the execution technique. Let's look at what a machine made in the most familiar way (from paper), but using different types of manufacturing, will look like.
Military vehicle
Many boys are crazy about special equipment, then you should consider ready-made materials for creating this type of machine or start cutting out blanks.
- To work, you do not need to have any special drawing skills, you just need to follow the step-by-step instructions and stick to one of the samples.
- There are quite a lot of details in this type of craft, every little detail should be given special attention, because the car is of a military standard.
- All kinds of antennas or additional tanks will make the specimen more impressive; as you work, you should explain to the child what such devices are used for, and a rather long conversation will begin.
Tear-off applique “Funny Car”
This method allows you to convey the texture of the image and create the image in bright colors. For this work you need multi-colored candy wrappers, cardboard, scissors, a brush, and glue.
Execution sequence:
- do not tear the candy wrappers too finely;
- Glue the resulting pieces onto the base (cardboard, landscape sheet), trying not to leave gaps, and let dry thoroughly;
- on the reverse side draw the outline of the car;
- carefully cut out the silhouette according to the design;
- turn over, finish the job by gluing the wheels, windows, headlights.
The resulting work can be a wonderful gift in the form of a postcard. By the way, you can diversify the picture with flowers and trees made in the same style.
Ideas for the senior group
Children in the older group strive for independence in creativity. Here you can relax a little and completely give free rein to your children’s creativity.
As an additional treatment, you can use stickers, rhinestones, or sparkles, which will make the application bright and memorable.
What ideas can you offer to elders?
- Sea bottom,
- Ocean,
- Nature near your home,
- Camping in the woods,
- Favorite animal,
- Cards for birthdays or other holidays.
Marine theme
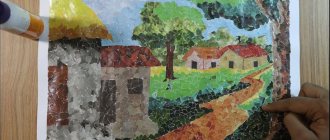
There are simply countless application ideas. One of the most interesting topics may be the seabed. For this application, you need to prepare materials of the appropriate color and work out in detail what will be located where.
Can be placed at the bottom of the plant in the form of dry grass. Additionally, you can sprinkle sand on the bottom, which will stick well to the glue. You can make whales, killer whales, turtles and other sea creatures from paper, each of which needs to be cut out separately.
Our yard theme
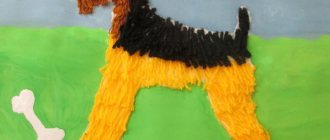
You can make an original idea for your own yard. To do this, children need to remember what their yard looks like from the window. Let them draw a sketch in pencil, from which they will reproduce the appliqué by creating different shapes. Another original idea could be an image of a favorite pet.
It’s not enough to just cut out a cat or dog; she will need to make fur from a thin piece of paper, which will be glued with glue. It would be very original to create an applique based on a photograph of a pet. To do this, you can take a photo of your pet on your phone and use the photo to create an image on cardboard made of paper. Additionally, you can use rhinestones, stones or paints, which will add originality.
Overlay applique
This technique makes it possible to create a multi-color image. The main point in this type is the preparation of templates from colored paper. Fragments are superimposed and glued layer by layer onto the drawn outline of the car. It is very important to follow the sequence of performing such an application. First, large-sized elements are glued, and smaller ones are glued onto them.
Police car
This application for children also looks great after the work is completed; a child at a very young age can print out the finished drawings and help cut out the details from them.
There are also beautiful, practical templates; using such a stencil, you can convey in a playful way the necessary, undoubtedly useful information that will be useful to children in adulthood.
No less impressive are road patrol cars made from various small components, often these are plasticine balls that need to be distributed, adhering to the color scheme in the sketch.
Mosaic (modular application)
This technique is based on geometric figures of different sizes, colors, and textures.
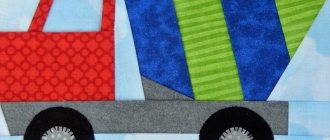
Let's try to make the “Truck” applique using the mosaic method. What is needed for this:
- Prepare the necessary parts. They can be made “by eye”, or adhere to certain sizes. Colored paper is used for this work.
- We lay out the blanks in front of the baby and help him choose the priority parts.
- Together we lubricate each part of the truck and stick it on a sheet: the long rectangle is glued first and smoothed out thoroughly (the kids do this process very diligently);
- Next, the cabin is glued - first we glue a rectangle in a vertical position, and then a square (car hood);
- then we decorate the cabin with windows;
- Finally, we glue the circles - wheels.
The work is not at all difficult, the kids enjoy doing it. A small nuance - in order to interest the child in the upcoming process, involve him in the preparation (put on an apron, prepare the necessary things for work and the workplace itself). During the manufacture of the truck, you can recite all the actions, examine the figures, and pay attention to the color and size of the parts.
Fun Truck
To work, you will need the most common material and tool - colored paper, scissors, glue (a glue stick will be the most convenient for kids). Parents will need help in preparing parts of the truck.
Progress
Cut out geometric shapes such as three rectangles, two squares of different sizes, two circles, a triangle or a semicircle.
If the child has cutting skills, he can prepare these parts himself.
On half an A4 sheet, lay out the prepared parts as follows:
- below – a narrow green stripe (grass);
- then position the truck (from left to right): one rectangle horizontally, the next rectangular shape vertically, a larger square;
- at the top of the vertical rectangle - a small square (window) and a small rectangle (door);
- put the car on wheels (two circles);
- Place a triangle or semicircle on top of the horizontal rectangle - a weight.
The child chooses colored paper independently.
Together with the baby, you need to adjust the location of all the parts and glue them.
If desired, you can supplement the picture with environmental objects (sun, clouds, tree).
Symmetrical applique
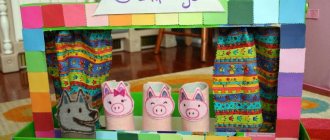
This technique is good because the child will clearly see (and try to do it himself) the receipt of two completely identical samples. Using this type of application, you can make an application from the series: cars that help people.
"Important Fire Truck"
Together with the children, prepare and cut out the necessary parts using the paper folding method. The sheet is folded in half and a certain contour is applied. By cutting out and unfolding the sheet, you will get absolutely identical parts, for example, absolutely even, round, identical wheels, rectangular windows, doors, cabin, stairs. The preparatory stage of this technique is very attractive to children. They are very serious about making the correct machine parts, so this type of transport is extremely important in difficult firefighting situations.
Fire engine
This application is proposed to be made using the fabric mosaic technique.
To work, you need to prepare fabric, scissors, glue, a sheet of thin cardboard, and a pencil. Draw a fire engine on a sheet of paper (you can choose a ready-made stencil of this vehicle) and cut pieces of multi-colored fabric into small pieces.
It is better to use the so-called “non-flowing” fabric - thin suede, raincoat material, teak, felt, etc. You can start creating a mosaic application.
Execution stages.
Fill the body of the fire truck with red scraps. The pieces of fabric are glued immediately. In this case, you need to try to glue them in such a way that they do not extend beyond the contours of this part.
The car windows are created using blue fabric.
Highlight the top of the wheel with light strips.
The base of the staircase is filled with blue pieces (the tone can be chosen a little darker than the window fabric).
Pieces of yellow material are used to cover the symbol of the fire engine “01”, as well as the wheel rims. The tires are made from brown scraps.
Finally, the bottom of the sheet is decorated with greenery right up to the wheels to give the appearance of a car standing on the grass. Cover all free space around the car with pieces of blue, dark blue and purple fabric.
This work can be placed in a frame under glass and decorate a child’s room.
Tape appliqué method
This method is somewhat similar to the symmetrical technique of visual activity. The difference is in the number of identical figures. To get the selected silhouettes, you will need a sheet of paper (width and length selected in accordance with the intended image), fold it like an accordion, draw an outline and cut out the image.
This method complements the application itself well. For example, a truck is carrying New Year's gifts to children. The truck is made using the most common technique - gluing templates, but using the tape method you can create a background: an alley of fir trees or trees.
Volumetric figures
On a plane made of thick cardboard you can make original and quite beautiful things; this approach to realizing your plans is perfect for exhibitions and competitions. You need to put in more effort, because the process is somewhat complicated.
You will also need a lot of improvised items; elements with strict lines are often suitable for cars, for example:
- Matchboxes.
- Pencil packaging.
- Any rectangular or square specimens.
Stages of work:
- After forming the base in the form of a car of a certain type, it is worth moving on to the design of the decorative plan.
- Colored paper is cut strictly to size and then glued using PVA.
- At this stage, you will need to pay attention to detail so that the entire frame is hidden well, otherwise the appearance will definitely deteriorate.
Silhouette applique
This method is used when working with older children who are proficient with scissors.
"Ambulance"
To complete this work, you must first make sketches. First, the outline of the car is drawn, carefully cut out and glued to the base. Then we draw the wheels, cut them out, and glue them to the car. In the same way we make windows and a red cross. Alternatively, the car can be drawn with wheels.
Paper applique is the most familiar, familiar and easy way to make an attractive craft with your baby. However, there are many types of this fine art that use completely different materials.
Doctor Aibolit's car
Children certainly rush to help their little friends - animals. They need an ambulance. The material is similar to the previous work.
Execution Sequence
- Create a set of car parts. Round the edges of a rectangular sheet.
- Place two wheels on the bottom of the part.
- There is a window in front and a flashing light just above.
- Be sure to cut out a red cross.
- Glue the arranged figures onto the base. While working, you can read poems to your child about a specific machine.
As options, you can create an application for a fire truck, a passenger car and other types of vehicles.
Seeds and cereals in application
Special attention is paid to the development of fine motor skills, as they play an important role in the development of the baby’s speech. Therefore, kindergartens use various themes of cereal appliqué.
“Naughty bus” - semolina applique
What you need to prepare for this craft:
- semolina;
- cardboard, size and color are selected individually;
- PVA glue and brushes;
- simple pencil, paints, gouache;
- markers.
Draw a bus on cardboard with a simple pencil. This will allow, if necessary, to adjust the silhouette. Then we will outline the outline with a felt-tip pen to clearly highlight all the elements and details of the transport. We glue the parts separately with a brush, sprinkle them with semolina, let them dry and thoroughly shake off the remaining semolina. At first we work together with the child, then you can invite him to do the work on his own. When sprinkling the cereal, you need to draw the baby’s attention to ensure that the contours outlined with a felt-tip pen do not fall asleep. This will come in handy when applying paint. When the bus is ready, we begin painting. You can first select an illustration with a funny bus. We use paint or gouache. The work will look more interesting if you make a frame from the same semolina and paint it.
Working with semolina will give your baby a large number of indescribable tactile sensations. In the process of making this application, variations are possible with various cereals and seeds.
Ambulance
The basis of the beautiful applique is created from a white piece of paper, with a noticeable three-dimensional red cross placed on it.
After which they begin to design the chassis of the vehicle; these elements can be cut out by the kids so that the geometric shape is as even as possible.
To make the process easier, you should outline round things with a simple pencil and invite the child to use scissors to follow the outline. With a little practice, he will be able to create such shapes on his own.
At the last stage, the ambulance is equipped with beacons and the cabin is highlighted; if you show your imagination, the craft will turn out to be very impressive.
Straw applique “Car”
This beautiful material turns the product into a real work of art. An important point is its preparation for work: assemble, open, and dry in time. Then the scrap is cut and ironed. Straw appliqué is best done in small groups. Each team can choose their own car.
Execution steps:
- select a sketch;
- each detail is located on tracing paper;
- the prepared straw must be glued to the front side of the tracing paper;
- the strips are folded in such a way that the gaps are not visible and extend beyond the contour lines;
- turning the entire workpiece over to the wrong side, the excess paper with straws is carefully trimmed with scissors;
- All parts of the product are laid out against the background, glued and given time for final drying under pressure.
At this time, you can look at the cars they have chosen with your children, talk about their purpose, remember the verse about cars, and play with toy cars.
Dry plants are excellent preparations for application
More complex version
Before moving on to the work of a labor-intensive sample, it is worth learning how to make simpler paintings with your own hands, and, guided by the knowledge gained, the young member of the family will be able to realize the most daring ideas.
The use of fabric in the process is very popular, because in the end the vehicle looks very realistic. The texture characteristic of trucks or long vehicles is transmitted, which significantly diversifies the production of cars of various sizes.
In order not to get confused in the arrangement of parts, many templates have been developed specifically for fabric appliqués; they can be printed and used without much difficulty.
Unusual applique for children
Cotton appliqué is a rather unusual form of fine art. Classes develop the child’s artistic horizons, instill not only hard work and perseverance, but also accuracy during work. They are excellent exercises for improving fine motor skills. The scope for children's imaginations is unusually wide, and it can increase significantly if the cotton wool is tinted.
For this type of application you need special cotton wool (100% cotton), velvet paper, a stationery knife, tracing paper, paper clips, scissors, and transfer paper. This process takes place with the mandatory participation of adults.
"A funny car on a winter day"
Choose a picture of a funny car. You should consider in which places the cotton wool should remain white, where to use colored cotton wool, and where to make the cotton wool a non-fluffy material. This application can be done in different ways.
First method:
- Use tracing paper to copy the drawing and attach it to velvet paper with paper clips. Next, the adult cuts out the outline of a certain part with a stationery knife.
- We fill the cut out part with cotton wool (some of the material can be pre-painted in different colors), while the weight of the drawing remains on the paper.
- This is how we do all the work. Preference is given to unpainted cotton wool, since the machine went for a walk on a winter day.
Second method:
- Using carbon paper, we transfer the picture onto the base, try to ensure that the outline is an extremely clear imprint.
- If necessary, use an eraser to remove any dirt from the base.
This winter picture will look best on a blue or blue background. You can make snow, a snowman, and snow-covered trees from small pieces of cotton wool. The result will be a real winter landscape.
Use the applique to create together with your child. On special websites you can get acquainted with a catalog of proposed ideas and see photos of finished works.
How to make three-dimensional models of cars from paper
The most popular and relevant crafts at the moment are three-dimensional models of paper cars. Their advantage, as mentioned earlier, is that they can be either figurines for decorating something or a full-fledged toy.
In order for the figurine to become a full-fledged toy, it is necessary to carefully select the thickness of the paper that will be used to create such a craft.
In general, to assemble it you will need paper or cardboard on which the part will be printed or drawn, scissors, and glue.
How to make a car out of paper? Let's look at how to do it step by step:
Print details
Below are templates and diagrams of parts for a three-dimensional paper machine, which may look like this:
Draw a drawing by hand
You can also create a template yourself by drawing a drawing by hand. In this case, you will need additionally: a simple pencil, an eraser and a ruler. You can draw a drawing manually in cases where it is not possible to print the details. You can draw details from templates.
How to fold correctly
The next step is to connect all the available parts.
In order to assemble the machine correctly, you must follow all the instructions step by step, without changing their order. First, you need to cut out the parts, and then carefully and sequentially glue the ends together, starting with the largest parts and ending with the smallest seams.