New Year's themes appear in art classes in kindergarten and kindergarten with the first snowflakes. It is the anticipation of the holiday and gifts that makes children work harder, learning new techniques and skills. In addition, the crafts will certainly have a practical use - before the holidays, you will not only need to decorate the Christmas tree, a room at home and a room in the garden, doors and windows, but also make presents for all relatives and friends. New Year's crafts made from paper, cardboard and waste materials are perfect for this.
Pumpkin
You will need: rolls of toilet paper or paper towels, scissors, twine or rope, stick, pva glue, for decoration - glitter or book pages.
Master Class
- Cut the sleeve into circles.
- Apply glue to one piece, sprinkle with glitter or glue a piece of page and leave to dry.
- Decorate with glitter or book pages with every detail.
- Gather the circles onto twine to form a pumpkin.
- Glue the stick into the middle of the pumpkin.
The pumpkin made from bushings is ready! You can find even more crafts made from bushings HERE.
Volumetric shape of paper crafts
Making voluminous paper crafts for children is interesting, but a little more difficult. You will need to be patient. But the result will please all participants. For example, “voluminous cat”.
All you need is a sheet of A4 paper, scissors and glue. This is where you need a template that can be downloaded and cut out. The neck is bent like an accordion, and the tail must be twisted in a spiral. In the template part, four cuts are cut along solid lines. The paws along the fold line are glued to the cardboard.
Volume umbrella
You will need: double-sided colored paper, a compass, a simple pencil, scissors, a glue stick or adhesive tape, thick wire, thread.
Master Class
- Cut out 16 circles of the same diameter from colored paper.
- Fold each circle in half twice.
- Secure each piece in the upper round part with glue so that it is opened only at the bottom and does not open at the top.
- Take 2 blanks and glue them at right angles to each other.
- Glue the remaining pieces together in a circle, forming the upper part of the umbrella.
- Form an umbrella handle with a wire loop, then attach it.
- Prepare a piece of string and hang the umbrella by the loop.
A voluminous umbrella made of colored paper is ready! I recommend watching this video!
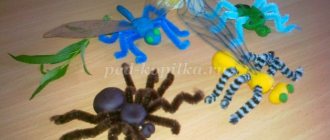
Crafts for children made from chenille wire
Making and inventing models from wires is no less exciting than folding origami, sculpting from plasticine, and creating from paper. You can make many interesting and funny crafts from chenille wire for friends, parents, and useful things for yourself. As a result of the work, imagination develops, children learn patience and perseverance.
It is not necessary to make crafts exactly in the presented color scheme. You can take any wire according to your own idea, mood and preference.
Fluffy wire butterfly
Chenille wire hare
Chenille wire flower
Chenille wire octopus
Fly agaric made of chenille wire
Chenille wire spider
Acorns
You will need: cardboard, scissors, glue stick, marker, templates.
Master Class
- Print out the lid template.
- Print out the box template.
- Cut them out.
- Make folds in the marked places.
- Fold the box and lid as shown in the photo instructions.
- Secure with glue.
- Make a small leaflet out of paper and draw a face for it.
- Make a whole collection of brightly colored acorns.
Acorn boxes are ready! I recommend watching this video!
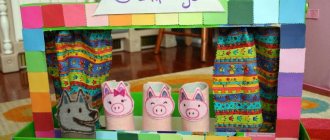
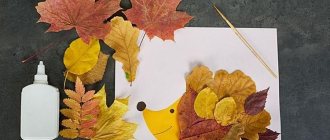
You will need: a thin book without a cover or a magazine, colored paper, scissors, black marker, glue, pompom, decorative eyes.
Master Class
- Fold the top and bottom corners of the first page as shown in the photo. Repeat this process with all pages until the middle of the book.
- Fold the corners of the pages, changing their direction on the second half of the book.
- Cut out 4 paws from colored paper and mark the claws with two stripes using a marker.
- Glue the paws at different corners.
- Make a face for the hedgehog by gluing eyes and a pompom nose.
The hedgehog from the book is ready!
Fairytale "golden fish"
A child of four years old can make his own paper craft in the shape of a goldfish. What do you need? Round plastic plate - once. Thick cardboard - two.
Then everything is on the list: scissors, multi-colored paper sheets, stationery glue, pencils, decorated elements for the fish. Subsequence:
- turn the plastic plate over onto cardboard and trace it with a simple pencil;
- the resulting circle is cut out;
- draw a triangle inside another circle;
- cut it out. This is the tail of the fish;
- glue the cardboard circle and triangle together;
- stick yellow paper and decorations on top;
- cut out a blue circle and a smaller black one for the eye and stick it on.
Simple and fast. You can play with it or just admire it as a decoration.
Rainbow in the clouds
You will need: colored cardboard, scissors, glue stick, cotton wool, stapler.
Master Class
- Cut 7 strips of paper of different colors so that each piece is shorter than the previous one. The red stripe should be the largest and the purple stripe the smallest.
- Arrange the stripes in the following order: red, orange, yellow, green, blue, indigo and violet.
- Fasten the strips of paper together using a stapler.
- Roll 6 cotton balls.
- Glue 3 cotton balls at the base of the rainbow as clouds.
Rainbow in the clouds is ready!
Preparation
Sitting at a craft, drawing, cutting, coloring it, the preschooler is diligent. His attention is absorbed in the process of creating a craft. His hands tenaciously hold objects and do what needs to be done. His mind is busy solving a problem. This is almost a 1st grade student. Everything is done in a playful way.
But it’s not just paper that a preschooler needs to work with. All children's crafts for the preparatory group include working with plasticine and cardboard. Ability to use glue and thread.
The ability to properly control your body. A preschooler needs the ability to perform certain movements so that these movements become familiar to him while studying at school.
Corrugated paper mushrooms
You will need: corrugated paper, scissors, glue, paper straw, honeycomb paper, paints as desired.
Master Class
- Check out the mushroom template.
- Cut 2 rectangles from corrugated paper.
- Form a mushroom cap by gluing them together as shown in the photo.
- Cut out a small circle of corrugated paper and glue it in the center, covering the hole in the cap.
- Take honeycomb shaped paper, fold it several times and cut out a semicircle. Make 2 of these multi-layer blanks.
- Glue the semicircles together and form mushroom plates as shown in the image.
- Glue the plates to the bottom of the mushroom cap.
- Cover the straw with corrugated paper and glue it as a mushroom stem.
- Make a whole collection of mushrooms of different sizes.
- If desired, paint or tint them.
Corrugated paper mushrooms are ready!
Features for girls and boys
When working with children, educators sometimes have to focus on whether a child is a boy or a girl. As they get older, children of a certain gender tend to show interest only in what is natural.
Girls love to sew and tinker with dolls. Boys - play with a ball, tinker with cars. But both of them must be taught to live in society, together.
Therefore, such an event as crafts on February 23, the preparatory group is held together. To give gifts in the form of drawings or carved figures to your dads and grandfathers.
Girls can also congratulate boys as future defenders of the Fatherland, which is what they hope for them, for boys. That when they grow up they will become good defenders.
The preparatory group also holds a crafts event on March 8 together. Together, girls and boys make crafts for mothers and grandmothers, for relatives. Congratulations to the teacher. Boys congratulate girls on March 8th and give them some kind of gift.
We recommend reading:
- DIY wall panel using scrap materials
- How to choose a secure travel case
- Registration at 1xBet
Autumn leaves
You will need: double-sided colored paper, scissors, glue stick, ruler.
Master Class
- Prepare 10 squares of colored paper measuring 8x8cm.
- Take one square and fold it as shown in the photo instructions. It should look like a rhombus.
- In this way, fold a total of 6 blanks.
- Take 3 squares and fold them to form triangles.
- Glue 2 rhombuses together and one triangle in the center.
- Do this process with all the parts.
- Glue the blanks together to form a leaf.
- Make a total of 8 leaves of different colors in the same way.
- Glue the leaves together in a circle, then decorate a couple of them by making a face.
Bright autumn leaves made from colored paper are ready! I recommend watching this video!
Original crafts from plastic bottles for the New Year 2022
Crafts for the New Year can also be made from scrap materials. Even the most ordinary plastic bottles will do. Such decorations can be made together with children. It is very interesting to watch how masterpieces are made from ordinary bottles.
Using the bottoms of plastic bottles you can make interesting decorations for the Christmas tree. Even a child can cope with the task.
Materials:
- plastic bottles:
- scissors;
- acrylic paint (preferably in a tube);
- wire.
Step-by-step production:
- Cut off the bottoms of the bottles, 2-3 cm from the edge. The plastic should be transparent. Bottles with a figured bottom resembling a flower are suitable.
- Draw patterns on the back of the bottoms using acrylic paint.
- Thread wire rings at the top of the bottoms so that you can conveniently hang crafts on the Christmas tree. You can string the blanks on a rope and make an interesting garland.
On a note!
A more complicated version of this craft will be a three-dimensional workpiece. The manufacturing principle is the same, but you need to glue painted bottoms of the same diameter together; you can put glitter and confetti inside. It is convenient to use transparent tape for fastening.
Very interesting Christmas tree decorations in the form of cones can be made from ordinary dark-colored plastic bottles. The result is a very unusual craft, and it is not even immediately clear what it is made of.
Materials:
- brown plastic bottles;
- scissors;
- lighter;
- awl;
- wire or thread;
- beads.
- green bottle.
Step-by-step production:
- Cut squares of different sizes from brown plastic bottles. Each subsequent one should be a little larger than the previous one.
- From each square, carefully cut out a flower shape with rounded petals.
- Very carefully melt each part so that the petals melt and bend down, and the center becomes convex in the other direction.
- Pierce each piece with an awl and gather them together with thread or wire to form a bump. String a bead between each piece.
- String a few beads on top to make a tail.
- Cut out a piece from green plastic and string it on a thread, then tie a loop.
On a note!
Instead of green plastic, you can use organza ribbon, which can also imitate a piece of fir branch.
Garland of leaves
You will need: colored paper or cardboard, a simple pencil, leaf templates, scissors, a needle, tape, thin rope.
Master Class
- Transfer the leaf templates onto colored paper.
- Cut them out.
- Thread the leaves onto a string through a needle.
- The number of leaves and the size of the garland depends on your desire.
- Hang the garland on the wall, securing it with tape.
The garland of autumn leaves is ready!
Tools and materials
Purchasing the necessary paraphernalia for a master class is a very complex issue. If this is your first time organizing such an event and you are going to buy everything at the nearest supermarket, be prepared to shell out a decent amount of money.
For a large-scale event (at least 10 people), we recommend placing an order in an online store, where the product will most likely be significantly lower, plus you may receive a discount from a wholesale purchase.
For those who are planning a master class in advance, the ideal solution would be to place an order on the website of a Chinese store. Their only drawback is long delivery, and you can choose quite high-quality products if you carefully study the comments and reviews of customers.
Corrugated paper aster
- Secrets of builders: working with couplings
- DIY New Year's crafts - 9 best options
- Autumn paper crafts
You will need: corrugated paper of purple, yellow, green and light green, scissors, wire, glue gun, pencil, ruler, watercolor paints, brush.
Master Class
- Prepare a strip of purple corrugated paper 4 cm wide.
- Tint one edge of the strip with purple paint and set aside to dry.
- Fold the strip several times.
- Make cuts along the unpainted edge. The first blank is ready.
- Make the second blank in the same way, only take a purple strip 6 cm wide.
- Prepare a strip of yellow paper 3 cm wide.
- Fold the yellow strip several times and make cuts.
- Wrap the wire with a light green piece of corrugated paper and secure with glue. This will be the stem.
- Wrap a yellow blank around the end of the stem - these will be the stamens.
- Twist the ends inside the purple piece, which is 4 cm wide, using a pencil.
- Step back from the base of the stamens and glue the petals.
- Take a 6cm wide purple blank and wrap it around the bud as shown in the photo.
- Twist the ends of the petals and straighten the middle.
- Cut out 6 sepals from green paper, then glue them on.
- Cut 6 long leaves of different sizes from light green paper and glue them to the stem.
The corrugated paper aster is ready! You will find even more flowers HERE.
I recommend watching this video!
Note! Paper pencil craft
"Merry Caterpillar"
A cute craft that will please everyone. Be sure to choose bright, rich tones of paper. Multi-colored circles cut with scissors are glued onto the base cardboard. They should vary in size. The head is the largest circle. The tail is the smallest circle.
Note!
- DIY paper crafts: TOP-200 photos of exclusive ideas and craft options
DIY paper origami craft step by step: ready-made diagrams for creating beautiful origami at home (90 photo ideas)
Crafts from paper and glue for children: step-by-step instructions for creating interesting crafts with your own hands (90 photo ideas)
All elements are glued to cardboard using PVA. A black felt-tip pen is perfect for eyes and facial features, and black paper is perfect for hairs and small horns.
DIY autumn crafts for the garden and school
Autumn crafts
- These are works made most often from natural materials. Acorns and chestnuts, cones and nuts, seeds and berries, and even colorful leaves - all these are universal craft materials that autumn is so generous with. The section presents master classes and photographs from exhibitions from kindergartens and schools. If you were asked to make a craft with your child in kindergarten on the themes: “Gifts of Autumn”, “Pantry of Autumn”, “What Autumn Brought to Us”, “Golden Autumn”, etc. — be sure to look at the materials from this section.
The change of seasons brings variety to our lives and serves as a source of creative inspiration. Autumn is a special time. The energy accumulated over the summer is looking for a positive outlet, and nature pleases with an abundance of bright colors. Clear days alternate with monotonous rains, and cheerful walks with quiet homework. This is the best time to make crafts from natural materials with your children.
Autumn inspires
Contained in sections:
Includes sections:
- Leaves. Crafts and applications from leaves 834
- Autumn bouquet. Fine art, compositions, drawing 455
- Autumn wreath 55
- Crafts from vegetables and fruits 418
- Rowan. Fine art, crafts, rowan drawings 410
Master class: application “Autumn Forest” for children of middle preschool age I bring to your attention a simple application for children of middle preschool age on the theme “ Autumn ”: 1) For work you will need: colored paper of red, orange, yellow, brown and blue , scissors, glue, black felt-tip pen. 2) On yellow and red paper.
Collective work with children of the middle group “Autumn has come to us”
Topic: “ AUTUMN ” Materials: Whatman paper, colored pencils, wax crayons, leaves, clover flowers, berries, maple and birch seeds, PVA glue, glue brush, oilcloth, hand rags. Goal: To develop the ability to arrange leaves of different colors and sizes on the background, to move them in search.
Origami technique
Paper toys, animals, plants, vehicles, birds, and various objects made using the Japanese origami technique will delight anyone to whom they are presented - parents, close friends.
Origami differs from appliqués, cutting out silhouettes and many other types of art in that it is the art of the whole. There is no need to cut or glue anything, you just need to use one whole sheet of paper. It is possible to add expressiveness to the craft and individuality by adding some details. For example, eyes, animal faces, patterns on the body, clothes.
Recently popular modular origami, which is more difficult for children, consists of several pieces of paper.
Animals using origami technique
Origami trees
Origami steamer
Origami girl
Origami pelican
Origami bee
Origami ice cream
And various other ideas that can be found in the origami for kids section.
Crafts on the theme of autumn with your own hands: 70 photos
Golden autumn has arrived, which means it's time for long evenings at home due to bad weather. We invite you not to waste time, but to get creative. DIY crafts on the theme of autumn will be useful for both mothers of children in kindergartens and schoolchildren, and complex compositions will perfectly decorate the house and make it cozier and warmer. Such crafts can reduce autumn depression, because any kind of creativity calms the nervous system.
- Autumn craft ideas for kindergarten
- Crafts on the theme of autumn for school
- Photos of crafts on the theme of autumn for the home
Beneficial effect
When a child works on a craft, he is not only busy, interested and determined to achieve results. There is an imperceptible influence on his subconscious in a positive way. The child develops the necessary skills.
Children's DIY paper crafts help fingers become stronger and hold objects more confidently. Feeling the density, texture, color of the paper, his subconscious sensations remember them.
Autumn craft ideas for kindergarten
Let's start with the simplest compositions. It is difficult for kids to make intricate crafts, so appliques made from dry leaves, chestnuts and acorns would be excellent options. Such applications will delight the little ones.
A wreath made of leaves is also a fairly simple children’s garden craft, but no less beautiful for that.
Such a wreath will be an excellent craft if you do not have time to stock up on natural materials. Just cut out the leaves from colored paper; it will be especially chic if you decorate the leaves with paints or gouache.
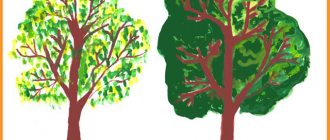
Very simple crafts for kids - trees with colorful foliage. There are so many options for making them!
All children love hedgehogs and many people associate this animal with autumn. Cute and prickly hedgehogs with an apple or mushroom on their back will delight children. They are made simply: as a rule, the body is made of plasticine, and needles - seeds (or other natural materials) are pressed into it.
Note! Craft from Brussels sprouts and banana "lion"
Children in the older group of kindergarten are no longer so interested in making simple compositions, so we found several more complex options, but making them will not be difficult. For example, a doll with a dress from dry leaves is not difficult to make. You need to take the top half of the doll and place it in the neck of half a plastic bottle. Due to the shape of the bottle, different styles of dresses will be obtained. The leaves are glued in layers and moment crystal glue is used. Of course, girls will like this craft more than boys.
The following crafts are universal, both boys and girls will be delighted with them. Of course, these are already beloved houses made from natural materials. In such a house you can settle fairy fairies or animals, or you can leave them on their own.
Crafts for children: Top 200 ideas step by step
For successful work, use the following tips:
- Study the list of materials required for making crafts so that before you start work, prepare everything you need;
- Be careful with sharp objects. It is important to use only children's scissors with rounded tips. If holes need to be made, blunt punches should be used and always under adult supervision.
- Care is important when working with materials. Paints and plasticine can stain the surface, and hard objects can scratch it. Therefore, you need to protect the work surface, cover it with oilcloth or put special plastic or wooden planks;
- When using paints, you should change the water often, and then wash your hands and hands thoroughly. To prevent the paint from drying out, the jar must be closed tightly, just like a box of paints.
- After working with clay and plasticine, they are stored wrapped to prevent them from drying out. It is better to wrap the clay in a piece of damp cloth, and the plasticine in plain paper.
- Pencils should always be well sharpened. You cannot use a knife or blade for this. Sharpening should be done with a special sharpener.
- Felt-tip pens need to be capped so that they are always ready for further work.
Crafts on the theme of autumn for school
Crafts on the theme of autumn for school are in many ways similar to those made in kindergarten. The difference lies largely in whether the child makes them himself or with the help of his parents. Simple crafts are suitable for DIY. The eyes will come to the rescue - they will make any craft more lively and expressive.
With due diligence, these mushrooms are also not difficult for a child to make on their own.
It’s more difficult to do these options yourself, in many ways you will need the help of parents, but joint creativity brings us together.
Such crafts are suitable for competitions and require imagination from the performer. How do you like these ideas?
Photos of crafts on the theme of autumn for the home
It is not at all necessary to make crafts just because they were assigned in kindergarten and school. Many of them can be made simply to decorate your home. These completely unconventional ideas will amaze you with their beauty and give you unique pleasure and lift your autumn mood.
Dry leaf applications don't have to be simple. Sometimes they become real paintings - masterpieces. Here are just a few ideas.
Wreaths have already become a traditional home decoration, and in the autumn they can also be a small work of art.
For those who like to sew or knit, the ideas might be something like this.
If you don’t want to do anything complicated, but need to create an atmosphere, garlands of leaves or fabric of appropriate colors are suitable.
This pumpkin craft is not at all difficult to make - you will need glue and a flexible pipe for extraction. Bend the pipe to create a pumpkin shape and then spray paint it. Add a stalk - a wine cork or a suitable twig, and decorate the craft with leaves.
This miniature will delight the eye for many years. Of course, it is not so easy to make, but the result is amazing.
This kind of fun pampering with photographs will make long autumn evenings truly creative.
Candles will bring comfort on cold evenings:
A few more craft ideas for adults and children
Which crafts did you like the most?
My name is Nadezhda, I am a mother of many children. I love children and am actively involved in their development. At one time, I was looking for a site where all the information on children’s development, ideas for crafts, and poems for memorization would be collected. And also the inspiration that all mothers need, because being a mother is not always easy. Now I know such a site - I created it myself))) “Mom can do anything!” This is not just a website, this is my motto in life.
Crafts for children from cocktail straws
There's nothing you can't do with cocktail straws. You can weave them, the tubes are glued during the process, strung, cut lengthwise to make beautiful flowers, across to make a mosaic and even beads.
Flowers from cocktail tubes
Mosaic of tubes
DIY autumn crafts
Crafts on the theme Autumn
Autumn crafts with children
Crafts made from natural materials
Autumn crafts from natural materials for schoolchildren. Master classes with photos
Autumn gives us many beautiful ideas for creativity. What beautiful autumn leaves are in the fall, you can look at them endlessly. Nature has spread a beautiful golden autumn carpet of leaves in front of us.
In autumn, you can collect not only leaves, but also acorns, cones, chestnuts, acorns and other natural materials for children's creativity.
DIY autumn flowers made from threads
Work from waste material “Autumn stars”
The work is intended for children 6-7 years old.
Can be used as a group decoration or as a gift
Goal: to promote the development of creative imagination.
Objectives: develop coordination of movements, fine motor skills of fingers, cultivate a caring attitude towards nature.
Master Class. Panel “Wonder of Autumn”
For work you will need: cardboard, fabric, scissors, pencil, Moment-Crystal glue, tree leaves, wood shavings, pencil shavings, a cutout of a woman's face from a magazine, braid.
Draw a contour figure of a girl on thin cardboard and cut it out, cut out the base for the panel from box cardboard of the desired size.
From an opaque plain fabric, cut out the background for the panel, 1.5 cm. larger than the panel size.
DIY autumn crafts at school
Master class: “Leaf fall”.
Application: Work for exhibition, interior decoration.
Dear friends, in childhood we all launched paper airplanes, made wallets, boats and steamboats out of paper, made caps and hats from newspapers. And only many years later they learned that paper folding is called a beautiful word - origami.
And I offer you a master class of work made using the modular origami technique - “Falling Leaves”.
Material: For work you will need colored paper in “autumn” shades, a ruler, a simple pencil, glue (glue stick), gouache, and a brush.
Modular origami is a style of origami in which a whole figure (work) is assembled from separate parts - modules. There are many varieties of origami modules, both flat and three-dimensional.
Master Class. Composition “Autumn Sun” (natural material).
The master class is designed for students in grades 2-3.
This craft can be used for an exhibition at the Autumn Ball holiday.
Step-by-step manufacturing process
Prepare dried flowers or dried flowers (small leaves are fine).
Materials we will need: scissors, yarn, Titan glue, any lid from large paint cans (I used a lid from Façade Paint).
DIY crafts made from natural materials.
Master class “Butterfly made from natural material”
The master class is designed for school-age children, teachers, and parents.
Purpose: Decoration in a corner of nature, interior decoration, gift.
Goal: To develop fantasy, creativity, imagination.
— Introduce a new way of using natural materials;
— Develop fine motor skills, attention, intellectual and creative activity;
— Foster a sense of love for nature.
Corn leaf doll. Master class with step-by-step photos
Crafts from talasha. DIY doll
Master Class. Corn leaf doll
This master class will be useful for additional education teachers, technology and primary school teachers, and passionate and creative parents. The doll can be made together with children over 8 years old.
The product can be used to decorate the interior or as a souvenir
Application on the theme “Applique of autumn leaves”
Master Class. Application of autumn leaves “Fairy”.
Autumn was blooming at the edges of the colors,
I quietly ran a brush across the foliage.
The hazel tree turned yellow and the maples glowed,
The aspen trees are purple, only the oak is green.
Autumn paper crafts in the preparatory group of kindergarten
Master class “Autumn trees”
Making autumn trees in different ways.
Technique: Paper plastic.
The master class is designed for preschool children aged 6-7 years.
Purpose of the master class: interior design of kindergarten groups for the autumn holiday.
Goal: development of artistic and creative abilities of children.
Crafts for the autumn school exhibition
Purpose: the master class is designed for craftswomen who have experience in threading and weaving beadwork and are passionate about this technique, since the work requires a lot of patience and some theoretical knowledge and practical skills in this field of art.
Note! DIY paper bird craft
“The sky was already breathing in autumn...”
Crafts made from natural materials for primary schoolchildren
Master class: Volumetric applique made from natural material using paper mosaic “Vase with flowers”.
The master class is designed for students of primary school age.
Goal: to create conditions for unleashing the creative potential of children through artistic creativity.
— deepen students’ knowledge and skills about paper mosaic, volumetric applique and techniques for using natural material in work;
DIY rose bouquet from maple leaves
Roses from maple leaves. Master Class
Autumn bouquet “Roses for you” Master class
Master class: DIY autumn crafts from natural materials.
Bouquet! It can be so different: candy, floral, fruity. And this bouquet is special, deciduous. It is beautiful and unusual, made of crimson autumn leaves.
Such an autumn bouquet can be a pleasant gift for your loved ones, a decorative decoration for a table and not only for autumn, show your imagination and it will delight you all year round.
Application on the theme “Autumn”. Master Class
DIY Autumn tree applique
The master class is designed for children of middle and senior preschool age, teachers and parents.
Purpose: interior decoration.
To work you will need:
DIY autumn crafts for elementary school
Application made from natural material “Trees in autumn”
Materials needed: glue, scissors, colored or white cardboard, dry leaves, a small tree branch, paints
Roses from maple leaves. Master Class
DIY crafts made from natural materials
Goal: learn to create flowers from different materials: colored napkins, maple leaves, threads and wooden sticks; work carefully.
Materials: tree leaves, threads, colored napkins, scissors, wooden sticks, tape, stapler.
Scenario
We have prepared an approximate list of necessary steps for independently organizing a children's master class. With the help of a methodological script (program), you or the presenter will be able to conduct a master class in a smooth and fun way.
- The guys get to know the teacher (expert) and each other, if they did not know each other before.
- Participants are shown successfully completed work on the topic of the master class.
- Introductory briefing about the process.
- A short theatrical (if appropriate) presentation about the historical roots of the master class.
- Safety briefing.
- Demonstration of materials and training in working with them.
- Creation of layouts and templates.
- The main process of activity.
- Musical accompaniment or audio fairy tales (books) (excellent collections can be found on the Internet on YouTube channels).
- I called the participants at the intermediate stages.
- Demonstration of magazines with works or finished souvenirs.
- Joint team and individual photo session.
- Packaging of finished work.
- Presentation of gifts.
- Farewell to the teacher.
- Cleaning the workshop venue.
Idea 1. Autumn topiary
Topiary is a decorative tree that can be used to decorate a dining table, mantel, or front door area. To make it, you can use natural or artificial materials, for example: leaves, berries on twigs, acorns, cones, chestnuts, flowers, dried citrus slices, as well as felt, sisal, linen and whatever your imagination tells you. In the next slider you can see several examples of such autumn crafts.
Next, we present to you a simple master class on making an autumn decorative tree from artificial leaves and berries.
- Clay pot;
- Wooden stick or branch;
- Two polystyrene or floral foam balls;
- Materials for decorating the crown;
- Dry moss (you can replace it with sisal);
- Glue gun and several glue sticks;
- Scissors;
- Side cutters or pruning shears;
- Acrylic paints for painting the trunk, ball and pot (optional).
Step 1. Cut a hole in the base ball with a sharp tool for the barrel, about a third of its diameter deep. Place a drop of hot glue into the hole and insert the barrel into it.
Step 2: Insert the second ball into the pot. If the ball does not sit tightly enough in the pot, place newspaper around it. Cut a hole in the ball for the trunk, 2-3 cm deep. Insert the trunk with the crown into the hole and adjust its length. Next, drop glue into the hole of the ball, place the barrel in it and begin to fill the hole with glue, placing small pieces of paper around the barrel. This is necessary so that the hot glue does not deepen the hole too much.
Step 3: Paint the pot the color you want if you don't like the original look. In this project, the pot was painted with spray paint in a dark bronze shade from Rustoleum (sold in construction stores, for example, in Leroy Merlin).
Remember that the design of the pot should be simple and unpretentious so as not to distract attention from the crown. If necessary, paint the barrel and/or balls at this stage. It is advisable to paint the balls so that the gaps between the decorative details are invisible.
Step 4. While the paint on our blank is drying, sort the decorative parts by type and size. If you use artificial leaves, flowers and berries with a wire base, then when cutting them, leave “stems” about 2 cm long. This is necessary in order not only to glue the parts, but also to stick them into the ball - then they will hold more securely . If the “stems” do not have wire, then it is better to cut the parts “at the root”.
Step 5. Now it's time for the fun part - creating the crown. First, evenly distribute and glue the largest parts onto the ball, then the middle ones. Finally, fill in the gaps with small embellishments.
- Step 6. Well, that's all, all that remains is to decorate the ball in the pot with dry moss or sisal, after treating it with glue.
How to make a New Year's watch for a competition
Did your child bring an assignment from school or kindergarten to make a New Year's clock for the competition? I am sure that you will make the most magical and most accurate clock that will always show the New Year's hour. Let us consider with you light options made from cardboard, disks, as well as watches made from candies.
approach the matter with all seriousness, you can use a clock mechanism. In the first case, the dial can be replaced by an openwork paper napkin. Ask your dad to make a blank from a plank and age it with paint.
Look how interesting they approached the creation of watches. I think all this can be found in the house and simply glued to the base.
Watches made directly by children are the most magical in the world. They have absorbed a time of goodness, miracles and love. And this time is endless.
If you have leftover branches from an old Christmas tree, decorate the clock by also adding tinsel. And you can fit so much on the dial itself.
A watch made from a cardboard box and disks will deserve a place at the exhibition. We use the old disk as a dial, and make the frame from the same CD pieces. Just cut this material yourself, as cutting the edges can turn out quite sharp. Be careful.
The round base can be decorated with tinsel and rhinestones, and supplemented with New Year's figures.
A watch does not have to be round. Look how beautifully the craft is designed. And the divisions can be made from buttons.
The Japanese-style watch just needs to be decorated a little and brought to the exhibition. Let your child express his imagination.
And finally, we’ll make you a super delicious watch to outshine everyone at the exhibition.
For the craft we will need:
- Thick foam
- Cardboard
- Wrapping
- Colored paper
- Candies
- Coffee beans
- Pasta
- Dye
- Glue gun
- New Year's elements for decoration.
We make preparations. It is necessary to determine whether you will make a large watch or a small one. We cut two circles of cardboard and foam according to the required diameter. You can use corrugated or shiny smooth colored paper.
Glue the paper circles to the cardboard, each on one side only. Next, apply glue to the foam and fasten it to the cardboard on both sides. We measure out a strip of wrapping paper of the required width and glue it along the entire circumference on the side.
It turns out to be such a neat basis for future watches. Now it's time for the candy. To keep them well, give preference to square sweets. We also glue them around the entire circumference.
As an additional decoration, take any pasta, paint it and decorate it around the perimeter.
The divisions on the dial will be made of coffee beans. Perhaps you will have a different idea.
For the rest, do as you please. And depending on what decorations you have on hand. The hands can be made of beads, painted millet, or you can install a real mechanism. There is room for creativity here.
What you need for creativity
With paper and cardboard everything is almost clear. We create from what we find at home. A wide variety of paper products are suitable:
- white office paper;
- tracing paper;
- wrapping paper;
- old newspapers, magazines;
- old tattered books, scraps of wallpaper, scribbled school and music notebooks;
- paper for scrapbooking, designer and speckled;
- any colored paper, including corrugated and metallized paper;
- cardboard packaging for cereals, cereals, dairy products, sweets, disposable cardboard plates;
- large parcel boxes and shoe or clothing boxes;
- regular student cardboard is white or colored with different textures - from velvety to corrugated.
In addition, other auxiliary tools should always be at hand:
- cutting and piercing: scissors, stationery knife, awl, stapler (if available, then a special one - figured);
- ruler and compass;
- PVA glue or glue stick and glue gun;
- paints (gouache or watercolor), colored and simple pencils, felt-tip pens, colored gel pens, markers, brushes;
- plasticine, salt dough or other modeling mass;
- various materials for decorating products: sequins, beads, beads, braid, lace, scraps of fabric and fur, woolen threads... in general, everything you can find at home.
And for some crafts you will need stencils. If you know how to draw, you can make them yourself or print them from the Internet and then cut them out.
There's no point in starting a project to make something exciting and interesting if you don't have the essentials on hand. Of course, it is possible to postpone creativity until the next evening, but when it comes, this next moment is unknown and the child will be disappointed.
Diversity
The more preschoolers can do, the better. After all, with cutting, gluing, and coloring, the movements become precise and the hands stop making mistakes. By modeling plasticine, three-dimensional thinking is developed. The child sees the volume of the craft he is creating.
Fantasizing, composing something that doesn’t exist, he immediately implements it. Creates. When sculpting with plasticine, not only the fingers develop. The frontal lobes of the brain become more developed. The child becomes smarter.
This happens due to the specifics of sculpting. This action combines several factors of intelligent activity. It is no coincidence that all sculptors are distinguished by great memory, curiosity and a sharp mind. It is useful to train children by modeling plasticine.
There are, of course, combined crafts. They include: paper fragments combined with plasticine crafts. If you approach such a craft with imagination and work it out carefully, you can even send it to an exhibition of children’s creativity.