Children's creativity not only contributes to the development of artistic taste and fine motor skills, but also broadens the child's horizons. Creating landscapes using the appliqué technique will help kids learn the concepts of perspective and horizon. The theme of the autumn forest will help kids learn the signs of this time of year.
Tell your children about autumn and let them make crafts according to their taste, without being limited by rules. Even if the first works do not really meet the requirements, they are still beautiful, because the child filled them with his imagination and sincere love for this world.
Applique autumn forest made of colored paper
Crafts on this topic can be made even with children in the younger group of kindergarten. At this age, children already know the features of the seasons and can create the correct color palette for the appliqué.
To practice fine motor skills, it is best to use torn paper technology. Choose soft colored paper, as tearing thick paper can cause your child to cut himself.
First make the background. Cover the bottom half of the sheet with green paper with a torn edge. The green should not be too bright as it is an autumn grass. You can add accents by drawing individual blades of grass. Stick blue clouds on the sky.
Cut out tree trunks from brown paper and arrange these objects on the background sheet. There is no need to require the same arrangement; let the children show their imagination and make original compositions. Glue the trunks.
Take colored paper in autumn shades (red, orange, yellow, light brown) and tear it into pieces about 1x1cm. Then randomly glue them onto the top of the trunks, as well as onto the ground, like fallen leaves.
Children from the preparatory group can make a more complex application “Hedgehog in the autumn forest” in this way. From gray paper, cut out the shape of a hedgehog (an oval with a nose), and use a black felt-tip pen to draw needles, eyes and a nose for the hedgehog. Cut out apples from red paper and stick them on the back of the hedgehog.
Pumpkin
Autumn is associated with the harvest and Halloween. You can make a bright applique on this topic for the middle group of kindergarten.
For work, prepare:
- template – outline image of a pumpkin with leaves;
- pumpkin seeds;
- gouache paints;
- office glue.
Instructions for creating the “Pumpkin” applique:
- Glue the pumpkin template onto the cardboard base.
- Place the seeds on the table, after covering it with film or newspapers.
- Color most of the seeds orange, the smaller part green. Leave to dry.
- Carefully glue the dried seeds to the template image: orange ones to the pumpkin itself, green ones to its leaves.
Forest applique of autumn leaves
Working with natural material is quite complicated; it requires preparation and careful handling of fragile leaves. Typically, an application of leaves on the theme “Autumn Forest” is done in 2nd grade.
The material for this craft must be prepared in advance by drying the leaves. To prevent the composition from looking sad, find leaves that retain a bright color after drying. For example, red wild grape leaves or yellow linden leaves.
The collected raw materials need to be laid out with newspapers and weighed down with something heavy, leaving in this form for three to four days. If the material is needed urgently, it can be quickly dried with an iron. To do this, the sheet is placed between two sheets of paper and ironed for ten minutes.
Cut out or draw a tree trunk from paper. Glue the leaves using PVA glue.
Older children can cut the leaves into small pieces and make a craft using the collage technique.
Collective application
This type of work occupies a special place in the preparatory group. During the process, children are given freedom in choosing material and interpreting the task. When doing work, children should show more imagination, be more proactive, and learn to solve assigned tasks as a team. The topic set should give scope for creativity, provide an opportunity to apply existing knowledge from the field of social life, natural phenomena, and works of art. For a collective application, themes such as “On a construction site”, “Inhabitants of the deep sea”, “Summer colors”, “Autumn carpet” can be used.
Video notes of appliqué classes with kids will be an excellent help in a deeper study of this topic:
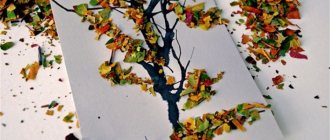
Volumetric applique of autumn forest
This method requires some skills and is accessible to children of primary school age.
Take white birch paper and draw black marks. For a voluminous central trunk, cut a strip of 9x17 centimeters and screw it into a tube onto a marker, gluing the edge so that the tube retains its shape.
Attach strips of 10x4 centimeters in the same way, using a pencil, to get thinner tubes. Roll the paper along the long edge, so you will get a thick tube 17 centimeters long and several thin ones 10 centimeters long.
Glue them in the form of a central trunk with branches on the sides. Using a template or a hole punch, cut out leaves from paper in autumn shades and attach them evenly along the branches.
For originality, you can add autumn fruits, such as apples.
How does the application help in studying the world around us?
As a sample for appliqué, children are most often provided with a real object, for example a leaf, a spikelet, or various containers. It is very important to teach them to convey the real ratio of the size of things to each other, their real shape and color. Mushrooms are perfect for these purposes. While doing the work, children remember the names, learn to distinguish between species, and determine whether they are poisonous or non-poisonous.
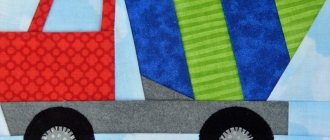
The skills of accurately conveying a design are developed using images of various vehicles. By assembling an image from individual parts, children in the process of work gain knowledge about the structural features and purpose of a particular type of transport.
Application themes related to fairy-tale images will help children develop their creative abilities and use their imagination. Tasks to depict fictional animals and bright buildings activate the child’s thinking and independent search. In such work, preschoolers receive freedom of action and the opportunity to creatively apply the knowledge and skills acquired earlier, change colors and shapes at their discretion, add or remove structural elements.
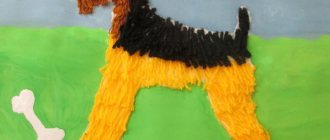
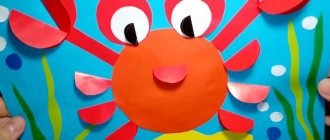
One of the most difficult tasks is for preschool children to master the skills of creating representatives of the animal world - birds, fish, domestic animals. This application requires the presence of small details, compliance with the exact parameters of the silhouette and color. Having mastered this step, children move on to depicting moving figures. Here certain difficulties arise with children conveying the dynamics of the animal, acquiring an understanding of how its body changes while jumping, running, etc.
Having mastered the skills of appliquéing individual objects, preschoolers move on to combining them into complete images and related plot pictures. Their works reflect such themes as “Fruit Bowl”, “Spring Bouquet”, “Migratory Birds”, “Hares in a Forest Clearing”, “My Family on a Walk”.
Autumn forest made from rolled strips of paper
Prepare an autumn background for the application and determine the location of the trees on the sheet.
Three-dimensional trees can be made in three ways.
The first method: cut strips of 1x5 centimeters from colored paper in autumn shades. We glue each strip into a ring, the colored side out. Glue the resulting rings sideways onto the trunk in a chaotic manner. Try to glue so that the joint line is hidden at the bottom.
Second method: Cut a strip of paper 1.5x20 centimeters and wind it in a spiral around a pencil. Make 10 spirals in this way and glue them to the paper, placing them like rays from one point in the center of the trunk.
Glue smaller leaves on top of each spiral. Leaves can be cut out using a template or punched out with a hole punch.
Third method: willow or birch. Cut out many strips of 0.5 x 20 centimeters and screw them very tightly onto a toothpick so that you almost get a tube. Draw a willow or birch trunk with drooping branches. Glue the resulting spirals to the ends of the branches.
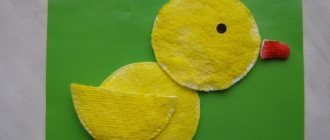
Autumn forest applique made from cotton pads
This technology is perfect for children aged three years and older. Since the disks are quite large, this method is more suitable for single trees. Prepare red, orange and yellow paints. For this craft, it is better to use gouache, as watercolor will give lighter colors.
Paint 10-15 discs and dry. You can paint with a brush or dilute the paints and drip from a pipette. If you use several colors on one disk, the colors will mix with each other and give new shades, which will allow you to more fully convey the color scheme of autumn.
Glue the barrel onto a sheet of paper and painted cotton pads on top.
Applique autumn forest from other materials
You can use many materials to create a beautiful and unusual applique. It all depends on the desire and capabilities of the master.
Application from plasticine
Since plasticine is quite heavy, applique requires a solid base, such as cardboard or fiberboard. You can use a disposable plate. You need the softest plasticine so that it spreads easily.
For the background, roll out two green sausages and one light brown one, then assemble them into one sausage without kneading. Tear off pieces and spread where the soil should be.
There is no need to mix the colors into one; let the effect of chaotic spots remain, as if part of the grass has already dried out. Smear blue across the sky, occasionally adding white.
Sculpt or paint with gouache. Roll many 5mm balls in the color of autumn foliage. Each ball must be attached to the base and squeezed to form a flat cake.
Use these flatbreads to fill the space of the tree crown. You can make mushrooms from white and brown plasticine and place them between the trees.
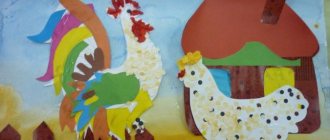
Cereal application
For the “Autumn Forest” applique you need buckwheat, millet, wheat and other cereals. The paper should be thick enough, since you will have to use a lot of PVA glue, and the thin paper will get wet.
It is better to paint the background and contours of the trunks. Apply glue to the tree crowns and sprinkle with cereal. You can use a separate type of grain for each tree or mix all grains together. The work should lie until the glue dries completely.
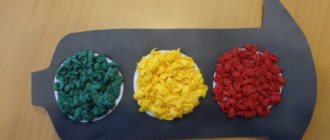
A craft with seeds is made in a similar way. Pumpkin seeds are painted with gouache in the colors of the autumn palette, and then glued to the base.
To develop children's imagination, invite your child to choose his own materials for crafts. For example, paper can be replaced with fabric or felt. Let your child get acquainted with different textures and materials.
It is in early childhood that the child’s imagination develops most actively. Don't miss this moment and grow a creative person.
Application “Autumn” in the preparatory group of kindergarten
Preschoolers 6-7 years old can be taught to work with salt dough. It is more interesting for children to sculpt figures from it than from plasticine. The work is painstaking, teaches patience and perseverance, and develops imagination.
Step by step execution:
- Prepare a dough from white flour, fine salt and water. It should be dense enough for modeling.
- Place the finished dough in a cool place for 1.5-2 hours.
- Make out of it any two-dimensional, that is, flattened figures associated with autumn: fallen leaves, mushrooms, ripe fruits. Make a beautiful composition out of them. You can, for example, make a vase with leaves, you will get a wonderful still life.
- Place the composition in the oven. Heat for 30 minutes at 130°.
- Paint the frozen dough with gouache paint.
- Glue the finished autumn composition to decorative cardboard using a hot glue gun.