Paper bunny
You can make such a bunny just like that, or you can time the craft for Easter. With the help of parents, the child will be able to make the craft quickly and easily, and a minimum of materials will be required:
- Cardboard for the base and white paper;
- Glue;
- Scissors;
- Felt pen;
- A small piece of pink paper;
- A stapler or thread with a needle to secure the accordion.
Operating instructions:
- Cut a sheet of white A4 paper in half crosswise;
- Place the short side of the sheet in front of you and begin folding it into an accordion. Each fold should not be very wide, about 1 centimeter, or narrower. It is important that the folds are even;
- The same must be repeated with the second half of the sheet;
- Next, the two accordions are glued together and bent in the center. To ensure that the bend point is fixed, you can fasten it with staples or tie it with threads;
- Now you need to get a circle from this accordion. The top and bottom parts are glued together. It turns out the face of a bunny;
- The muzzle needs to be glued onto the base, and then continue to design the craft, cutting out and gluing the remaining parts;
- According to the instructions for children in this craft, ears are then cut out from white paper, inserts into the ears are made of pink paper, and glued to the muzzle on the base;
- Next, a muzzle is cut out of pink paper, a nose and points for a mustache are drawn on it;
- You need to cut out eyes from white paper and draw pupils in them;
- The final stage is the final assembly of all the parts and gluing them to the muzzle.
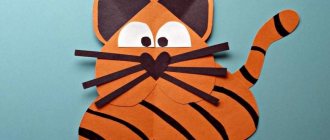
Colorful life of a child
In addition to cats, you can make a small dog. The principle of creation is the same. For older kindergarten groups, you can offer to play with colors. Offer the main one, not an ordinary landscape sheet, but colored paper of different colors.
It is much more interesting for a child to work with his favorite colors. Therefore, it is worth taking more bright and calm colors. This way you can get to know the child’s psychotype a little. Psychologists use these techniques.
Color can help connect neural pathways in the brain. When the right color is chosen for a person's problematic object, then that object becomes much easier for the child; the student truly experiences joy in learning.
It was found that children wearing colored glasses who had to take tests on a pegboard performed much faster on the tests when they wore glasses of their favorite color. Color in a child's life is a small joy that pleases their eyes and brain.
Lamb
Since we are still learning how to make animal appliqué, crafts should be simple and require a minimum of materials. In addition, the templates can be downloaded from any source; all that remains is to cut out the necessary parts and glue them to the base.
Therefore, the next craft - a lamb - is also quite simple. And the animal template, printed and cut out, is taken as the basis.
Additionally you will need:
- Glue;
- Scissors;
- Pasta or cotton wool to decorate the fur.
Operating instructions:
- The finished stencil is cut out of paper and pasted onto cardboard. You don’t have to stick it on the base, then the craft will turn out to be a contour;
- You can glue pasta in the form of curls to the place where the fur should be.
- You can glue cotton balls instead of pasta, then the craft will also turn out fluffy.
Crafts for kindergarten
We put it out as a separate item for your convenience. In the garden they love nature themes such as “Golden Autumn” or “Spring has come!”, so forest animals that you have made before at home or in additional classes will be useful for you and your child.
IDEA! Advice for busy parents: assemble the finished figures into a composition on a thick sheet of paper, add seasonal attributes (yellow leaves, pine cones, flowers, twigs, cotton wool snow, etc.) and the standard masterpiece for the garden is ready.
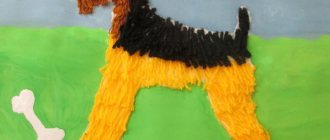
bear
The photo of animal appliques shows that voluminous appliqués that can be placed on a table or shelf look very interesting and unusual.
This craft can be brought to kindergarten or school for an exhibition. You need to try it from the simplest, so we suggest putting together a three-dimensional bear.
To work you will need:
- Brown cardboard;
- Orange or white cardboard to decorate the face;
- Black felt-tip pen;
- Glue;
- Scissors.
Operating instructions:
- From brown cardboard along the sheet you need to cut two strips approximately 2-3 centimeters wide;
- You need to glue the strips together at right angles;
- Now you need to fold an accordion from two strips at the same time, gradually placing one strip on top of the other;
- The resulting accordion needs to be glued together at both ends so that they do not stick out;
- The bear's body is drawn using a stencil or a freehand drawing. It is depicted simply and schematically - two paws. You need to cut out two identical parts from brown cardboard;
- Then the parts are glued to the cardboard accordion on both sides. Now the body can be placed on the table, it will be stable;
- Next you need to start decorating the head. A large circle for the muzzle and two small balls for the ears are cut out of brown cardboard. A circle is cut out of white or orange cardboard for a spot on the face where the mouth and nose will be drawn. All parts are glued together;
- All that remains is to finish drawing the muzzle and gluing it to the body. You can glue it without a neck, or you can fold a small accordion from a thin strip - this will be the neck. The craft will look more interesting with it. The bear is ready.
Types of crafts
We have arranged the techniques in order from simple to complex, so that you and your child can increase their level of applied skill:
- Simple applications
- Applications with three-dimensional details
- Simple volumetric figures
- Quilling
- Origami
- Cardboard figures in 3D
- Papier mache.
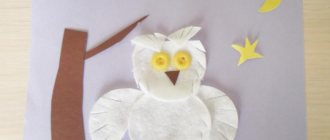
Hedgehog
The process of creating a hedgehog is similar to creating a lamb. Only instead of cotton wool or pasta, you will need to use buckwheat to create needles.
In addition to this, you will also need a cardboard base, glue and an animal stencil.
Operating instructions:
- You can draw a hedgehog yourself, or you can take a ready-made stencil and print it or redraw it onto a base;
- Next, you need to glue buckwheat to the place where the needles should be. The easiest way to do this is to carefully spread glue within the contour, and then pour in the cereal.
- As soon as the glue has hardened and the buckwheat has stuck, you need to carefully remove the un-glued remains. You can stick buckwheat dotted into empty spaces.
Finger Theater
Glue together 5 small multi-colored truncated cones from cardboard the size of an adult finger. On each one you need to stick the head of an animal (even a primitively depicted one, most importantly, recognizable).
With such simple props, you can perform a home performance with your child, for example, “Teremok”, “Who Says What?” or “My favorite animal.”
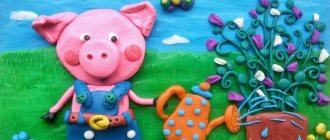
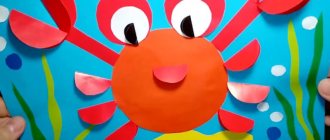
Piggy
Even a preschooler can handle such a simple craft. With the guidance of your parents, you can easily create a funny pig. By the way, such a craft can even be converted into a cap, because its shape allows this.
To work you will need:
- Cardboard or thick pink paper;
- Glue;
- Scissors;
- Felt pen.
Operating instructions:
- For the base you will need a pink paper cone. To fold a cone, you need to draw a circle and divide it into 2 halves, cutting out one of them;
- From this half of the circle you will need to form a cone, adjusting its thickness when gluing;
- The base is ready, now all that remains is the details. Ears, snout, tail and eyes are cut out from pink cardboard. The pupils can be drawn with a black felt-tip pen.
- All parts are glued to the piglet. Below you only need to draw on the mouth, and the craft is complete.
- If you thread a thin elastic band inside the craft, you will get a festive hat.
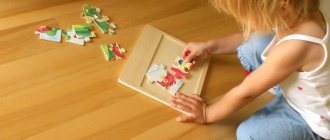
Accordion base
Instead of a body there is a strip of thick paper folded into a small accordion. Glue flat, stable legs on the bottom, and a head with characteristic details on top to identify the animal.
This way you can make jumping animals: a bunny, a frog, a mischievous monkey with a long tail. Kids will not only be interested in making animal figures with their own hands, but also play with them.
Hedgehog
To make a hedgehog you will need:
- Toilet paper roll;
- Brown cardboard;
- Orange cardboard;
- Scissors;
- Glue;
- Felt pen.
Operating instructions:
- A toilet paper roll is covered with orange cardboard - this will be the body of the hedgehog;
- From brown cardboard you need to cut an oval of such a size that it protrudes beyond the body.
- Trim the edge with a zigzag to create needles;
- Then the needles are glued to the body, a muzzle is drawn - eyes, nose and mouth;
- You can also cut out two small strips from orange cardboard - these will be the hands of the hedgehog.
Quilling
The technology refers to a variety of applications, but of increased complexity. The work is small and painstaking, so it is suitable for preschoolers and primary schoolchildren.
The essence of quilling: you need to cover a graphic image of an animal on a base sheet with “curls” of thin ribbons. Quilling paper is sold in office supply stores.
The method is interesting because it very successfully imitates the texture of wool or feathers, if you take on animal crafts.
Photos of animal appliques
Modular origami compositions
A module is one assembly unit of a composition. From different sheets you fold triangles and connect them, getting a head, torso, limbs, etc. It is clear that crafts are becoming much more complex and realistic.
What animals can be made from paper in the style of modular origami is up to you. Even a huge dragon, where each scale is a separate module. Preparing modules is a boring routine, so not many people are ready to work on complex figures, especially children.
Fennec cutout
Fennec Fox Facts:
- The fennec fox is the smallest fox species in the world.
- They have huge bat-like ears that help radiate body heat and keep them cool in the desert.
- They mainly live in North Africa and the Sahara Desert.
- They have long hair, which keeps them warm on cold nights and protects them from the hot sun.
- They live in underground dens in small communities of about ten foxes.
- Fennec foxes are omnivores and eat both plants and small rodents, eggs, reptiles and insects.
- They can go without water for a long time.
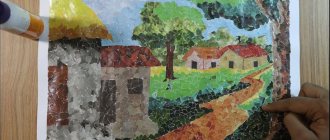
Papier mache
Formally, these are not paper crafts, but rather a sculptural form. Papier-mâché is a method of creating sculptures from paper pulp, and the working material is torn pieces of newspaper. To depict a papier-mâché animal, you need to mold it from plasticine and cover it with newspaper scraps in several layers.
After drying, cut the figure, take out the plasticine, connect the halves and paint. If at a school competition you present a papier-mâché product among the usual appliqués and origami, this will at least ensure you the attention of the public.We hope that the article was useful and we convinced you that paper animal crafts are exciting and entertaining. Create your own and teach children freedom of expression!