Application helps develop creative skills and hand motor skills. This kind of art is relevant for all ages and problems, but most often, educators practice this process in kindergartens and primary grades.
To keep the boys busy for a few hours or to spend fun and useful time with them, they make car panels from scrap materials. Now we need to look at machine templates for appliqué for children of different ages.
Simple car applique for kids
This simple option is suitable even for small children from 2 years old. To work you need to find material:
- Colored paper - the more shades, the better. It is better to develop color perception from infancy.
- Safety scissors are plastic.
- Glue stick.
- The base is cardboard or a thick white sheet.
It is difficult for children to draw figures; in the early stages they are printed using a printer on colored paper. Parents should be involved in the process so that the baby can observe the actions and repeat. Simple application instructions:
- cut out 2 small circles, 1 rectangle and a square;
- small ovals are cut out of red paper, which will indicate the presence of headlights (since the panel will be two-dimensional, only 2 pieces will be needed);
- then the assembly process begins - each part is coated with glue and placed on the base.
The shape of the car, colors are selected only at will. The main essence of this work is to develop motor skills by working with small parts.
Volumetric machine applique
Many adults remember this option. Previously, there were children's magazines on sale, where the authors included special car templates for appliqué for children, from which they assembled a full-fledged car.
Today it is difficult to find something like this; adults can print any model on their own. Assembly instructions are simple:
- You can use the suggested options.
- Next, the vehicle is printed on a thick A4 sheet.
- After that, it is cut along the dotted line.
- For convenience, a ruler is used; it will help make the folds even.
- Next, the parts are glued together with tape or PVA glue.
Thus, you can make any model that will become a full-fledged interior decoration. The work is suitable for older people, as gluing and folding parts requires skill.
Car applique
This option is good for all ages. To inspire your child, you can take a short walk around the city where he can watch the traffic. Next, it is recommended to study the master class:
- Parents often develop creativity through the “observe and play” technique.
- Children see the world differently, and with the help of art they can show it to adults (by the way, appliqué often helps to identify experiences or concerns; psychologists use this method).
- To work you will need colored paper, safety scissors, glue stick, rulers, compass.
- Using a compass, wheels and the sun are drawn on black paper.
- Next, using a ruler, the main elements are formed - trunk, windows, doors, body, etc.
- It is necessary to make a background - it is done using colored paper.
- Clouds or gas emissions are made using the torn technique - colored material is carefully torn, the child can create any interesting shape.
- Next, all the details are cut out and folded onto the background, after which they are glued.
Such work can even be submitted to a competition in kindergarten.
Cars in the city
This composition can be offered to children of the older group, and everyone can perform it together. It is enough to fix a sheet of whatman paper on the board and prepare the necessary materials and tools.
At this age, many children already know and distinguish between car brands and will be happy to talk about their favorite car.
Step-by-step implementation of the application
For each child, it is advisable to prepare a sample car (this can be a drawing or photo) and stencils of its parts.
From colored paper (children must choose the color themselves), cut out the parts of the car. To do this, a stencil is applied to paper of a certain color, outlined with a simple pencil and cut out.
A sheet of whatman paper should be designed in the form of a roadway: paint over a little more than half of the plane with gray watercolor paints (asphalt) and let it dry.
Decorate the second part in a blue tone (sky). After the paints have dried, place houses on the line connecting the road and the sky (cut and paste rectangles and squares of different sizes, adding windows and doors).
The road can be divided into two parts by sticking thin narrow strips in the middle (two-way traffic).
Children make their own car in their seats and stick it on the road. In this case, the teacher should focus the child’s attention on the different positions of the car, so that in the overall composition the vehicles move towards each other.
You can finish the lesson by familiarizing yourself with the Rules of the Road.
For kids, wonderful applique kits on the theme “Necessary Cars” are suitable. They contain illustrations of machines that are human assistants. These sets are suitable for small children.
Because large parts are easy to stick on, and the thick paper from which these parts are made does not wrinkle or get wet from the glue. By gluing the car onto cardboard, you can complement the plot with various hand-drawn components (houses, traffic lights, clouds, trees, etc.).
This type of work is fun to do with the whole family. On our website you can get acquainted with catalogs of similar kits and kits and choose according to the age of the child.
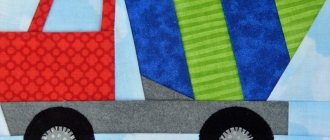
Truck applique
Children love to watch massive and large vehicles that amaze them with their majesty. Therefore, if a child is impressed by what he sees on the street, this is an excellent reason to make an applique with him at home. Necessary materials:
- Drawing.
- Cardboard.
- Scissors.
- Pens or pencils.
- Glue.
First you need to download a dump truck template made from thick paper, which many have already assembled. This will make the preparation process easier and the child will not lose interest in work. It is recommended to print the template on white cardstock.
If you only have regular printer paper, this will work too. However, cardboard is better, it is thicker and stronger. This will make it easier to draw the pattern on colored thick paper, and it will retain its shape for a long period.
After the pattern is printed, you next need to cut out the parts using scissors. For realism, add a little brown color for the ground, this is optional.
Using a torn technique, it can be added to the very bottom; each detail is glued with a glue stick. All parts are first placed on the base and then glued using regular PVA. You can complement the concept using watercolors, drawing clouds, houses, the sun, etc.
Fire truck applique
This craft is so simple that even small children can do it. And if the child is a little older, he can even help cut out and trace the template. Necessary materials for application in the senior group of fire trucks:
- Drawing.
- Cardboard.
- Scissors.
- Pen or pencil.
- Glue.
As in the previous version, it is recommended to print the template on cardboard. You can also use regular printing paper if your printer won't accept thick paper, but cardstock is an economical and convenient option that can be reused many times in the future.
Once the pattern is printed, the child simply cuts out the shapes using scissors.
Once all the shapes are cut out, you can start choosing the background color. Most often it is blue, as it resembles a clear and bright sky. On this basis, the red details will look even more impressive.
First of all, the children glue the body onto the base. Then two black outer tires and a center one. Two windows are added, a staircase and finally a yellow light at the top.
You can add a road under the fire truck or clouds in the sky to complete the scene to your liking. The fire truck applique is an excellent reason to tell your child about this profession while working.
MAGAZINE Preschooler.RF
Abstract of GCD on artistic and aesthetic development (application) on the topic: "City transport on our street".municipal budgetary preschool educational institution "Kindergarten of a combined type No. 1" of the Samara city district
in the older group (compensatory focus for children with special needs)
Developed and conducted by: teacher Fedotova Elena Rinatovna Samara, 2015.
Goal: to generalize children’s knowledge about urban transport.
Tasks:
Educational:
- Continue teaching children to work with stencils, cut circles from a square, cutting off the corners.
- learn to complement the collective composition “City Street”
- establish rules of behavior in public transport
Educational:
- develop auditory attention, logical thinking, attention.
- expand and activate children's vocabulary.
Educational:
- cultivate independence, accuracy, and cooperation skills.
Preliminary work:
making a collective composition “City Street” , observing transport while walking.
Materials and equipment:
- "Our City" layout , pictures of urban transport with missing parts, traffic light layout, red, yellow, green circle, "bus stop" and "pedestrian crossing" , bus layout, steering wheel, conductor's bag, travel tickets, trash can , a sheet of whatman paper with a schematic image of a road, a road intersection, traffic lights, colorful houses, stencils of urban transport, colored paper, a tray, scissors, glue, a glue brush, oilcloth, napkins.
Logic of constructing GCD.
1. Introductory word from the teacher
Educator: “Buses, trolleybuses, cars and trams
They run and run through the streets, overtaking each other. A traffic controller is a traffic light, like a conductor in an orchestra. He will indicate who to go and who to stand still. A collision can be avoided and a collision too -
At the intersections of all roads, a traffic light will help us. I’m friends with traffic lights, I’m attentive, I don’t go to red lights, I wait for green lights” (examination of the “Our City” )
- Guys, what can you call it in one word: bus, tram, trolleybus - what is it (city transport)
— Why do we need this transport? (for transporting people)
— What is the name of the transport that carries passengers? (passenger)
2. Game “Fourth wheel” Progress of the game. The teacher asks the children to identify the extra word in the series and explain why it is extra.
- Tram, bus, plane, trolleybus. (The word “airplane” , because this is an air mode of transport, and the rest are ground).
— Boat, helicopter, speedboat, liner. (The word “helicopter” , because this is an air mode of transport, and the rest are water)
- Yacht, steamship, fire engine, ship (The word “fire engine” , because this is a special transport, and the rest are water vehicles)
Educator: Guys, where do they repair vehicles if a breakdown occurs? (children's answers). I suggest going to a car service center.
3. Game “Fix the damage”
— We ended up in a repair shop. There are a lot of broken vehicles here! Do you want to renovate? (children complete the pictures of transport with the missing parts, then make up a sentence about what they did: “I repaired the bus” , similarly for the rest)
Educator: So the breakdown has been fixed.
Educator: There is a lot of traffic on the road. Whatever happens
accidents, drivers and pedestrians follow traffic rules. And there is also an assistant on the road.
“He is both polite and strict. He is known throughout the world. He is the most important commander on the wide street.”
(demonstration of a traffic light layout)
4 Dynamic pause “Traffic signals”
The teacher plays the game “Traffic Signals” : if the circle is red, the children squat, if the circle is yellow, they stand up, if the circle is green, they walk in place.
5 Game "Ride the Bus"
Educator: Guys, a bus is waiting for us at the stop, but for it to go, we need a driver. Now we will choose a driver according to the counting rhyme.
- We're going to play. Well, who should start? One, two, three, you begin.
— What does a driver need to drive a bus? (children's answers).
-Get behind the wheel, driver, and take the passengers.
— What are the people who travel on the bus called? (passengers)
Educator: Who should be allowed through when entering the bus? (children's answers) Please, passengers take your seats.
- Who else is on the bus? (children's answers)
— When passengers travel on a bus, the conductor sells tickets. I will be the conductor (the teacher has a conductor’s bag). We have a magic bus in which tickets are issued for polite words (the conductor issues tickets for polite words)
— Let's remember the rules of conduct for passengers on public transport.
5 Game “You can - you can’t”
- Run around the bus.
- Look out the window.
- Distract the driver.
- Littering in transport.
- Read a book.
- Hold on to the handrails.
- Push passengers.
Educator: Can you play quiet games on the bus? (children's answers)
6 Finger gymnastics “Transport”
(as we read the poem, we bend our fingers one by one)
My first finger, the baby, and I will go to the tram park on foot. With another - we will go on a tram, quietly humming songs.
The third and I will get into a taxi and ask them to take us to the port! With the fourth finger in the rocket We will fly to another planet.
Get on the plane, number five, and we’ll go on a flight with you.
Conductor: Passengers, be careful, the bus is approaching the stop, get ready to get off.
— How should you get off the bus (children’s answers).
What should you do with your tickets after traveling on the bus? (children throw tickets into the trash can next to the bus stop)
Educator: Guys, there is a pedestrian crossing in front of us. Take your time, look left, right. Let's calmly walk through the pedestrian crossing. (children walk along the pedestrian crossing)
7 Collective work “Urban transport on our street”
Educator: Guys, look at our collective composition “City Street” , what is missing (children’s answers)
Look at the road, why is it in two parts? (children's answers)
Offer children:
- choose a vehicle stencil, choose the color of paper to make the applique
- trace the stencil and cut out the silhouette image along the contour line
Can this bus go? (children's answers)
To make the wheels, take a black square and carefully cut off the corners with scissors and glue it onto the bus.
Will we be comfortable on such a bus? (children's answers)
We cut out the windows and stick them on the bus;
— stick the vehicle onto whatman paper.
8 Reflection.
Educator: You guys are great! Let's display our collective work at an exhibition of children's work.
| Next > |
Ambulance application
The sound of an ambulance can be heard several hundred meters away, such a car attracts attention. Making it at home using the appliqué technique is quite simple. What we need for the colored paper applique machine:
- Colored paper.
- White cardboard.
- Scissors.
- Glue.
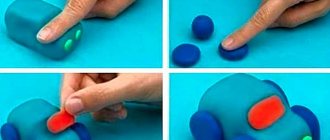
Let's start with a minibus template. It consists of two parts - a body and a frame with wheels. First we make the body, having previously estimated the size on paper. We also make the rear part of the body separately and glue it to the roof using glue.
After this, you need to cut out a cross separately and place it on the body. Red flashing lights and black wheels are cut out separately, depending on the size of the overall part.
All parts are carefully glued to the cardboard. If you have an old stencil at home that you can use to make letters, you should definitely use it.
Police car applique
It's a fun activity to make things out of paper with your own hands. Parents need to: download and print the template, cut it out, fold it along the lines, and glue it.
You can also paint the car yourself by pre-printing the drawing in black and white. The car will be unique. The main point of assembling such a machine using origami and appliqué techniques is the possibility of play.
If made from thick cardboard, the vehicle will be stable and strong.
Such a machine can even be made from an old cardboard shoe box or equipment. Any ideas:
- Cut several holes for windows.
- Next, cut off the parts for the doors; this must be done so that they can open.
- Afterwards the structure is simply covered with colored paper.
This version of the craft can become a full-fledged toy or work for a competition. This work is similar in technique to fire truck appliqué.
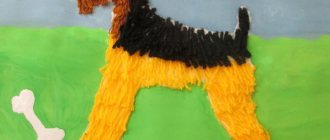
Applique car made of threads
This painting is a wonderful gift for a friend’s birthday or for dad on Motorist’s Day.
How to do:
- cut out a template for any car (car, truck, special-purpose vehicle);
- glue on cardboard - base;
- cut colored threads into small pieces (for the body, windows and wheels);
- Apply glue to the template and distribute the cut threads.
By working on creating such a craft - applique, the child develops creative abilities, tactile and visual perception, fine motor skills, as well as hard work, patience and attentiveness.
The kid will be happy to show a toy he made with his own hands and tell how he worked with mom and dad.
Fabric machine applique
This part of the master class is suitable for mothers who want to decorate towels or bed linen for their babies. Stripes are often used for identification in kindergartens; teachers may ask them to buy them or make them themselves.
The technique is quite simple, especially if you have a sewing machine at hand:
- First you need to choose bed linen or clothing on which embroidery will be done.
- Next, you need to download and print a special machine template for the applique. It will make the work much easier.
- After this, the threads are selected.
- The sewing machine is refueled and you can start working.
- Each detail is carefully stitched.
You can also do this work on a separate piece of fabric to use the machine as a patch. If the work is done for a kindergarten or camp, it is appropriate to add the name or the first letters of the initials. This can also be done using standard stitches.
If you don’t have a machine at hand, you can do the appliqué by hand, which will take more time.
Applique is a great way to develop motor skills and creative skills in a child. Working together brings adults and children closer together, which will have a positive impact on relationships in the future.
Fun Garage
A bright machine applique can be made using cereals and paints. The work is carried out collectively by children of senior preschool age. Half a sheet of whatman paper means a garage where various cars will be placed.
The teacher provides each child with templates of machine parts drawn on a separate sheet of paper. The child independently cuts them out and sticks them on a small piece of paper. Now - the most interesting part.
The cereal is selected according to the child's wishes. Therefore, on the work tables there should be containers with different cereals, paints, brushes, as well as cups of water and napkins for washing and wiping brushes, and glue.
Separately, each part is coated with glue and sprinkled with cereal. You can work with one type or combine different cereals. Having decorated one part of the product with cereal, give it time to dry. Shake off excess.
Paint this part immediately.
Complete all the fragments one by one.
By sending the car to the garage, the child can share knowledge about a specific car brand with friends. Children's collective works on this topic will be a wonderful decoration for the kindergarten foyer.