A cluster of points and lines on a plane forms geometric shapes. Their names depend on their properties and features. The figure is limited by lines and this condition affects the variety of forms. Each item is individual, has its own purposes and tasks. There are simple and complex figures, differing in personal parameters.
How to make a paper cone: step-by-step instructions
Building a paper structure in the shape of a cone takes just a few minutes. To do this, you just need to make the correct drawing from a rectangle of paper and fold the paper to size properly.
Production in stages:
- On a sheet of paper, use a ruler to measure the middle and mark this place with a dot.
- Draw a circle with a compass and immediately cut it out.
- Draw a line from the center of the circle to the edge.
- Make a cut along the marked line.
- Roll up the workpiece, making a kind of funnel.
- Secure it with a paper clip and trim the edges.
- Glue the structure.
- After this, measure the width of the base and subtract about three millimeters from the resulting number, thus obtaining the radius.
- Draw a circle with exactly the same radius on another sheet.
- Step back a couple of centimeters from the contours of the circle and draw another circle, making a circle with allowances.
- Cut the pattern along the outer contour.
- The half sides of the circle need to be cut using scissors for this purpose.
- Bend all notches.
- Coat them with glue and carefully place them at the base of the cone, thereby creating an accurate layout.
Basic Concepts
The basic geometric figures on a plane are a point and a straight line.
And the simplest figures are a ray, a segment and a broken line. The minimum object in geometry is a point . Its peculiarity is that it has no dimensions: it has no height, length, radius. A point can only be determined by its location, which is usually denoted by one capital letter of the Latin alphabet.
A line can be made from many points, and geometric shapes can be made from several interconnected lines.
Taking courses in mathematics will help you quickly understand the types and properties of geometric shapes.
Each mathematical figure has its own value, which can be measured using formulas and attentiveness.
Area is one of the characteristics of a closed geometric figure, which gives us information about its size. S (square) - square sign.
The perimeter is usually called the sum of the lengths of all sides of a polygon. The perimeter is denoted by a capital Latin P.
If parameters are passed in different units of length, you need to convert all data to one unit of measurement.
Popular units for measuring area:
- square millimeter (mm2);
- square centimeter (cm2);
- square decimeter (dm2);
- square meter (m2);
- square kilometer (km2);
- hectare (ha).
Geometric bodies are a part of space that is limited by a closed surface of its outer boundary.
If all the points of a figure belong to the same plane, then it is flat .
A three-dimensional figure is a geometric figure in which all points are not on the same plane.
Examples of volumetric geometric shapes:
- ball,
- cone,
- parallelepiped,
- cylinder,
- pyramid,
- sphere.
Let's take a closer look at some figures, analyze their definitions and properties.
How to make a cone out of cardboard: work diagram
In order to create an even conical frame, you can use both colored and white cardboard. The choice of material directly depends on the purpose for which it is manufactured. The design itself is quite durable, due to which it can be widely used.
What is necessary:
- pen;
- cardboard;
- compass;
- scissors;
- glue;
- stapler
In order to create a conical frame, you can use both colored and white cardboard
Progress:
- Using a compass, draw a circle on the cardboard and cut it out.
- Using a ruler and pen, divide the circle into four equal parts. To do this, draw a pair of perpendicular straight lines through the central point.
- Fold the circle first vertically and then horizontally to form four folds.
- Cut off one of the four segments.
- Fold the truncated circle and, in order for the development to hold its shape, secure the model at the bottom with a stapler.
- Coat the joints with glue.
Tip: if you need to make more than one shape, but several at once, then it is recommended to use the first cut out circle with the segments removed as a template.
Trapezoid
A trapezoid is a quadrilateral in which two sides are parallel and two are not parallel.
Main property: a circle can be inscribed in a trapezoid if the sum of its bases is equal to the sum of the sides.
How to find the area of a trapezoid:
S = (a + b) : 2 × h, where a, b are two different bases, h is the height of the trapezoid.
You can construct the height of a trapezoid by drawing a segment so that it connects the parallel sides and is located perpendicular to these bases.
The perimeter formula for an isosceles trapezoid differs from a rectangle in that an isosceles trapezoid has two equal sides.
P = a + b + 2 × c, where a, b are parallel sides, c are two lengths of identical sides.
DIY cone-based Christmas tree
A voluminous cone-shaped Christmas tree is made very quickly and simply. And if you don’t draw the layout of the future figure yourself, but simply print it out and transfer it to cardboard, then this process will become even simpler.
What is necessary:
- cardboard;
- wrapping;
- double-sided and regular tape;
- scissors;
- decorative elements.
A voluminous cone-shaped Christmas tree is made very quickly and easily
Progress:
- Form a funnel out of cardboard and, after gluing it, wait until it dries.
- If any irregularities remain, be sure to remove them using scissors or a stationery knife.
- Cover the finished structure with wrapping paper. To do this, lay it outer side on the work surface and attach the tip to the top of the base with tape.
- After this, slowly roll the cone, thereby wrapping it in bright paper.
- When the figure is completely wrapped, cut off the remaining paper.
- Secure the ends with double-sided tape.
- Glue buttons, beads or beads to the Christmas tree, thus imitating New Year's toys.
Triangle
A triangle is a figure that is formed when three segments connect three points that do not lie on the same straight line. These three points are usually called vertices, and the segments are called sides.
Types of triangles:
- Rectangular. One angle is right, the other two are less than 90 degrees.
- Acute angular. Angle degree greater than 0 but less than 90 degrees.
- Obtuse. One angle is obtuse, the other two are acute.
Properties of a triangle:
- In a triangle, the larger side lies opposite the larger angle, and vice versa.
- The sum of the angles of a triangle is 180 degrees.
- All angles of an equilateral triangle are equal to 60 degrees.
- In a right triangle, the square of the hypotenuse is equal to the sum of the squares of the legs.
to calculate the area of a triangle using the initial data, let's look at them.
- If the side and height are known.
S = 0.5 × a × h, where a is the length of the base, h is the height drawn to the base.The base can be located differently, for example like this:
With an obtuse angle, the height can be reflected on the continuation of the base:
At a right angle, the base and height will be its legs:
- If two sides and the sine of an angle are known.
S = 0.5 × a × b × sinα, where a and b are two sides, sinα is the sine of the angle between them. - If there is a radius of the circumscribed circle.
S = (a × b × c) : 4 × R, where a, b and c are the sides of the triangle and R is the radius of the circumscribed circle. - If there is a radius of the inscribed circle.
S = p × r, where p is the semi-perimeter of the triangle, r is the radius of the inscribed circle.
The perimeter of a triangle is the sum of the lengths of its three sides.
P = a + b + c, where a, b, c are the length of the side.
The formula for measuring the perimeter of an equilateral triangle is the length of the side multiplied by three.
P = 3 × a, where a is the length of the side.
What can be made from whatman paper
Most people associate Whatman paper exclusively with the school wall newspaper. In fact, this material can serve as the basis for many crafts. For example, you can use it to make an amazingly beautiful heart-shaped box.
What is necessary:
- whatman;
- lace;
- glue;
- scissors;
- pencil;
- ruler;
- ribbon;
- colored paper;
- beads.
Most people associate Whatman paper exclusively with the school wall newspaper.
Progress:
- Cut out a pair of identical hearts from whatman paper.
- Cut out exactly the same details from colored paper.
- Now cut out strips from whatman paper, the width of which should be about seven centimeters, and the length should correspond to half the volume of the heart.
- Bend each piece about a centimeter from the edge and use scissors to make small teeth on this thin strip.
- Cut the same four parts, but without teeth, additionally.
- Glue the parts with teeth to the bottom of the future box.
- Attach tape to the lid.
- Cover the sides with colored paper on the inside and outside.
Additionally decorate the box with lace, beads and ribbons.
Parallelogram and rhombus
A parallelogram is a quadrilateral whose opposite sides are parallel in pairs.
A rhombus is a parallelogram with equal sides.
Properties of a parallelogram:
- Opposite sides and angles are equal.
- The sum of any two adjacent angles is 180 degrees.
- The diagonals intersect and are bisected at the point of intersection.
- Each diagonal divides the figure into two equal triangles.
General formulas for calculating the area of figures:
- S = a × h, where a is the side, h is the height.
- S = a × b × sinα, where a and b are two sides, sinα is the sine of the angle between them. In the case of a rhombus, the sides are equal, so the formula will take the form S = a × a × sinα or S = a2 × sinα.
- For a rhombus: S = 0.5 × (d1 × d2), where d1, d2 are two diagonals. For a parallelogram: S = 0.5 × (d1 × d2) × sinβ, where β is the angle between the diagonals.
The perimeter of a rhombus is the product of the side length and four.
P = 4 × a, where a is the length of the side.
The perimeter of a parallelogram is the sum of the length and width multiplied by two.
P = 2 × (a + b), where a is width, b is height.
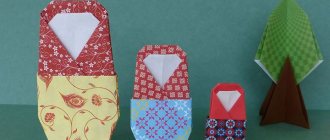
Craft Santa Claus based on a cone: do it together with children
Using simple materials, you can make a beautiful Santa Claus with preschool children. The craft turns out to be unusual and festive. With its help you can create a fabulous atmosphere on the eve of the New Year holidays.
What is necessary:
- red and white colored paper;
- cotton wool;
- glue;
- scissors;
- pencils.
You can make a beautiful Santa Claus from simple materials with preschool children
Progress:
- Cut a circle out of red paper, about twenty centimeters in diameter.
- Fold it in half and cut it.
- Fold the semicircle into a cone shape and glue it together.
- Now draw a circle with a diameter of four centimeters on white paper.
- Cut a circle along the line and glue it just below the tip of the main figure. This will be the face of Santa Claus.
- Draw eyes, mouth and nose on a small circle.
- Cut out small parts from red paper and glue them to the sides - these will be the hands.
- Attach a small piece of cotton wool to the tip of the cotton wool.
- Also fix small cotton balls on the bottom of the small circle, creating a beard.
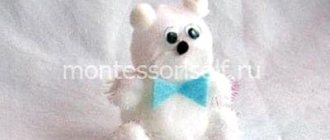
Options for crafts of animal toys for children 4-8 years old
Using a ready-made base - a cone made of cardboard of the desired color, cut out the missing details from sheets of a suitable color: ears, tail, paws. Having finished drawing the mustache and eyes, you get very cute animals. For work you will only need scissors, glue, multi-colored paper sheets, colored cardboard.
New Year's characters - Santa Claus, Snow Maiden and snowman according to the template
Using a template printed on a printer, first color the picture using felt-tip pens and watercolors (gouache). The dress, sleeves and bag of Santa Claus are covered with colored paper, a design is applied: stars, snowflakes, only then they are cut out and glued together. The diagrams show the places where the glue is applied. Materials and tools that will be required: paints, glue, scissors, colored paper, leftover yarn (for the Snow Maiden’s hair).
The Snow Maiden is performed in a similar way. You can additionally cut and glue hair from colored paper, or braid braids from yarn, and decorate with a braid scarf.
A similar method is used to make another winter character - a snowman.
To decorate the dresses of New Year's heroes, it is good to use self-adhesive shiny paper, cutting out small hearts, droplets, and stars from it.
Christmas tree made of tinsel
For children of primary and secondary school age, they will like another option for crafts - Christmas trees. In addition to the basic base - a cone of the required height, additional decorative materials are used: tinsel, foil tape. In addition - cardboard, tools - scissors.
A piece of cardboard is covered with foil tape on both sides and a star is cut out. Tinsel is attached to the top of the base base using a stapler. They wrap it vertically around the cone and connect it to the base (with the same stapler) in 2-3 places. All that remains is to fix the star on the top of the head, and the main attribute of the New Year holidays is ready.
To achieve a beautiful visual effect, it is better if the color of the cone matches the color of the tinsel.
Christmas tree made of colored paper (or thick fabric)
To create a lush green beauty, in addition to the cone blank, you will need: scissors, glue, colored paper or thick fabric. Strips of 4-5 mm wide are cut from it (the narrower the strips, the more magnificent the product), 5 cm long. Having connected both ends, they are glued to the workpiece. This is done with each paper loop. First, they form a circle of loops at the base, then move on to the next row, finishing the work by decorating the top of the head.
A good decorative material for decorating the top of the head is: tinsel, a bow formed from packing tape.
Christmas tree gift made from candies
As a base, you should use a cone made of denser cardboard that can withstand some force load. The candies are secured around the circumference using tape 2 cm wide. The top is decorated with a bow made of any shiny material: foil cellophane, satin braid, decorative ribbon.
Showing your imagination, you can add “fir branches” from nylon tapes or green corrugated paper. To do this, cut squares measuring 4x4 cm, make small holes in the middle into which the ends of the wrapper are pushed. As in the previous case, they are glued to the base with tape.
Party hats
Depending on the materials used, the sequence of work changes:
- If you plan to decorate the cap with wrapping paper, with any type of pattern, it is glued onto cardboard, after which it is cut out and formed into a cone.
- If they are going to decorate it with fabric, the material is cut out according to a template, according to the dimensions, sewn together, and pulled onto a cone.
You may need (depending on the type of decoration): fabric, wrapping paper, PVA glue, stapler, tinsel, hot nails, lace, braid, satin ribbon, lace, corrugated paper, ready-made pompoms.
To prevent the cap from flying off the head, an elastic band or braid is attached to the sides.
Gnomes
To make these little bearded creatures you need: cardboard, wrapping paper (or self-adhesive), white paper, glue, beads (or buttons) for the eyes and nose, scissors.
First, wrapping paper with a small pattern is glued onto the cardboard, only then a cone is cut out and formed. For each gnome you will have to prepare 2 cones of different sizes: one will serve as the body, the other as the cap.
Next, cut out 3-4 elements for the beard from a sheet of white paper. Cut the ends with scissors and wrap them around a pencil. Each layer of the beard is placed on top of each other and glued to the “torso”. Beady eyes and a nose are placed on liquid nails. Put on the cap.
Dwarves in warm clothes
Using fabric materials: fleece, flannel, felt and cotton pads, small cones are dressed in various “clothes”, gluing them with glue, or sewing them on with a needle and thread. You get nice “warm” Christmas tree decorations. The eyes are drawn in with felt-tip pens so that the gnomes don’t look faceless.
Wonderful Scandinavian gnome hats
To work on such “hat” creatures, the following materials are needed: scissors, PVA glue, yarn, hot nails, thick fleece, a large semicircular button (or self-adhesive bead).
First of all, a nose (bead, button) is attached to the conical blank using hot nails, after which yarn is glued around the circumference in 2-3 layers. It is carefully combed, separating the fibers, and a gorgeous beard emerges. The cap is cut out of fleece.
A bead is strung on a thread, thus decorating the tail of the cap and ears. They cover the head of a bearded creature with it, and the work on the Scandinavian gnome-hat is completed. You can hang the toy on the Christmas tree.
The hats can be knitted or crocheted, or made from cotton pads.
It’s not a shame to give such homemade toys as a souvenir to friends and relatives. Share with them the secret of craftsmanship, talk about the step-by-step manufacturing process. “Sweet Christmas tree” is a very original and unusual New Year’s gift that will please any person.
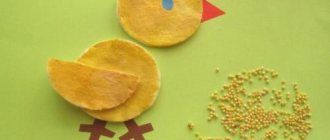
Cone-based cockerel: step-by-step instructions
A fairy-tale rooster made of colored paper is a simple and very fun craft that even very young children can make. The main thing is to help the kids form the basis - a geometric figure that is still difficult for them.
What is necessary:
- cardboard;
- colored paper;
- compass;
- pencil;
- ruler;
- glue;
- markers;
- scissors.
Progress:
- Draw a circle on cardboard and cut it out.
- Fold the piece in half and cut it.
- Fold the semicircle, creating a cone.
- Glue the base and let it dry.
- Cut out a small piece from paper and form a beak from it.
- Glue this element to the figure.
- Cut a thin strip and glue it to the top of the workpiece.
- Glue the same strip in several more places. It turns out to be a funny comb.
- Also cut out three droplets and fix them just below the beak, forming a beard.
- Cut five strips of different colors.
- Fix one strip at a time using the same principle as a scallop on the sides - you get wings.
- Make a ponytail from the remaining strips and twist each piece with scissors.
Draw eyes with a felt-tip pen.
Development of geometric shapes
Large selection of developments of simple geometric shapes.
Children's first introduction to paper modeling always begins with simple geometric shapes such as cubes and pyramids. Not many people succeed in gluing a cube together the first time; sometimes it takes several days to make a truly even and flawless cube. More complex figures, a cylinder and a cone, require several times more effort than a simple cube. If you don’t know how to carefully glue geometric shapes, then it’s too early for you to take on complex models. Do it yourself and teach your children how to do these “basics” of modeling using ready-made patterns.
To begin with, I, of course, suggest learning how to glue a regular cube. The developments are made for two cubes, large and small. A small cube is a more complex figure because it is more difficult to glue than a large one.
So, let's begin! Download the developments of all the figures on five sheets and print them on thick paper. Before printing and gluing geometric shapes, be sure to read the article on how to choose paper and how to properly cut, bend and glue paper.
For better quality printing, I advise you to use the AutoCAD program, and I give you patterns for this program, and also read how to print from AutoCAD. Cut out the development of the cubes from the first sheet, be sure to draw a compass needle under the iron ruler along the fold lines so that the paper bends well. Now you can start gluing the cubes.
To save paper and just in case, I made several unfolds of a small cube, you never want to glue more than one cube together or something won’t work out the first time. Another simple figure is a pyramid, its development can be found on the second sheet. The ancient Egyptians built similar pyramids, although not made of paper and not so small in size 
And this is also a pyramid, but unlike the previous one, it has not four, but three sides.
Development of a trihedral pyramid on the first sheet for printing.
And another funny pyramid of five sides, its development on the 4th sheet in the form of an asterisk in two copies.
Next is the hexagon; gluing it will be even easier than the pyramids. Hexagon reams on the first sheet.
A more complex figure is a pentahedron, although a pentahedron is more difficult to draw than to glue.
Development of a pentahedron on the second sheet.
Now we get to complex figures. Now you have to work harder, gluing such shapes together is not easy! To begin with, an ordinary cylinder, its development on the second sheet.
And this is a more complex figure compared to a cylinder, because at its base is not a circle, but an oval.
The development of this figure is on the second sheet; two spare parts were made for the oval base.
To accurately assemble the cylinder, its parts need to be glued end-to-end. On one side, the bottom can be glued without problems, just place the pre-glued tube on the table, place a circle on the bottom and fill it with glue from the inside. Make sure that the diameter of the pipe and the round bottom fit tightly together, without gaps, otherwise the glue will leak and everything will stick to the table. It will be more difficult to glue the second circle, so glue auxiliary rectangles inside at a distance of paper thickness from the edge of the pipe. These rectangles will prevent the base from falling inward, now you can easily glue the circle on top.
A cylinder with an oval base can be glued in the same way as a regular cylinder, but it has a smaller height, so it’s easier to insert a paper accordion inside, and put a second base on top and glue it along the edge with glue.
Now a very complex figure - a cone. Its details are on the third sheet, a spare circle for the bottom is on the 4th sheet. The whole difficulty of gluing a cone is in its sharp top, and then it will be very difficult to glue the bottom.
A complex and at the same time simple figure is a ball. The ball consists of 12 pentahedrons, the development of the ball on the 4th sheet. First, two halves of the ball are glued, and then both are glued together.
Quite an interesting figure - a rhombus, its details are on the third sheet.
And now two very similar, but completely different figures, their difference is only in the base.
When you glue these two figures together, you won’t immediately understand what they are, they turned out to be completely unresponsive.
Another interesting figure is a torus, but we have it very simplified, its details are on the 5th sheet.
And finally, the last figure of equilateral triangles, I don’t even know what to call it, but the figure looks like a star. The development of this figure is on the fifth sheet.
That's all for today! I wish you success in this difficult work!
modelmen.ru