A colorful geometric paper applique is the most affordable way to instill in your child a lot of useful skills.
Working with scissors, glue and paper, children learn to be neat and persevering, and gain joy from the process of creative activity.
Using simple geometric shapes makes it easy for even young children to create impressive pictures.
Simple applications of geometric shapes for little ones
Crafts, souvenirs and mosaic applications of geometric shapes are ways to engage your child in useful practice. Participation in joint activities is a guarantee of high aesthetics of work, where children perform the feasible part of the task. This develops imagination and imaginative thinking.
Important! When teaching small children to work, pay special attention to the safety of the tool.
- Scissors don't have to be dangerous. There are special children's scissors for working with paper. They are distinguished by rounded ends and plastic tips that cover the outer part of the instrument. In any office supply store, the seller will show you what you need. Before work, you need to make sure that the blade is sharp enough to work with paper, the screw provides freedom, and the format is convenient for children's hands.
- Colored paper is the basis of geometric appliqué. It is sold in A-4 format packages. Additionally, white office paper, napkins, a “reaper” and foil on a paper backing are used. Colored cardboard is suitable as a background. Occasionally, scraps of wrapping paper and other pliable materials can be used for the work of children 6–7 years old.
- Glue is the main way to connect applique fragments into a single image. The composition and packaging are selected according to the age characteristics of the children. A glue stick is more suitable for kids; older children need to learn to work with a brush or the narrow spout of a PVA bottle.
Note! Any adhesive quickly dries or polymerizes. Before use, check the adhesiveness. At home, if you don’t have silicate glue or PVA, you can make a paste from flour or dilute a little dry mixture for wallpaper.
A carefully executed “fox” or “cat” appliqué made from geometric shapes requires patience from adults, and perseverance and consistency from children.
If children are interested and provided with everything they need, including safe tools, completing the task will be a lot of fun.
Speech development
- We do articulation exercises;
- Doing breathing exercises;
- We recite special poems together that encourage the pronunciation of sounds and words;
- Speech development games
For example:
Game "Repeat". An adult pronounces words loudly, quietly or in a whisper. The child repeats with an appropriate level of volume.
Game “What is this for?” An adult asks why this or that object is needed (table, chair, closet, bed). The child answers.
Game "Wrong Fairy Tale". An adult tells some well-known fairy tale (Kolobok, for example) with errors. The child corrects, etc.
Applications from geometric shapes for the younger group of kindergarten
Young children are taught to engage in creative activities from the age of 2–3 years. This is a simple geometric applique in the form of recognizable objects.
The main work is done by adults - preparing templates and samples. A drawing with clear geometric contours made of colored paper should correspond to the image that the children liked. Then they willingly join in the creative process.
Simple geometric figures should be recognizable to children:
- circle;
- square;
- triangle;
- rectangle.
Not all children in the younger group of kindergarten can pronounce the names of geometric shapes. But they are able to find and highlight objects that have a common shape or color. The teacher just has to show the child where and in what order to stick the figures.
For example, the face and eyes of a cat are circles, the ears and nose are triangles. The mustache and pupils of the eyes can be completed upon completion of the work. Children over 3 years old should learn to work with templates, which they themselves apply to colored paper, trace and cut out along the contours.
Creative activities on making appliqué for preschoolers develop creative thinking, attentiveness, perseverance and fine motor skills of the fingers.
Christmas tree
Children love preparing for the holidays. Anticipation of matinees, themed entertainment and special events for preschoolers begins from an early age. Children are taught to make simple applications based on the seasons and upcoming holidays.
It is proposed to make a Christmas tree from triangles of the same color. You can show children several options on how to make triangles:
- cut corners from a rectangular sheet of paper, marking with a ruler along the perimeter the distance from each right angle at 2 cm, 2.5 cm, 3 cm and 3.5 cm (the values can vary);
- make 4-5 triangular templates and invite the child to trace them himself;
- offer one large triangle and show how to fold it in half and make markings on it for cutting to make a Christmas tree.
Note! The difficulty of performing a geometric composition depends on age perception. In any case, teach children to economically lay out templates on colored paper.
It’s not easy for the little ones to cope even with carefully gluing together the forest beauty. Older children will willingly take on the task of decorating the New Year's tree. Suggest using a hole punch to make colored balls from scraps of colored paper left over from earlier projects to decorate it.
Along the way, consolidate your knowledge of the color, shape and size of triangles. Remind them of safety precautions to avoid getting hurt with scissors, and show them how to use glue economically.
At preschool age, pupils are able to master all these skills, creating beautiful geometric applications on any topic.
Chick
Preschoolers aged 3-5 years willingly perform work using geometric elements. A hen, cockerel or chick that has just hatched from an egg is made according to a general pattern.
The remaining elements will determine who should turn out in the picture. The combined elements will create a more specific image.
The background for the application is a sheet of blue cardboard so that the overall picture can be decorated with sun and clouds.
Completing of the work:
- invite the child to cut out 2 circles of different sizes (torso and tail) from yellow paper;
- 2 brown triangles – chicken feet;
- a triangular beak and a scallop (3 small circles) are made from red paper;
- black color is the eye of a small chicken.
Children will assemble an image from ready-made fragments. If everything is satisfactory, the geometric figures are glued to the base. The drawing can be supplemented with grains, clouds, the sun and trees in the background, which one of the adults will do.
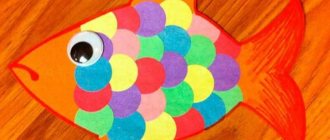
Fish
Show your children a few sample works, and they will eagerly join in the application of geometric shapes for kindergarten. Children 3.5 - 4 years old will love making colored fish from different figures. To do this you will need to cut:
- large green oval (torso);
- 3 semicircles (bottom pebbles);
- 2 small circles of different sizes for the fish’s eye;
- 2-3 blue circles (air bubbles);
- 3 orange triangles (fins, tail).
As you can see, there is nothing difficult for a preschooler - the child can handle it himself if he is given suitable templates. For those who find the work too simple, try making the task more difficult.
Offer to make semicircular scales, vary the shape of the fish tail, and fill the aquarium yourself.
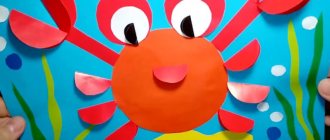
Ladybug
The sunbug or ladybug is one of the first insects that children are introduced to. Simple compositions are easy for children to understand. Several geometric shapes - the application is ready.
To make a simple applique of geometric shapes you will need several green and yellow stripes - this is grass. A red circle cut in half is the back of a bug.
You will need a brown semicircle to represent the head and several small circles. These are the eyes and spots for the opening wings.
When the children's panel is ready, remind them that the antennae still need to be finished, and the work will be completed. Don't forget to praise your child for his efforts. Creating such a picture will captivate the child and delight parents with the charm of simplicity.
Piglet
Creating a funny pig is a fun creative task for any child. It will help consolidate knowledge about color and geometric shape.
To complete this you will need 2 pink circles – a head and a torso. The top element is shaped like a head - stick on the patch and eyes.
It is better to take the other two circles of a darker color and cut them in half. These will make the ears, front and back legs of the piglet. The remainder of the dark semicircle is a dashingly curled ponytail. You can cut it out of paper or draw it in with a felt-tip pen, and at the same time mark holes on the patch.
Helpful advice! Don’t forget to remind your child in what order to stick the shapes so that you don’t have to redo the finished craft. When all the elements are ready, all that remains is to connect all the fragments together and glue them to the base.
General recommendations for parents
Geometry for a child is an ambiguous subject, since there are many figures, and even more ways to study them. To prevent a young student from having a “mess in his head,” parents should choose no more than 5 teaching methods, which will alternate from time to time. The process of studying figures should not last longer than 10 minutes at a time, as the baby will quickly get tired and will often get confused. Fighting fatigue will not bring anything good to either an adult or a child.
To prevent geometric shapes from becoming scary monsters for children, you should not immediately talk about all possible shapes. Start with a circle
Draw it with your finger on the baby’s palm, tell him about the warm sun, pay attention to the shape of the plate at dinner. When the baby easily remembers what a circle is, move on to studying another figure.
For example, tell your little fidget about a square box. Always compare familiar geometric shapes with new objects you brought for the children. Constantly returning to this topic will help the adult understand what shapes of objects the baby remembers well.
Every child is a genius. The main task of a parent is to help him recognize and recognize this. In the first years of life, a child is ready for intellectual achievement, so adults need to gently and carefully encourage the development of his natural abilities. Make learning about geometric shapes creative and interesting. Don't demand the impossible from your child! Always give him space for imagination.
Geometric applique ideas for preschoolers
The world around us is an inexhaustible treasure trove of ideas for children's creativity. Many images can be made from circles, triangles and rectangles of different colors and sizes.
A simple task with varying green shapes - tree caps of different shapes. It is easy for adults to cut out a brown trunk with some branching, and children can attach different green figures that will symbolize the crown.
This experience can be used to form compositions from geometric figures.
Funny animals and their cheerful faces, natural phenomena, houses and cars, airplanes and rockets are good topics for geometric applications. The older the children, the more difficult the creative part of the task should be.
They must learn to form different figures from the same fragments, which can be cut into pieces or in half.
Transport
It can be difficult for young artists to draw technical objects - tanks, ships, cars. It is much easier to make a “car” appliqué from geometric shapes than to draw it with paints or a felt-tip pen.
The very process of selecting the necessary “parts” from which a bus, truck or car is built is interesting.
Helpful advice! Let the children choose which option they would like to make using geometric circles and rectangles.
For the truck that the boys like to make, you will need 2 rectangles (body), a light square (cab glass), 2 large circles (tires) and 2 smaller black circles (wheels).
Understanding that everything in the world around us consists of individual elements is an important part of the educational process. If children are able to cut out the necessary components themselves, adults will need help in determining the order of “assembling the car.”
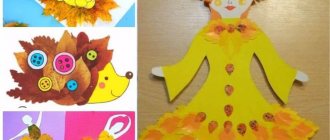
Animals
It is easier for children to make flowers or grass than to make a face. Some images consist mainly of a torso and head, and are much easier to make than “animating” animals.
So that the child is not afraid of difficulties, suggest assembling a fox figurine from geometric shapes - an applique of triangles:
- Two large orange triangles are the head and body of a fox cub.
- To design the face you need 2 orange elements (ears), 1 black (nose) and 2 white (eyes).
- The tail consists of orange and white halves.
- Another 1 white triangle will decorate the animal’s chest.
You can complete the pupils of the eyes or leave them as is. The fox can be seated on the grass, autumn meadow or snowdrifts.
Important! If you replace the color of the triangles and several elements, use the same method to make a puppy or cat. Faces can be “revitalized” with a felt-tip pen.
Flowers
A favorite theme for all girls. The task of completing the applique in 2nd grade is proposed to be differentiated - offer flowers to girls and cars to boys.
Schoolchildren already have skills in working with colored paper. Therefore, it is better to offer them a difficult task - a three-dimensional applique of geometric elements in the form of a flower arrangement.
Rocket
Children are often asked to perform this flying object on the eve of Cosmonautics Day. A preschooler himself is able to lay it out from several geometric shapes:
- 3 triangles;
- 2 circles;
- 3 squares.
The color can be varied or selected in accordance with the proposed sample. Connecting the elements together and gluing them together is not difficult. The hidden complexity lies in the symmetrical (mirror) connection of triangles and the overlapping of squares, symbolizing the separate parts of the rocket.
How to draw a volumetric square with one perspective point
A slightly more advanced way to draw a 3D square is to use single vanishing point perspective. The resulting volumetric square is very similar to the one we drew in a simple way, the difference is that it turns out to be a little more compressed due to perspective.
Despite the fact that drawing such a voluminous square is a little more difficult, the result looks much more realistic. That's what perspective does, perspective is a great way to depict three-dimensional objects on flat paper. Let's draw our volumetric square in perspective!
Step 1: Draw a Square and a Vanishing Point
As in the first case, first draw a regular square.
Then mark the point where our perspective will merge. This point is called the vanishing point. In our example, we placed it in the upper right corner, so we get the appearance of a 3D square, which is similar to the one we drew in the example above.
Once you've drawn a 3D square like the one shown here, play with the placement of your vanishing point. Try moving it further away, down or to the left, changing the position of the vanishing point will give you a completely different look for your volumetric square.
Step 2: Draw Perspective Lines
Draw perspective lines; they will serve as guidelines for the future volumetric square. They start at the top two and bottom right corners of our front face square and merge into a vanishing point. (This point is called the vanishing point because as you get closer to this point, all objects become smaller. At the vanishing point, objects will be so small that they will simply disappear.)
To make it easier for you and get straight lines, use a ruler, this will greatly simplify your task.
Also, don't draw these lines too much - we only need them as guidelines and we'll erase them later.
Step 3: Draw the far edges of the volumetric square
Using auxiliary perspective guide lines, draw the far edges of the volumetric square.
Both lines indicating the back edges of the volumetric square should begin and end on the perspective guide lines. First, draw the top far edge parallel (in the same direction) to the horizontal top line of the front edge of the square.
Then draw the vertical (top to bottom) far edge in the same way.
Yes, here are some fancy words you just learned:
- "Parallel" lines are two lines going in the same direction.
- A “vertical” line is a line that goes from top to bottom or bottom to top.
- A “horizontal” line is a line that runs from left to right or right to left, just like the horizon.
- And the “horizon” is the line where the earth meets the sky when looking into the distance—a line that runs exactly from left to right.
Step 4: Draw the Side Edges to Complete the 3D Square
After a short linguistic digression, we return to drawing a three-dimensional square.
The next step is very simple - just draw the edges of the volumetric square by drawing a pencil along the auxiliary lines of perspective, connecting its front and back sides.
Step 5: Erase the Construction Lines
The last step is to erase the vanishing point and guide lines that you drew earlier.
As you can see, the resulting 3D square design is very similar to the simple method we used above, only a little more flattened at the back. But this is what makes it more realistic, and it looks like a real cube in three dimensions, even though it is drawn on flat paper.
Applications for primary schoolchildren
The theme of applications from geometric shapes for schoolchildren is animals and birds, insects and natural objects. Teachers can simplify any task by showing ready-made samples of work and handing out prepared stencils (templates).
Depending on the child’s age, they are asked to assemble a picture from ready-made circles and squares or cut them out themselves.
Further, the task can be complicated - lay out the fragments symmetrically or change the shape, but so that the image becomes recognizable.
We offer a gallery of the best works of preschoolers and applications made from geometric shapes by children in grades 1-2.
On the topic: methodological developments, presentations and notes
Familiarizing children with geometric shapes and the shape of objects
Familiarizing children with geometric shapes and the shape of objects
Formation of ideas of preschool children about geometric figures and the shape of objects through educational games within the framework of the Federal State Educational Standard of Preschool Education
Consultation for parents on the topic “Features of the formation of ideas about geometric figures and the shape of objects in preschoolers.”
Development of children's ideas about geometric figures and the shape of objects for different age groups
Development of ideas about geometric figures and the shape of objects in preschool children.
Article “Formation of ideas about geometric figures and the shape of an object in children of senior preschool age through logical games”
Where to start studying?
To begin with, you can introduce your child to the image of a circle: trace it with your fingers and tell what it is. After a day, start looking around you for everything that reminds you of it. If the baby finds it difficult, parents should help him. The following figures are studied in the same way.
Then you should explain to the child that three-dimensional figures are similar to flat ones (a square is like a cube, a circle is like a ball). Let him try to correlate them, finding analogies around himself. To do this, it is useful to show the baby a flat image, asking him to take the same object out of the bag, but three-dimensional, and also to look for “hidden” figures while walking, reading books or watching cartoons.
A special “geometric” lotto helps to consolidate the acquired knowledge: cards with geometric shapes that need to be placed in places on the game map. You can make the lotto yourself. To begin with, take cards of the same color. Later you can add other colors - this makes it more difficult to find the right pair.
This is also facilitated by the tactile recreation of a given form: drawing, modeling, laying out various objects, cutting, mosaic, appliqué. As you master more and more new shapes, applications can become more complex: not just squares on a square sheet or circles on a round one, but entire pictures consisting of different shapes. When creating them, you need to say which figure will serve as which part of the composition (a circle - the sun or a wheel, triangles - Christmas trees, a roof, etc.).