What a beginner needs to know
First of all, the fact that Mezen painting may not bring moral satisfaction and aesthetic pleasure, but it is also a good option to earn money. The fashion for antiques will never go away, and mezen is too rare a painting even among the greatest rarities.
Considering that few people own it, you can easily understand the demand for it among knowledgeable people. If you set a goal and concentrate on this rare art, you can gain great authority and at the same time earn good money.
The fashion for antiques will never go away, and mezen is too rare a painting even among the greatest rarities
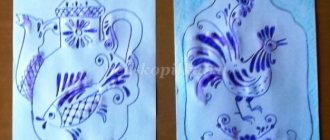
Color scheme of Gzhel painting
Traditionally, the design is done only in shades of blue. Against the background white color of porcelain, the master is able to convey the entire palette of the universe with one color. But blue can be different: from faded blue to expressive deep blue, turning into shades of night. A dark cobalt color is also used. And the laconic Gzhel pattern is completed with platinum or gold decor.
And before that, Gzhel popular print was popular, when the craftsmen painted the dishes with blue, yellow, brown and purple paints, all on the same white background. But the most beautiful handicrafts are considered to be overglaze samples: the craftsman applied colored paints directly over the glaze. After this, dishes or other products must undergo three or even four firings.
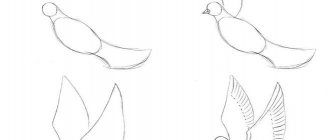
Start of image
In order for the drawing to turn out really neat and beautiful the first time, it is not enough just desire and prepared materials
It is very important to learn the technique of applying an image. Here you need to understand how to hold the brush, how to guide it, what movements to use to depict the details of the drawing
All Gorodets painting is carried out in three stages. The first thing to do is to apply a background onto which the drawing will be superimposed. Next, we carry out the drawing step by step.
Underpainting. Large spots of color that will subsequently serve as the basis for the image. These are big figures. For children, the elements of underpainting are very easy.
They are applied in a thin layer and completely shaded. You need to sketch them very carefully so that there are no streaks, sagging or gaps. For a good result, it is better to paint with a flat, wide brush.
- Fabric. Brush number 2 is used. The essence of this stage is to break the underpainting into parts and highlight the details.
- Revivals. This is another technique in the Gorodets technique. Here black and white paint comes to the rescue, which highlight the accents of the picture. This stage is very difficult and requires concentration.
With black and white paint, many dots are applied to the underpainting and fabric, which add brightness and liveliness to the drawing.
It’s important not to overdo it here, as a large amount of animation can ruin the drawing.
Gorodets painting will turn out very well if you learn how to hold a brush correctly. It should be perpendicular to the surface on which the design is applied.
In this case, the hand should be supported by the elbow and fixed by it, and the hand should remain mobile and free. If it is difficult for a child to hold his hand in this position for a long time, then you can rest it on the little finger. In this hand position it is easier to draw smooth and regular lines.
The last thing in drawing a Gorodets painting is to connect all the elements together step by step. Pictures should be bright and colorful.
This is the main feature of this direction in art. If the child has learned to depict elements well on paper, you can continue and offer to draw on a wooden base.
Preparatory work
The procedure is simple: first you need to accumulate visual experience. View dozens of examples of work, evaluate the drawings from the point of view of subsequent reproduction. Determine how the artist builds the composition, how the picture is revealed, what unites the works. The more samples you carefully study, the more accurate your idea of the work ahead will be.
It is important not only to study each stage of painting, but also to train your hand in depicting basic patterns and elements
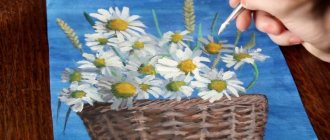
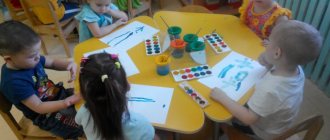
If the goal of studying Zhostovo trays is step-by-step drawing for children, you need to show samples to the children and talk to them about the distinctive features of the painted products. Children, as a rule, use squirrel brushes, gouache, and blanks in the form of paper trays, which they have to paint. Such blanks usually already have a colored background.
But such preparatory work is also useful for adults: draw more than one paper blank in order to hone their skills on paper. In order for the rose to open, it must be drawn more than once. To remember all the stages of painting Zhostovo trays, each of them needs to be worked out as a simulator: draw several shadings, work with shading and highlighting.
This video clearly shows the implementation of the basic elements and simple patterns of Zhostovo painting.
https://youtu.be/aBWgk8Hp7A8
Motifs and elements
Depiction of rural life in Gzhel
The theme of the painting is a reflection of the master’s worldview, traditional and cultural understanding of life, its course and main events. Artists can turn to iconographic elements; they capture scenes of everyday life and observations of the natural world.
The subject of the drawing is differentiated into 4 types:
- subject drawing – involves displaying the seasons, landscapes;
- ornamental - these are the usual mesh combs, pearls, as well as tendrils, droplets, layers and checkers;
- plant motifs - berries, buds, grass, branches and cereals;
- animals are usually birds.
Natural motifs and architecture today can often be found on tea sets and other Gzhel tableware. To this day, the masters depict peasant buildings, wide city streets, and churches on their products. Floral designs are also popular: take the same Gzhel rose, which migrated from porcelain to prints on clothes, etc.
Series of articles: drawing lessons for children.
It's hard to believe: are there really only two colors? Miracles!.. This is how artists from Gzhel paint the heavens on the snow! L. Kulikova.
Gzhel painting is an ancient, traditionally Russian art, the origins of which originated in the Russian outback more than 670 years ago.
“A gentle blue miracle - a fabulous Gzhel” - this is how people in Rus' affectionately called everyone’s favorite, amazingly decorated ceramics made of snow-white clay. Without a doubt, Gzhel dishes, souvenirs and toys - these unique original works of art - from time immemorial and to this day are highly valued all over the world.
Examples of dishes in the Gzhel style:
Perfection in every detail:
Today we have an excellent opportunity to introduce a child to Gzhel painting, introduce them to primordially Russian creativity, and even test themselves in the role of a folk craftsman. The activity will also help develop his aesthetic taste, imagination, and the ability to compose a general pattern based on motives.
In general, this lesson is designed for a child 5-9 years old, but in principle, for a change, you can also involve a three-year-old child, without, of course, requiring him to perform the painting too accurately.
A little history
History indicates that the development of wood studies led to its application on the most unexpected subjects, which included:
- furniture;
- chests;
- sled;
- utensils used indoors.
Most often there was a symbolic character, and the background tones were: green, blue and sometimes black. Particularly popular were and are drawings with specific themes, showing people and animals.
After World War I, art fell into decline, forcing specialists to look for other sources of income. The revival of the popularity of the direction is associated with the name of I.I. Oveshkov, who opened the workshop to the public.
It organized the training of appropriate personnel, which resulted in an increase in those able to process the source code. Involving a new generation in recreating images develops a sense of belonging to the culture of their country and develops artistic thinking on different levels.
Cutting board decoration
Gorodets painting on a cutting board has become the most popular lately. This essential item for any housewife can become a real work of art in the hands of a good craftsman. By gradually following the instructions from the work diagram, novice craftsmen can create their first creation:
- Draw a sketch of a pattern to decorate the board or print the finished composition.
- Cut out templates of basic shapes using the appliqué principle.
- Prepare a board for painting. To do this, it is sanded with sandpaper.
- If the design provides for a colored background, then prime the sanded board with this color.
- Trace the templates and cut out parts with a pencil.
- The basic forms are painted over.
- After drying, they move on to the shade. At this stage, the coloring of the board takes on more specific forms.
- The final stage of painting is revival. Light colors give the product an elegant, festive look.
- Spray the varnish with a spray bottle, evenly covering the surface of the image and the entire board.
Master class on painting a wooden spoon
To paint a spoon, you need to buy the blank itself. Wooden spoons are usually easy to find at hardware stores and craft stores. Don’t rush to paint it right away, let it sit for a couple of days: it is not known in which room it was stored. Let the material get used to the temperature and humidity of your home.
In addition to paints, brushes, an eraser and a pencil, you will need:
- acrylic primer;
- tempera paints – black, yellow, green;
- acrylic lacquer;
- skin 000;
- toothpicks;
- a clean, lint-free cloth;
- palette;
- jar of water.
When choosing between gouache and acrylic paints, take the latter. Red, gold and white acrylic paints make Khokhloma painting recognizable.
Khokhloma - how to draw patterns on a spoon step by step:
- The spoon needs to be sanded first, but not too much. Then wipe the spoon with a damp cloth to remove any wood dust.
- But use the tip of a spoon to apply the primer using a size 18 brush. It will dry for 25-30 minutes. When drying, the primed tip should hang down.
- When the tip is dry, take the spoon by it and cover the entire spoon with soil. And dry again - 40 minutes.
- After drying, the fibers of the spoons will rise again and need to be “combed” with sandpaper.
- It's time to apply patterns - with a simple pencil, apply leaves and berries on a wooden surface. Paint the leaves with gold paint and brush number 5. Since the paint is transparent, several layers need to be applied.
- The berries are painted with a brush number 4. For red paint, two layers of coating are enough.
- When the leaves and berries are dry, you can begin to create the background. To do this you need black tempera paint and a size 4 brush.
Next, strawberry flowers are drawn on the dried black background - white, with a yellow center. The petals can be marked with cotton swabs, and the core with toothpicks.
- By mixing yellow and green tempera paints, you will get the desired shade for drawing grass. Using a thin brush, paint stems and curls.
- The handle of the spoon should be gold - cover it with gold paint in several layers, each time allowing it to dry.
- Give the spoon a rest period for two days; this is the preparatory period before varnishing. As in the case of primer, first the tip is varnished, then the entire spoon. The varnish is applied in several layers, each drying for at least 3 hours.