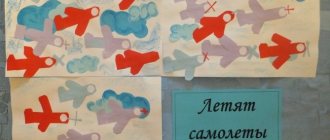
Drawing in the second junior group on the topic: “Planes are flying”
Marina Shkerina
Drawing in the second junior group on the topic: “Planes are flying”
Topic: “Planes are flying”
Goal: To arouse children's interest in drawing an airplane
Educational: strengthen the ability to draw objects consisting of several parts.
Developmental: develop perception, aesthetic attitude towards the surrounding world.
Educational: to cultivate interest in drawing an airplane. Evoke an emotional response.
Methodological techniques: reading a poem, showing an airplane, looking at
Materials and equipment: a sheet of white paper, blue gouache paints, brushes, jars of water, paper napkins, an easel, a toy plane, pictures of an airplane, a poster with flying airplanes.
Preliminary work: examining images of the aircraft, clarifying ideas about the features of the appearance of the aircraft (flying in the sky, in the air.)
Progress of the lesson:
Educator: Guys, what are we going to draw with you, you need to guess the riddle:
Not a bee, but buzzing,
Not a bird, but flying (an airplane)
Educator: Children, look at the plane, what does the plane have? (children's answers).
Educator: And now I will show you how to draw an airplane (drawing demonstration).
Educator: Children, take a brush, let's draw a plane in the air.
Children draw an airplane, help children who cannot cope.
Summary of the lesson.
At the end, lay out all the drawings on the table. Draw the children's attention to how many different airplanes they drew, how beautifully the airplanes fly in the sky.
Educator: Children, what did you draw? How did you draw airplanes? I really liked your drawings. Did you like drawing the plane?
Photo report. Drawing in the younger group on the topic: “Valentines with polka dots for beloved moms and dads.” Continuing the theme of “Valentines” for beloved moms and dads, I decided that the children and I simply needed to give hearts for them. Collective work on applique in the middle group “Planes are flying” Collective work on visual activities (applications) in the middle group “Planes are flying” Goal: - to form children’s ideas.
Summary of a lesson on cognitive development (FEMP) for children of the second junior group “Leaf fall, falling leaves, yellow castings are flying” Program objectives: Educational: Learn to compare the properties of objects, find a common property of objects; mastering counting to two based.
Drawing a snowman in the second junior group Lesson notes in the 2nd junior group. Drawing. Topic: "Snowman". Goals: To train children in drawing round objects. Learn to transmit. Master class for February 23 - collage “Russian planes are flying” in the second junior group. As part of the thematic week “Future Defenders of the Motherland” dedicated to Defender of the Fatherland Day, the students of our group made a collage.
Progress of the Lesson:
Q. Guys, the holiday “Defender of the Fatherland Day” is coming soon. Why is it called that? Who can we call defenders of the fatherland?
Q. But to defend the Motherland you need special equipment. Guess the riddle:
it looks like an all-terrain vehicle,
will pass through mud easily,
hill, ditch is not a barrier,
will instantly rush as it should. (tank)
The bird flies across the sky, but does not move its wing.
makes a wonderful flight ( plane )
Guys, look at the plane (showing a toy plane )
.
An airplane has a body , wings, and a tail.
Let's try to make a plane out of magic pebbles.
We'll build the plane ourselves,
let's fly over the forests,
let's fly over the forests,
and then we’ll go back to mom.
Now look at how to draw an airplane . You need to take a pencil and hold it with three fingers. Like this. First we draw the body of the aircraft . Like this, in a straight line (I show)
Now we draw the wings.
I draw straight lines on the sides of the aircraft . Like this (I show)
at a slight angle.
Draw the tail from the end of the airplane body upwards , to the side. Like this (I draw on an easel)
.
Now let’s show in the air with our finger the order in which to draw the plane . (Together with the children I show with a gesture, and we say with the children again: body, wings, tail of the plane ).
Admire your planes , how beautiful they turned out. How beautifully they fly in the sky . Well done!
Summary of the integrated lesson “Hello, autumn!” (second junior group) Summary of the integrated lesson 2nd junior group “Hello autumn!” Objectives: Expand children's understanding of seasonal natural phenomena. Summary of the integrated lesson “Geese-swans” (second junior group) Purpose. Consolidating children's knowledge of the material covered on FEMP and speech development. Objectives: Educational: 1. Strengthen the ability to determine. Summary of the final lesson on FEMP “Journey to the Fairytale Forest” (second junior group) Purpose: to consolidate the concepts of many, one; train the ability to compare the number of objects: “more”, “less”, “the same”; secure.
Summary of the music lesson “Acquaintance with musical instruments” (second junior group) Synopsis of the musical lesson “Acquaintance with musical instruments” Second junior group Program content • Learning objectives:.
"Maple twig." Notes on non-traditional drawing using the technique of “imprint, imprint with leaves” (second junior group) Notes on the lesson “Maple Twig” using the method of unconventional drawing Technique “Imprint. Imprint with leaves" Educational.
Source
“Planes are flying” outline of a drawing lesson (junior group) on the topic
Program content: learn to draw objects consisting of several parts. Strengthen the ability to draw straight lines in different directions. Learn to convey the image of an object. Develop aesthetic perception.
Materials and equipment: a sheet of light blue paper, gray gouache paints, brushes, jars of water, paper napkins, an easel, a toy airplane, pictures of an airplane.
Preliminary work: examining images of the aircraft, clarifying ideas about the features of the appearance of the aircraft (flying in the sky, through the air).
Organization of children: frontally, children stand next to the teacher.
GCD move:
- Guys, today we are going on a trip. Where and on what? This is my secret. Listen to the riddle and you will immediately find out everything:
Not a bee, but buzzing, Not a bird, but flying, Not making nests, Carrying people and cargo. (Airplane)
- How quickly did you guess (show the toy, perform a “flight” with it). What a wonderful bird! Look at the plane, pay attention to its parts and the direction of the wings. What does the plane have?
— Long body and two large wings.
Physical education minute:
Let's fly, fly, (Stand legs apart)
They twirled their arms forward. (Rotate arms in front of chest)
Hands to the sides - take off in flight. Send the plane, (Spread your arms horizontally to the sides)
Right wing forward, (Turn the body to the right with the right arm moving forward)
Left wing forward. (Turn your torso to the left with your left arm moving forward)
One, two, three, four - Our plane has taken off. A wonderful pilot. The plane was sent on its way. (Random running with arms out to the sides)
- Which of you has flown on an airplane? (children's answers).
- Today we will all become pilots and go on a “trip” on an airplane.
And now I will show you how to draw an airplane (drawing demonstration). Let's draw an airplane body with a tail.
Draw the body and tail.
And now the wings. Don't forget to draw portholes - these are the windows on the plane through which you can look.
Progress of the lesson:
Q: Guys, today on the way to kindergarten I met Sasha from a neighboring group , and he was very sad. to draw an airplane for his birthday , but did not have time. Let's help him draw .
Q: When you and I were walking, we saw planes flying in the sky . The planes flew smoothly , beautifully in a clear, bright blue sky or among white fluffy clouds. When the sun illuminated the plane , it sparkled beautifully. An airplane is the fastest mode of transport. All planes arrive and depart from the airfield. Who flies the planes ?
D: pilots, pilots.
Q: There are passenger and combat aircraft .
Guys, look at the plane (showing a toy plane )
.
An airplane has a body , wings, and a tail.
Now look at how to draw an airplane (children approach the easel)
.
You need to take a brush and hold it with three fingers at the iron tip. Like this. Place it in a jar of paint, remove excess paint from the edge of the jar and paint with the whole brush . First the aircraft . Like this, in a straight line (I show)
Then put paint on the brush again.
Now I'm drawing the wings. I draw straight lines on the sides of the aircraft . Like this (I show)
at a slight angle.
I pick up the paint again and draw the tail from the end of the plane's body upwards , to the side. Like this (I draw on an easel)
.
Now let’s show in the air with our finger the order in which to draw the plane . (Together with the children I show with a gesture, and we say with the children again: body, wings, tail of the plane ).
Q: Well, now, let’s relax before work and sing a song about an airplane .
The plane is flying , the plane is buzzing ,
U-U-U-U I'm flying to Moscow (arms to the sides, alternately tilting to the right and left)
.
Commander pilot, the plane is flying ,
U-U-U-U, I'm flying to Moscow. (rotate your arms in front of you)
.
Q: Well, now take your seats and start drawing . (Children do the work)
.
Q: Oh, guys, what beautiful planes you drew . How many of them did you get?
Q: What do planes do ?
D: They're flying !
Q: Let us also fly on airplanes (the teacher invites the children onto the carpet)
We get on the plane , (Children crouch)
Let's take flight! ( They “start”
the plane , stand up and say: “zhu”
)
We are flying above the clouds. (Hands to the side)
We wave to dad, we wave to mom. (Take turns with both hands)
We see how the river flows (they show waves with their hands)
We see a fisherman's boat. ( "Abandoned"
fishing rod)
Be careful: the mountain! (Lean to the left, to the right, say: “zhu”
)
It's time for us to land! (Squat)
Q: Guys, what did we do today? Who did they help? Did you like it? Well done! Admire your planes , how beautiful they turned out. How beautifully they fly in the sky . Now Sasha’s friend will not be left without a gift. Well done!
GCD summary for application in the second junior group “Flying Airplanes” GCD summary for application in the second junior group “Flying Airplanes” Author: Olga Mikhailovna Yudina, teacher. Place of work: Children's preschool educational institution.
Lesson summary for the second junior drawing group “Airplane”
Maslennikova Elena Nikolaevna
Lesson summary for the second junior drawing group “Airplane”
Goal: Creating conditions for children to become acquainted with objects of the surrounding reality.
• Learn to draw objects consisting of several parts.
• Strengthen the ability to draw straight lines in different directions.
• Learn to convey the image of an airplane .
• To cultivate children's interest in painting with a brush , accuracy, and independence .
Methods and techniques: verbal, visual, practical.
Materials and equipment: blue landscape sheets, gouache or gray paints, brushes, oilcloth, wet wipes, toy airplane , pictures of an airplane .
Preliminary work: examining paintings depicting an airplane , clarifying ideas about the features of the appearance of the airplane (flying in the sky, in the air)
.
On the topic: methodological developments, presentations and notes
Lesson on visual arts (appliqué without gluing) in junior group I on the topic: “Planes are flying.”
Abstract of GCD Plasticinography. The plane is flying.
The lesson was dedicated to February 23.
Summary of a lesson on artistic and aesthetic development (drawing). Theme: "Planes fly through the clouds." Middle group.
Goal: Develop imagination and creative thinking. Objectives: Continue teaching children to work with scissors, following safety rules. Teach by smoothly rounding the ends of the rectangular strips, cutout.
Source
Method two
In this version, how to draw a fighter plane step by step. The fighter poses a formidable danger to the enemy in the air.
It is equipped with high-quality weapons, and all body parameters are aimed at achieving maximum speed, lightness and maneuverability, which makes it beautiful and graceful.
What you will need:
- Simple pencil
- A4 paper or album
- Eraser
- Colored pencils or markers: green, blue, yellow, dark blue, red, black (or take as desired)
- Workplace. Prepare as in the previous version
How to draw a fighter jet:
- Place a sheet of paper or album horizontally
- Closer to the right half of the sheet, in parallel, draw a small oblong cone, reminiscent of a bullet (its sides will be slightly rounded) - the nose of the fighter.
- It will “lie” on its side, that is, located parallel to the top or bottom of the sheet.
- From the pointed end of the cone, to the right, draw a small straight line - the antenna of the future aircraft
- From the two lines forming the walls of the cone, continue straight to the left. The length of each line will be approximately 2-3 times the length of the cone.
- The lines do not have to be absolutely parallel. Towards the end, they should diverge slightly from each other.
- This forms the transition from the bow of the hull to the main part, where the engine and ammunition are located.
Next, the wings are drawn:
- From the end of the top line of the body, a triangle is drawn, the apex of which is directed upward and slightly deviated to the left.
- The second side of the triangle is a straight line that goes from top to bottom, to the base. (That is, the triangle will be right-angled, with 900 at the base)
- From the bottom line, a triangle is also drawn, deviated to the left, but the apex is directed downward.
- Erase the top and part of each triangle (about 1⁄5 of the wing length)
- Connect the erased parts of each wing with a straight line. (So instead of triangles, you get irregular beveled trapezoids).
- Continue each connecting line to the right by 1⁄2 of its length. (the line will extend beyond each wing. This is how the aircraft's combat weapons are designated.)
- From the base of each wing, on the left side, two more similar triangles are drawn, but with a smaller size.
- The edge of the cut tops (straight line) should reach the middle of the main wings.
- The left side of the upper small triangle goes into the left side of the lower one. That is, the triangles are connected by one line to the left.
- Close to the middle of this line, on the left, there is a small rectangle, the width of which is equal to the bullet-shaped cylinder of the bow.
- Its left side is erased.
- In its place, an oblong oval is drawn, touching the upper and lower sides of the rectangle.
- This is how the main turbine appears.
- Just below the “nose” cone, in the front part of the aircraft, an oblong oval is drawn - the cockpit.
How to paint a fighter jet
There are many options.
The plane can be entirely gray-steel, or have a military coloring:
- The cone-shaped nose and antenna will be white.
- White stripes also indicate the outline of the wings
- The plane itself is blue with blue stripes.
- Red army stars are painted at the ends of the wings
- The main turbine hole is rendered boldly in black, with a small glimmer of red in the middle.
- The cabin is light blue. It is crossed by 2 black lines, which divide it into 3 parts. (Also, you can leave a small unpainted oval on it - a reflection of light on the glass)
- The wingtip guns are aimed in dark blue or black
As you can see, even drawing a fighter plane step by step with a simple pencil is much more difficult than a regular plane.
This method may require the participation and assistance of an adult or someone who already knows how to draw.
But mastery of this technique will bring pleasure in drawing not only to outside viewers, but also to the artist himself, while significantly improving his talent.
