Summary of the lesson on drawing with palms “Sun” (first junior group)
Elena Aleksandrovna Bizyaiva
Summary of the lesson on drawing with palms “Sun” (first junior group)
Municipal budgetary preschool educational institution kindergarten No. 62 of a combined type.
Summary of a lesson on drawing with palms
on the theme " Sunshine "
first junior group
Educator: Bizyayiva Elena Aleksandrovna
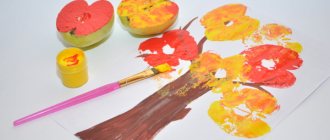
Sun ( painting with palms )
Purpose: to introduce the technique of palm . Learn to quickly apply paint to your palm and make an imprint - rays of the sun . Develop color perception.
Preliminary work: Learning nursery rhymes, observing while walking, playing games. Equipment: landscape paper with drawn in the middle, yellow gouache, brushes, napkins.
Project “Colored Palms”
Municipal preschool educational institution
"Lipitsa combined type kindergarten "Spikelet"
Project “Colored Palms”
(
use of unconventional drawing techniques)
1st junior group 2015-2016
Educator:
Polyakova N.A.
Relevance of the project:
Non-traditional drawing technique as a means of developing creative abilities in preschool children.
The world will be happy only when everyone
man will be the soul of an artist. In other words, when everyone finds joy in their work.”
Rodin
It is impossible to raise a creative person without beauty. Beauty is an eternal source of spirituality, inspiration, and creativity.
How to help a child discover himself most fully? How to create conditions for the dynamics of creative growth and support a child’s inquisitive desire to know the world in all its bright colors and manifestations? It is these questions that visual activity, one of the simplest, most exciting and accessible ways to develop a child, helps to solve.
In the field of artistic and aesthetic development of a child, the main objectives of educational activities are to create conditions for:
developing children's interest in the aesthetic side of reality.
introduction to various types of artistic and aesthetic activities,
developing the need for creative self-expression, initiative and independence in the embodiment of artistic ideas.
Using non-traditional drawing techniques helps us solve these problems with children of early preschool age, since at this age children have not yet developed the skills of drawing with a pencil and brush.
Such non-standard approaches to organizing visual activities surprise and delight children, thereby arousing the desire to engage in such an interesting activity. Original drawing reveals the child’s creative capabilities, allows you to feel the colors, their character and mood.
Non-traditional drawing techniques create an atmosphere of ease, openness, promote the development of initiative, independence, and create an emotionally favorable attitude towards activities in children.
That’s why we developed the “Colored Palms” project.
Objective of the project
— formation of artistic and creative abilities in children of early preschool age through non-traditional drawing techniques.
Tasks:
- develop children's imagination and creativity,
- enrich and expand the artistic experience of children,
- develop a desire to experiment,
- encourage and support creative ideas.
— to cultivate a child’s positive attitude towards cooperation with adults, with children, towards his own activities and its results.
Progress of the lesson:
1. A sunbeam and asks for help.
2. Children are ready to draw a lot of rays from the sun to make it lighter, warmer, and the snow to melt faster. Showing a method of applying gouache to the palm and imprinting it on paper.
4. Evaluation of work. Reading poems
“
Sunshine , sunshine ” Sunshine , sunshine , Look out the window, Shine a little light, I’ll give you some peas!
Olga Chusovitina “Me and the Sun ”
The sun is shining through my window in the morning, which means it’s time for me to go to kindergarten. I quickly wash my face, brush my teeth myself, and I can hear the cheerful noise of birds outside the window. The birds are happy that spring has come,
5. Games with a sun bunny .
Synopsis of the physical education lesson “Let's go on a flight” (first junior group) Synopsis of the physical education lesson 1st junior group. “Let's go flying.” Venue: on the street. Objectives: 1. Strengthen the ability to perform.
Summary of the integrated lesson “Grandfather Frost’s Birthday!” (first junior group) Summary of the integrated lesson “Grandfather Frost’s Birthday!” (1st junior group) Tasks: Introduce children to the main character of the New Year. Summary of the integrated lesson “Needles for a hedgehog” (first junior group) Integration of educational areas “Artistic and Aesthetic”, “Speech Development”, “Cognitive Development”, “Physical Culture”. Synopsis of the integrated lesson “Oh, the red rowan tree” (first junior group) Synopsis of the integrated lesson “Oh, the red rowan tree” (first junior group). Program content: Expand your understanding of trees.
Abstract of the educational activity for drawing "Balloons" (first junior group) (2-3 years) Abstract of the educational activity for visual activities (drawing) "Balloons" First junior group (2-3 years) Objectives:.
GCD summary for drawing “Let's decorate a plate” (first junior group) GCD summary for drawing “Let's decorate a plate.” (first junior group) Integration of educational areas: • cognition • socialization;.
Summary of the modeling lesson “Mother Duck and Ducklings” (first junior group) Purpose: To arouse in children the desire to depict, sculpt; Develop fine motor skills and creative abilities; Continue to master some. Summary of the lesson on plasticineography “Ladybug” (first junior group) Program content: • Form children’s ideas about the inhabitants of their immediate environment, teach them to recognize and name animals by their bright colors.
Source
Paint Recipes
The technology called “Finger Painting” involves the use of paints. But many parents worry that they may be dangerous for the child. After all, many kids taste them, and they contain many harmful chemicals.
Some mothers prepare their own paints. The ingredients are quite simple:
- 2 tbsp. flour;
- 1.5 tbsp. water;
- 7 tbsp. l. salt;
- 1.5 tbsp. l. vegetable oil;
- glycerol;
- food colorings.
First you need to mix the dry products - flour and salt. Add water to them and stir until thick sour cream forms. Then add vegetable oil. The ingredients can be mixed with a whisk, fork, mixer or blender. Glycerin is added as desired, it gives the paint shine.
The finished mass is poured into different jars; you can use empty containers from gouache or baby puree. Then you need to add dyes. They can be natural - juice of carrots, beets, celery, turmeric. You can also use food colorings that are added to baked goods.
At home, you can prepare three-dimensional paints for finger painting. You will need few ingredients:
- 1 tbsp. flour;
- 1 tbsp. salt;
- 2 tbsp. water.
The products must be thoroughly mixed and placed in different containers. Then dyes are added to them. For additional shine, glitter or glycerin is added to the mixture. Next, the jars are placed in the microwave for 1.5 minutes at 180 degrees. The result will be a voluminous material. While drawing, the paints will lie on the paper so that any image will acquire a 3D effect.
You can also use porridge for cooking:
- 0.5 tbsp. fine-grained cereals;
- water;
- dyes.
Semolina is suitable for creating paints; it is quite small. It is cooked according to the usual recipe; the consistency of the porridge should resemble sour cream. For greater viscosity, you can add PVA glue to the mixture. The mass is also laid out in small jars and mixed with dyes. This material will also allow you to create three-dimensional drawings. But after applying it to paper, you need to handle the painting more carefully - it must dry. You can fix the cereal with regular hairspray.
Notes on hand drawing in the first junior group "Bush"
IRINA GUSOVA
Notes on hand drawing in the first junior group "Bush"
Notes on GCD non-traditional drawing in the first junior group . " Bush "
Gusova Irina.
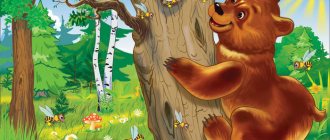
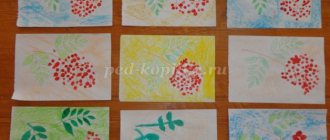
Goals and program objectives. Improve children's ability to draw with their palm , leaving an imprint on a sheet of paper and bring the drawing to perfection with the help of paints. Develop creative imagination. Cultivate a caring attitude towards the environment.
Handout and visual material. Sheets of light green or blue paper, brown and red paint, pictures depicting rowan bushes , lilacs, currants, etc. Preliminary work. Show the children several paintings of bushes . Progress. 1. The teacher draws the children’s attention to the pictures. “Children, what is shown in the picture? What bush ? (Children answer.)
2. Distribute paints, paper, and jars of water to the children.
3. Help each child to place their palm correctly on a sheet of paper . 4. Use red paint to complete the drawing. Finish drawing the berries .
5. Admire the finished image. Summary of GCD in the first junior group on non-traditional drawing “Healthy vitamins” Summary of GCD in the first junior group in non-traditional drawing (finger drawing). "HEALTHY VITAMINS." Malaeva N. M. teacher of the GBDOU d/s.
Abstract of the educational activity for drawing with potato stamps in the first junior group “Balloons” Municipal state preschool educational institution “Kindergarten No. 26”. Summary of direct educational activities. Notes on hand drawing "Tulips in a flower bed" Educational Department of the Istra City District Administration Notes on drawing lessons in the younger group using non-traditional.
"Our palms." Summary of a lesson on drawing with palms in the first junior group
Victoria Dunaeva
"Our palms." Summary of a lesson on drawing with palms in the first junior group
Summary of a lesson on drawing with palms in the 1st junior group “ Our palms ”
• Develop creative imagination, attention, fine motor skills and hand coordination.
• Getting to know your hand as a subject of artistic activity.
• Develop small arm muscles.
• Reinforce the techniques of painting with gouache paints .
• Involve children and parents in the creative process, unite people of different ages.
• Attract children and adults to fine art using non-traditional techniques - “ palm drawing ”
Materials: Sheets of paper, yellow, green, blue and red finger gouache, brushes, wet wipes, pencils.
Materials and tools
All materials can be found in any store that sells office supplies. Children do not need professional expensive paints. It is better to choose those with a safe composition, because the child can taste them.
Required tools and materials:
- paper;
- finger or any other paints;
- dry and wet wipes;
- cotton swabs and disks;
- old toothbrushes;
- oilcloth or mat for creativity.
You can choose any paper for drawing - A4 or A3 sheets, Whatman paper, coloring books, colored cardboard. You don’t have to buy expensive goods; just buy a standard album or sketchbook. But the paper in them should be thick so as not to get wet from water. Suitable paints include watercolor, gouache, and special materials for fingers. They can be purchased at any art stores. The colors should be bright; there are watercolors and gouache with glitter. Such materials will interest children. You can draw figures not only with your hands - the child can use cotton pads or sticks, toothbrushes.
It is advisable to seat the baby at a comfortable table, and lay a blanket or pillow on the chair to make him comfortable. It is better to cover the workplace with oilcloth or a special rug. In any case, the children will cover it with paints. It is also recommended to dress the child in old clothes that you don’t mind getting dirty. And to cleanse the skin you need to use dry or wet wipes.
Kids won't be able to draw serious pictures yet.
Their first attempts will resemble meaningless scribbles: dashes, sticks, crooked lines, blots. But the more often the child practices, the more interesting his images will become. With age, technique will improve, and the most talented children will begin to create real masterpieces.
Progress of the lesson
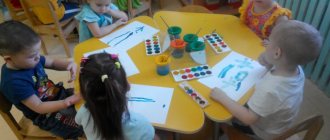
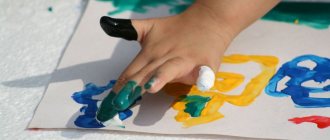
- Today you and I will be wizards, not with a brush , but with our palms, together with our mothers .
-Let's all roll up our sleeves together, take the sponges and dip them in the paint, then apply the paint to your palm , place your palm on the leaf and remove it , you get a palm . Look, your palm is dirty , what should you do?
- Yes, it’s good to wipe with a wet napkin.
Let's practice with you, as if the paint is standing next to us
— Dip your palm in paint and apply it to a sheet of paper. Let's try again (2nd time)
dip in paint and apply.
— When you finish, wipe your palms with napkins .
- Oh, what fun spring palms we got ! Let's admire them!
Now we need to figure out what can come out of our palms ? Let's try to paint on the details with our fingers . What a beauty we have, octopuses, cockerels, elephants, and very beautiful spring flowers.
- Well done boys! Well done! Many thanks to our mothers !
Now let's go wash our hands so they are clean.
Artistic and creative project “I’m not a wizard, I’m just learning!” “I’m not a wizard, I’m just learning” Artistic and creative project. II – junior group. Educator: Petrenko A.I. Relevance: Fine.
Source
Options for handicrafts made from palms
You can create applications from original paper templates not only at home, but also in kindergarten or school. If the children all work together, the result will be even better. Palms will help you create many different and interesting crafts on any topic.
Flat application
Already at 2 years old you can engage in creativity with your baby. These will be simple handicrafts made from palms. The mother places the child’s palm on the sheet, traces it and cuts it out.
You can create figures of birds, animals, insects or flowers. You also need to select small elements and markers for decoration.
If the baby is still small (2-3 years), then the details can be completed. Children from 4 years old can already glue the missing parts themselves. For example, a bird's eye, a beak or balls for a Christmas tree.
There are many ideas for flat applications; they can be combined with drawing elements. For example, you can draw a beautiful tree. The palm is cut out of brown and attached to a green leaf. Circles of different shapes are drawn on white paper, and then cut out and glued onto the palm, creating a tree crown.
There are many options, the main thing is to have imagination and the desire to create something interesting.
From paper
Basically, all crafts made from children's palms are made from colored paper. This simple and fun activity attracts children. Especially if they are engaged in creativity with adults. For example, you can design an adorable chicken. It will take a little effort to create it:
- a large chicken egg is cut out of yellow cardboard, which is attached with glue to a white sheet of thick paper;
- prepare 3 red palms, glue one above the head, and two instead of legs;
- 2 palms made of yellow paper are glued to the sides of the body, these will be the wings;
- Two eyes are cut out of white cardboard, two small circles are cut out of blue;
- glue on the eyes and add blue circles in the middle of them;
- A beak is cut out of red paper and also glued to the face.
Even a first grader in technology lessons can handle this craft.
Volume craft
Older children do more complex work. Creating a beautiful, bright and cheerful clown will be an excellent gift for any occasion. It’s not difficult to do if you follow the steps step by step:
- On sheets of different colors, trace the palms 15 times and cut them out;
- Make hair parts (2 parts), boots, hats, and butterflies from thin cardboard. You can immediately print it on colored sheets, or on white, and then paint it in the desired color;
- draw a face in the form of a circle on the base sheet, mark the eyes, nose, mouth;
- Lubricate the parts with PVA and glue them in the right place;
- starting from the bottom of the head, a suit is formed from the palms: first, three in a row, and then 4 pieces are glued only to the upper part, the fingers remain free, creating volume;
- a butterfly is attached to the neck, hands at the sides;
- boots are glued to the bottom.
You can complement the costume with decorations made of sparkles or ribbons.
Postcard
For your mother's birthday or March 8th, you can make a card with a secret. To do this you need:
- prepare thick rectangular paper; if you fold it in half, it should fit your palm;
- It is necessary to place your hand on the folded cardboard from the bending side;
- trace your hand with a pencil without grabbing the wrist;
- also cut out the template when folded, but do not cut the fold;
- open the resulting workpiece, it should look like two palms connected to each other;
- You can stick a heart or a flower in the middle of a rectangular strip-stand.
When you open the card, a voluminous decorated heart or a beautiful flower will appear.
Summary of GCD for drawing with palms in the first junior group “Birds”
Nadezhda Stupnikova
Summary of GCD for drawing with palms in the first junior group “Birds”
Summary of the drawing lesson “ Birds ”
in 1st
junior group .
Goal: to develop the skill of drawing with palms . Refine and consolidate knowledge of colors. Develop interests and a positive attitude towards drawing . Develop household skills.
2. Develop memory, imagination, logical thinking,
creative abilities: sense of color, imagination.
Materials for the lesson:
For the teacher: Illustration with a picture of a bird , album sheet,
gouache, brush, napkin, bowl of water.
For children: Landscape sheet, gouache, brushes No. 6 and No. 3, napkins.
Progress of the lesson.
Organizational moment: children stand in a circle.
Educator: Guys, show your palms , stroke them, clap your hands , close your eyes with your palms , rub your cheeks with your palms . palms can do . also draw birds with your palms . (Children sit at tables.)
Educator: Guys, why did the birds fly away ?
Children: It’s getting cold, the birds have nothing to eat .
Educator: Well done, guys! Guess the riddles about what birds they are talking about!
He steals hemp. (sparrow)
Blue scarf, dark back.
Little bird , call her. (titmouse)
Children: These birds are wintering birds.
Educator: Well done! Let's draw a bird . Before drawing we must do finger exercises.
on your palm ,
Feeding the cute titmouse
The bird pecks the grains,
Sings songs to children:
I fly all day.
Educator: Look at my palm , it seems to me that it looks very much like a bird. And what do you think? Where is the bird's beak? Where's the neck? Show the body of the bird. What a wonderful fluffy tail. (The teacher shows on his palm , the children on theirs).