Spring landscape
Spring landscape
Target:
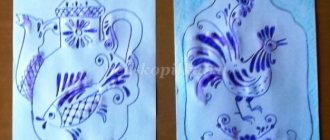
Formation of children’s ability to independently, in a certain sequence, create a spring landscape using non-traditional drawing techniques (“blowing”, “blotting”, painting with colored salt).
Tasks:
— consolidate children’s knowledge about changes in plant life at different times of the year; - develop speech, attention, thinking, respiratory system, fine motor skills of children’s hands; — promote the development of creative abilities, fantasy and imagination of preschoolers; — to cultivate interest, love and respect for nature, accuracy, independence. Materials for the lesson: blue tinted paper, containers with black ink, a rag or wet wipe for hands, a cocktail tube, colored salt in yellow, green and blue, PVA glue. Demonstrative material: Reproductions, illustrations, photographs depicting spring landscapes. Preliminary work: looking at illustrations of a spring landscape, observing while walking, learning poems and songs about spring.
Progress of the lesson:
Music by P.I. Tchaikovsky "April". Children are included in the group.
Vl: Guys, look how many guests there are in our group, let's welcome them.
V-l: Today we are waiting for an exciting journey into the wonderful world of nature. Sit down on the carpet. And you will find out what we will talk about by guessing my riddle.
Snow and ice melt in the sun,
Birds fly from the south
And the bear has no time to sleep
Spring is coming to visit us.
V-l: What is the first and main sign of spring?
Children: In spring the sun shines brighter.
Question: That's right, in the spring the sun shines brighter and begins to warm up. After all, all living things - nature, insects, birds, humans - need warmth and sunshine.
V-l: What spring months do you know?
Previously, in Rus', nicknames were invented for every month. March was called protalnik and drip. April is a snowman, and May is a herbalist.
Why do you think March was called protalnik? A dropper?
Children's answers: the snow began to melt, the first thawed patches appeared, and it began to drip from the roofs (spring drops).
V-l?: Composers compose music about spring, artists paint pictures, and poets sing of spring in poetry. In spring, all nature awakens from winter sleep. Let's remember the poems about spring.
Poems about spring.
V-l offers to sit at the tables.
- My dear wizards! Do you know why I approached you like this? Because today you will try to perform real magic. Updating knowledge. -What items do wizards use? (A magic wand, an invisibility hat, walking boots, a self-assembled tablecloth, a magic mirror). -You and I are wizards and artists, that’s why we have our own magical objects. They are on your tables. Please name them. (Tubes, colored salt). These objects will help us perform magic - to paint an ordinary picture in an unusual way. -But what exactly we will draw with these magical objects, you will find out by guessing the riddle:
How to paint spring in the forest step by step?
- Spring needs to be painted with bright colors - blue, yellow, brown.
- The composition of the picture is determined, for example, a forest standing in the distance and a field in front of it.
- The horizon line is marked, and it does not need to be in the middle of the sheet.
- The contours of the forest are outlined against the sky, and shades for the trees are chosen. Trees can be painted in a circular motion with a brush. Remember the rule: the further away the object, the blurrier its image should be, and vice versa.
- The sky is painted with diluted blue paint.
- I also detail the trees using thicker brown paint. By mixing blue and bright yellow, you can get a soft green tint of young foliage.
- Now we draw the melting snow, make clearings in the forest using brown paint.
“Colors of Spring” IOD in the senior group
Compiled by:
Frolova Elena Alexandrovna,
teacher
MADO kindergarten No. 100 in Tyumen
“Colors of Spring” Summary of integrated educational activities in the senior group
Program content:
1. Continue teaching children to mix paints to obtain new shades (when painting with gouache). To develop artistic and creative abilities.
2. Improve children's ability to create expressive images using non-traditional drawing techniques.
3. Continue to develop interest in visual arts.
4. Clarify and generalize children’s ideas about the characteristic signs of spring. Expand children's knowledge about spring, enrich and activate children's vocabulary (batik, palette).
Preliminary work: observations in nature, conversations about spring, listening to audio recordings with the sounds of spring, looking at paintings and illustrations about spring, guessing riddles about spring, learning poems about spring, finger gymnastics.
Equipment: cube with tasks, pictures depicting different seasons, cut-out pictures, white fabric, pieces of white fabric for each child, gouache paints, palette, brushes, napkins, jars of water, stands for brushes.
Integration of educational areas: speech development, artistic and aesthetic development, cognitive development.
Node progress:
1. Organizational moment.
Educator: Guys, remember last week we found a flower with tasks in the group? And today, I found such an interesting cube in the group. It's colorful, has six sides, and has pockets. And in these pockets, as I understand it, there are tasks for you. What are we going to do with the cube? Let's see the assignments? Will we be able to fulfill them? Want to? (children's answers).
Dice game
Educator: Where do you think we’ll take the first task?
Children: From number 1
Educator: Why did you decide that? I agree with you, I think so too, if there is a number 1, let’s start with it. So, Yura, help me get the first task. And there, guys, is some beautiful note. And the note says that we must help spring come as soon as possible. Shall we help you guys? What do you think of it?
Children: Let's help.
Educator: Guys, which side will we choose next?
Children: Side with number 2.
Educator: Karina, please find the right side (the child finds the right side).
Educator: What color is it?
Children: Red.
Educator: So, listen to the task: “Choose a picture from the set and tell us about it” (children are given pictures depicting different seasons, children must choose pictures depicting spring).
Educator: Well done, guys! You found all the pictures correctly. I think we have completed task number 2! What do you think Vika?
Educator: Guys, the next task will be numbered...?
Children: 3.
Educator: Angelina, what color is this side of the cube?
Child: Blue
Educator: Medina, did Angelina name the color correctly?
Child: That's right.
Educator: Yes, guys. Let's see what task is hidden in this pocket. Varya, please help me get the task. Assignment: “Tell a poem about spring.” Ilyusha, tell your poem to the boys, and you, Varya, tell your poem to the girls (the children share, Ilya tells the poem to the boys, Varya tells the girls).
Teacher: 1 - 2 boys run here. 1 – 2 girls run here.
Ilya: It gets light early in the morning. Thaws here and there. The stream roars like a waterfall, Starlings fly to the birdhouse, Drops ring under the roofs, The bear gets up from the spruce tree, The sun caresses everyone with warmth.
Varya: Spring is coming towards us with quick steps, And the snowdrifts are melting under her feet. Black thawed patches are visible in the fields, You can see the very warm feet of spring.
Educator: Well done, guys! Such beautiful poems told about spring. Thank you very much! Now, guys, let's continue to complete the tasks. Which side will we choose next?
Children: number 4
Educator: Gleb, find the right side (the child finds the right side).
Educator: Yura, what color is she?
Child: green
Educator: Yana, please take the fourth task out of your pocket. The next task, guys, is called “Collect a picture” (children are given cut-out pictures depicting spring primroses, children are divided into subgroups and collect pictures).
Educator: Guys, what have we collected?
Children: we collected flowers.
Educator: What flowers are these?
Children: These are spring primroses.
Educator: Look, guys, how beautiful and tender they are, like spring itself. Well done guys, you coped with this task too.
Educator: Guys, which side will we choose next?
Children: Side number 5.
Educator: Medina, please find the right side (the child finds the right side).
Educator: Varya, what color is she?
Child: Orange.
Teacher: Vika, please take the fifth task out of your pocket (the child takes out the task)
Educator: But what task awaits us here: “Play with your fingers.”
Finger gymnastics: (performed by a child)
A wonderful flower grew in a clearing,
On a spring morning he opened his petals,
Beauty and nutrition to all petals
Together they grow roots underground.
Educator: Well done, guys! Alice, which side will we choose next?
Child: At number 6.
Educator: Karina, what color is this side?
Child: Brown
Educator: Help me, Gleb, get the last task.
Educator: Oh, there’s something interesting here (the child takes out a white cloth with 2–3 colors painted in gouache on it). Something else fell out here. This is another message from spring.
"Dear Guys! Winter has washed away all the colors from my skirt. There are only a few flowers left. Draw exactly the same flowers in color"
Educator: Guys, can we help?
Children: Let's help.
Educator: I can draw such flowers. They are made using the batik technique, such an interesting word. Let's repeat it with you. I will definitely tell you how this is done. To paint flowers using the batik technique, we need to choose exactly the same paints. Here's what we have (they're looking at paints), unfortunately, we don't have the paints we need. What to do? Can be mixed. We will all work together now. And then everyone will draw their own flower.
Educator: How do we get a pink tint? To do this, we need to add red paint to the white paint. We will do all this with the help of a palette, but you can also take a white piece of paper. The brush should be held between three fingers (thumb and middle, holding it on top with the index finger), behind the iron tip, without squeezing it too tightly with your fingers. Dip the brush into the paint with all the bristles, then remove the excess drop on the edge of the jar; Before taking another paint, rinse the brush in water and blot it on a napkin.
Educator: Now, in the same way we will try to get a blue tint. We add blue to white paint and get blue.
Educator: We received all the paints. Let's move on to drawing flowers using the batik technique. Place the fabric on the oilcloth and straighten it. Take a rubber band, roll it up, tie it into a knot (the height of the tail may vary). Apply paint at the top, center and bottom. At the next stage, remove the elastic band, unfold the material and, using a brush, add leaves to the flowers. This is the flower I got. And now you will master the new batik technique. Everyone goes to work. Choose paints, get to work, don’t forget about the rules for mixing paints.
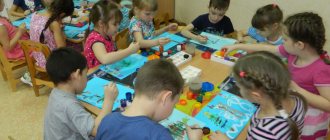
Independent activity of children.
Review of finished works.
Educator: We have one minute left. Finish and bring all the work here. Let's look at what interesting flowers you got. What are they good for? (children's answers)
Result:
Educator: Let's leave our flowers to dry. Then we will iron them and sew them onto our spring fabric. Do you think we managed to find spring colors and help spring?
Literature used: Sample general education program for preschool education “From birth to school.” Edited by N.E. Veraksa, T.S. Komarova, M.A. Vasilyeva. 3rd edition, corrected and expanded, publishing house Mozaika - Sintez, Moscow, 2014.
“Fine motor skills” gymnastics for fingers, author T.A. Tkachenko. EKSMO Publishing House, Moscow 2015
“Certificate of publication in the media” Series A No. 0005857
We invite teachers of preschool education in the Tyumen region, Yamal-Nenets Autonomous Okrug and Khanty-Mansi Autonomous Okrug-Yugra to publish their teaching materials: - Pedagogical experience, original programs, teaching aids, presentations for classes, electronic games; — Personally developed notes and scenarios of educational activities, projects, master classes (including videos), forms of work with families and teachers.
Why is it profitable to publish with us?
1. “Kindergartens of the Tyumen Region” is an officially registered specialized media outlet at the federal level. 2. The activities of the editorial office are supported by the Department of Education and Science of the Tyumen Region 3. We issue a “Certificate of Publication” in the media. 4. The document has a unique number, is entered in the register, has the original seal of the editorial office of the online publication and signature. 5. “Certificate of publication” in the media is sent to the author in both paper and electronic versions.
Details >>>
Sample “Certificate of publication of author’s methodological material in the media.”pdf
Share
How to draw spring with gouache quickly?
- Take a sheet of paper and gouache paint. Mix white and blue colors, paint over about a quarter of the sheet. It will be a spring sky.
- Mix white, blue and red paints to get a lilac-purple hue, and use circular movements at the top of the picture to create the outline of the forest in the distance.
- Apply a little white or blue paint on top to add dimension.
- In the foreground, blue and white paint can be used to depict a melting, shapeless snowdrift.
- Add yellow paint to the center of the picture, separating it from the image of the forest and from the snowdrift with white stripes.
- Add more detail to the forest by painting the trunks and branches of the trees in the forest with a richer blue color. Add green young sprouts on top of the yellow background in the center.
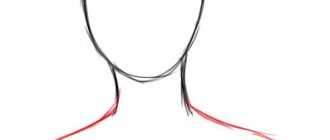
- Once you're done with the background, wait until the drawing is completely dry. Next, you can draw birch trees, they are just getting ready to awaken in early spring after winter. First draw their outlines.
- Throw shadows onto the white contours of the birches with blue paint.
- Then add texture to the birch bark by mixing black and white paint.
- Draw branches on the birches and apply black paint to the trunks to finish off the bark.
- Complete the drawing by adding brown and white paint to the ground to show that in some places the snow has already melted, and in others it remains in a shapeless form.
Spring in gouache.
How to paint early spring with children step by step with paints for beginners?
Several simple, feasible options for children are offered.
Early spring means swelling buds on trees and bushes, which become larger every day and are about to turn into young leaves or flowers. Therefore, you can first draw a branch using a wider brush, and then use a thinner brush to draw small shoots and leaves on the branches. To make the drawing bright and life-affirming, the sheet on which the branch is drawn can be pre-colored, for example, blue.
Children's drawing of spring with paints: steps 5-7. Children's drawing of spring with paints.
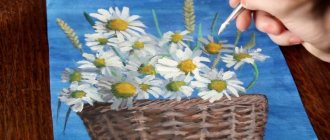
Early spring means the first flowers. We draw a snowdrop, tulip, or any other flower with petals around the core. Children will do well with such simple drawings. Children will be happy to draw a cheerful, bright sun over the flowers. Those who are older can add an insect to the drawing, which will bring the image to life.
Spring flowers in stages: tulip. Spring flowers in stages: snowdrop.
Spring flowers in stages: daffodil.
You can also suggest drawing a landscape, for example, hills from which the snow is gradually but steadily melting. Therefore, in some places you will need to leave the color white in the drawing, and in some places you will need to paint over the hill with a dark brown color. Let the bright yellow sun shine again over the hills and ravines, bringing the long-awaited warmth closer.
Spring landscape.
An interesting option is to create a design in a non-traditional form simply with paints and brushes, but, for example, by dipping a small diameter of the bottom of a plastic bottle into paint. So, a branch is first drawn. Then the bottom, which has convexities, is sealed onto it, so it turns out to be a very elegant and beautiful design, and it is interesting for the child to use different methods of creating it.