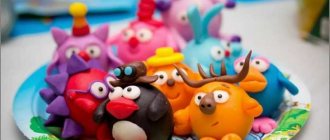
A simple bird - modeling in the preparatory group
First, let's sculpt a simple bird out of plasticine. Roll a blue ball. We form the body in the shape of a droplet and bend the tail up. Connecting the head and body. We sculpt wings from two balls and use scissors to make 2 cuts on each. We also cut the tail. Add wings, beady eyes and yellow legs and beak. Creating such a bird is perfect for middle school children.
Modeling lesson in the preparatory group “The rooks have arrived”
Technological map of modeling classes
Educational areas
: artistic and aesthetic development, physical development, cognitive development
topic : “The rooks have arrived”
Age group:
preparatory group
Purpose of the lesson:
Formation of the ability to create the image of a bird using sculpting using a combined method.
objectives :
Educational:
To develop the ability to convey the shape of the main part and other parts, their proportions, posture, and characteristic features of the bird; Strengthen sculpting skills using a combined method using the following techniques: rolling, pulling, smoothing, flattening.
Educational:
Develop fine motor skills of the hands.
Educational:
cultivate an emotional response to the results of creative activity. Develop aesthetic taste
Additional tasks:
Summarize knowledge on the topic “Birds”. Develop auditory attention and clear pronunciation of words.
Vocabulary work:
Dictionary enrichment:
Activating the dictionary:
rooks, migratory birds
Materials and equipment:
rowan, picture of a rook, black plasticine, stacks, planks, audio recording
Methods and techniques:
riddle, surprise moment: a ring rolled in, teacher's story, artistic expression, demonstration of material, musical accompaniment, conversation, positive assessment of the teacher, reflection, children's story.
Preparatory work:
conversation “migratory birds”, riddles, reading poems about migratory birds, spring. Conversation on the painting “The Rooks have Arrived” by Alexey Savrasov, learning spring chants.
Form of organization:
frontal, children sit on chairs in a semicircle; frontal sitting at tables in pairs
Planned outcome of the lesson
: Children made a rook using a combined method
| № | Stages, duration | Stage tasks | Activities of a teacher | Suggested activities for children | Expected results |
| 1 | Organized and motivational stage | Arouse interest in further activities | Guys, today a magic ring came to us. It wants to tell us something interesting. I will say the magic words, and you close your eyes and quietly listen to what the ring will tell us. “You roll, roll ring On the spring porch And from the spring porch Bring us news" (The phonogram "Birdsong" sounds) | Listen carefully, close your eyes. | Positive attitude of children to the lesson. Introduction to the situation. Creating interest in the content and upcoming activities. |
| 2 | Main stage | ||||
| 2.1. | Stage of production Problems | “Someone walks through the spring black arable land, strict and important. He will jump and flap his wings - the wings are black as soot. You can’t wash it off, even if you cry! This bird's name is..." Guys, when do the rooks arrive? That's right, rooks arrive in the spring. Do you want spring to come in our group? I suggest you make a rook today. | Children's answers | Accept the task | |
Plasticine duckling - how to make it with your own hands
We sculpt a ball and an oblong body. We make wings and press strips on them. We connect all parts of the body. From orange plasticine we sculpt two halves of a beak and paws. We designate the membranes on the paws with a stack. Let's make eyes from white large and black small circles. Poultry is ready.
Modeling “Birds at the feeder”
Construct of joint educational activities
according to PM 02 Organization of various types of activities and communication of preschool children
Zabrodina Valeria Alekseevna
Date of:
preschool educational institution
№: 86
Group:
Senior (5-6 years old)
Educator:
Ivanova Ekaterina Vladimirovna, Leonova Vera Ivanovna
Head of practice:
Temereva Lyudmila Petrovna
Methodist:
Chemezova Natalya Yurievna
Educational area:
“Artistic and aesthetic development”, “Physical development”
GCD type:
modeling
Subject:
“Birds at the feeder”
Forms
: frontal, individual
Target:
develop children's artistic creativity through sculpting birds
;
develop the ability to sculpt bird figures, conveying their shape and proportions
Planned result:
Children show interest in sculpting birds
Children show empathy
Children develop creative imagination. Children show interest in modeling.
Children can sculpt bird figures, conveying their shape and proportions.
Children can connect parts of a figurine while sculpting a bird.
Children can create an image by using a variety of modeling methods.
Children can choose the color of plasticine independently, in accordance with the topic of the lesson.
Children know how to beautifully place a bird figure on a feeding trough
| TASKS educational program |
| Educational : to cultivate interest in sculpting birds Cultivate a sense of empathy in children Developmental: continue to develop children's interest in birds; develop creative imagination Educational: figurative: develop the ability to sculpt bird figures, conveying their shape and proportions technical: improve the ability to connect parts of a figurine in the process of sculpting a bird. Learn to create the image of a bird by using a variety of sculpting methods. color: strengthen children’s ability to choose colors independently, in accordance with the topic of the lesson compositional: consolidate the ability to beautifully place a bird figure on a feeder |
Principles of preschool education (FSES DO):
building educational activities based on the individual characteristics of each child, in which the child himself becomes active in choosing the content of his education, becomes the subject of education;
assistance and cooperation of children and adults, recognition of the child as a full participant (subject) of educational relations;
supporting children's initiative in various activities;
formation of cognitive interests and cognitive actions of the child in various types of activities;
age adequacy of preschool education (compliance of conditions, requirements, methods with age and developmental characteristics);
Principles of training
: the principle of learning in the zone of proximal development, the principle of clarity, systematicity and consistency, the principle of consciousness, the principle of activity, the principle of accessibility.
Crane step by step - sculpting migratory birds in the senior group
We make a small mound from green plasticine. We stick a white and a red piece onto an oval of gray plasticine. Using a stack we show the bird's plumage. We attach two gray wings and a neck on top. We also show feathers. We glue on the eyes, beak and comb. We place the crane on one leg. For strength, the leg can be made from a skewer covered with plasticine. You can create a composition from different plastic plants around the bird.
Penguin - step-by-step modeling in the middle group
The pattern for sculpting a penguin is quite simple and suitable for children, for example, 2nd grade. We form the body of a bird from light plasticine. Attach the eyes and beak. We make two cuts on the paws. Stick on the wings and you're done.
Stork step by step - modeling a bird in the senior group
We sculpt a body from a white ball and attach the neck and head. We make white and black wings and show feathers on them. Attach the bird's tail and wings. Legs can be made from ordinary matches. To do this, we attach matches to the body using balls. We add membranes at the bottom. All that remains is to make a nose in the shape of a carrot and eyes from beads.
How is modeling taught in the senior group?
The senior group, starting creative activities in the first quarter of the school year, consolidates the skills acquired earlier. Children of this age have much more physical and psychological opportunities to be more skilled in various types of creativity.
So, the process of ossification of the hands has already begun, the muscles have become stronger, the fingers have become more mobile, and the brain is able to control higher precision of movements and coordination. Attention becomes stable, sharpened, memory becomes more tenacious. All these factors contribute to the fact that preschoolers of this age can make their crafts from plastic materials much better.
At the same time, students from older groups do not pay enough attention to details; they do not try to make their work more perfect, being more distracted by coming up with actions and situations with the subject. For example, the kid somehow sculpted a chicken, but decided to sculpt chickens too, although this was not required.
The task of the teacher and parents is to motivate children to pay attention to the little things that make the product realistic. We show techniques and methods on how to sculpt a figurine or object with a shape, proportion, and dynamics characteristic of the original, without forgetting about the details.
So, in the 1st quarter, the guys sculpt familiar objects, both from a whole piece and from individual parts connected to each other. This is the animal world and humans - something from folk art, dolls, whistle birds, etc. The children and I remember and consolidate the skills we learned in the middle group. Just in the fall, it is appropriate to conduct a lesson “Birds of Migratory” and depict the birds that fly away and those that remain. We clarify the dimensions and proportions, making sure that they correspond to the original;
The second quarter begins in December and since we are talking about sculpting birds, there is no way to avoid this topic in the senior group. Let's talk about how difficult it is for birds in winter, when it is very difficult to find food. Let’s first make the feeders and then we can conduct the “Birds on the Feeder” lesson.
Usually we read some story about wintering birds, then we solve riddles and think about how to help the birds in winter. Then we study the pictures, pay attention to the features of this or that bird. When starting work on modeling, we plan step by step how and what to do.
The teacher asks questions about modeling methods that are suitable for making a particular bird, and he himself shows some new techniques. For example, it is possible to make a beak from a grain; it shows how to apply a texture in a stack that imitates feathers, etc.
Also in this quarter, children are engaged in making and decorating dishes from plasticine, clay or dough.
- The third quarter is devoted to developing higher skill in sculpting people, animal and bird figures in dynamics. You can already use the tape method of modeling, we also introduce the children to mosaic modeling, drawing with plasticine, etc.
Knowing the abilities of your students, it is recommended to complicate the modeling technique at the discretion of the teacher. So, we invite children to sculpt according to the diagram. You can distribute according to the pattern on each table or offer to make the same craft according to the sample pattern. This is difficult, but possible and very useful for the development of observation, coordination, and spatial thinking.
- The fourth quarter is a general one. We consolidate the acquired skills and already make compositions: a poultry yard, a cat with kittens, etc., we convey simple plots from fairy tales, or the children sculpt according to their own ideas. I like it when children are given the task of making a fantastic bird, magical, unprecedented. What don’t they do! Modern kids are loaded with images from television, so they do such things, it’s amazing. I didn’t have such a fantasy as a child; I thought in a stereotyped way, like all Soviet children. And these are freed from conventions, it is easier for them to come up with a strange creature, alien, non-existent...
But the main thing that already happens in the senior group is the discussion of work after completion of the work. An important stage in the development of preschoolers - together we learn to objectively evaluate our work, analyze mistakes, and highlight the best examples from all the children’s work. Here, of course, you need to be as tactful as possible so as not to hurt the child’s feelings and not discourage him from doing anything at all.
ABSTRACT
NODE ON ARTISTIC AND AESTHETIC DEVELOPMENT (STYLE)
ON THE TOPIC "MIGRATORY BIRDS"
Program content:
1. Expand and consolidate children’s ideas about migratory birds: cuckoo, nightingale, swallow, rook, starling;
about the body parts of birds. 2. Learn to sculpt a bird from plasticine using a plastic method, pulling out parts from a whole piece and in a constructive way, observing the location and relationship of body parts, connecting the parts, pressing them together. 3. Continue learning how to use the stack. 4. Develop the ability to work with your hands, fine motor skills of the fingers, eye, attention, memory, creative thinking. 5. Instill in children a kind attitude towards migratory birds and all living things in nature. Demonstration material:
illustrations of migratory birds, a swallow made of plasticine.
Handouts:
plasticine, stacks, modeling boards, rags, twigs.
Preliminary work:
bird watching while walking; conversation about migratory birds, reading stories about birds.
Progress of the lesson.
1. The teacher
invites the children to guess riddles: (5 min) 1. Who, without notes and without a pipe, is the best at trilling, more vocal, more tender? Who is this? ... (Nightingale)
2. She sits on a branch in the forest, She repeats one “peek-a-boo”, She counts the years for all of us, She loses her chicks. “Peek-a-boo” here and there, What is this bird’s name? (cuckoo)
3. Faithful guardian and friend of the fields, The first messenger of warm days. Blackens all migratory birds, cleans the arable land of worms. (rook)
4. On a pole is a cheerful house with a small round window. For the children to fall asleep, the house is rocked by the wind. The father is singing on the porch - He is both a pilot and a singer. (starling)
5. Flies to us with warmth, Having traveled a long way. Sculpts a house under the window from grass and clay. (martin)
Children
solve riddles.
Educator
exhibits illustrations depicting guessed birds.
The teacher
asks the children questions:
What are the names of the birds that you guessed in the riddle? — Why are these birds called migratory? - Name all the migratory birds again?
Children
answer questions.
2. The teacher
makes a generalization and reports that the swallow sent a letter.
(2 min) (teacher shows the envelope).
Educator
offers to open the envelope, read and find out what the swallow writes.
(the teacher reads the letter).
Educator
says that the swallow itself has arrived! It is not simple, but magical. The teacher offers to mold her swallow friends from plasticine so that she will not be bored and lonely, but first she suggests doing finger gymnastics.
3. Finger gymnastics (bend the fingers of both hands) (2 min) Sing, sing along, This bird is a crake, Ten birds are a flock, This bird is a starling, This bird is a sparrow, A gray feather. This bird is an owl, This one is a finch, A sleepy little head. This one is a swift, This bird is a waxwing, This one is a cheerful siskin. Well, this one is an angry eagle, Birds, birds, go home (hands behind your back).
4. Educator
invites the children to first look at the swallow.
(10 min) - What parts does a swallow consist of? (head, beak, eyes, body, wings, tail, paws). - What kind of tail does a swallow have? (forked). -What kind of wings does a swallow have? (wide). Children
look at the illustration of a swallow and note its structure and features.
Educator
informs the children that they are now starting to sculpt a swallow. From a piece of plasticine you need to separate a large one (for the body and tail) and 3 small pieces for the head and wings. From a small piece we roll a ball (the head, the beak should be pulled out with two fingers and made sharp, the eyes will be drawn in a stack. From a large piece we will roll an oval (the body, the tail should be pulled out with two fingers and the tail should be divided into two parts with a stack. This way we get a forked tail. U swallows have a white breast, for this, using a white cake, you need to make a white breast.
5. Exercise “Guess and sit down.” (2min) Teacher
invites children to stand up for a physical education session called “Guess and sit down.” The teacher names migratory and wintering birds; if he names the name of a wintering bird, then you need to sit down; and if the name is migratory, then wave your hands. Crow, nightingale, woodpecker, magpie, dove, swallow, tit, rook, starling, bullfinch, stork, crane, sparrow, heron, etc.
Children
take their seats.
6. Educator
reports that the work continues and wings are made from the remaining two pieces of plasticine.
The swallow has graceful, pointed wings, shaped like a comma. To do this, you need to roll out small ovals and flatten them on one side. The point of the stack will help create the illusion of feathers, you just need to make longitudinal furrows. Then connect all the parts. First attach the head to the body, and then the wings. The swallows are ready. (6 min) 7. The teacher
says that their swallows are ready and invites them to answer: - What did you do today?
(they sculpted swallows). —What were the swallows made of? (from dough) - Please tell us how you sculpted the swallows? Children
remember the work done.
Educator
notes that they made very good and beautiful swallows. The Swallow really liked her new friends. And now they will live, play and enjoy the warm sun together (3 min).
Literature.
Kazakova T. G. Develop creativity in preschoolers. – M.: Education, 1985. – p.181.
In this article we will tell you how to make a beautiful bird from plasticine with your own hands. You will need modeling compound in different colors, a modeling surface, stacks and patience.
Owl - sculpt with your own hands
Let's make a realistic owl step by step. We form the body of the owl and attach the head. We smooth out the transition between the head and body well. Add light brown circles and yellow eyes with black pupils. We glue the beak and eyebrows. From small pieces of black, white and brown material we sculpt plumage for the bird. We decorate the owl's wings in a similar way. Attach the embossed tail and small paws.
Modeling a sparrow from plasticine
A fairly common bird in our area is the sparrow. Small, light, agile, jumping on two legs. Sparrows desperately fight with their fellows for food. This bird tolerates our winters quite easily; children often feed the birds with crumbs. In order not to watch the bird from the window, but to place it at home, you need to sculpt a plasticine sparrow.
For modeling we will need the following materials:
- colored plasticine;
- stack.
We need plasticine in the same color as in the picture:
1. Let's start with the head of our bird. Take brown plasticine, separate a piece with a stack and roll the ball in your palms.
2. The second stage is to roll a larger ball from plasticine of the same color as the head. Pull one side out a little. The result was the body along with the base of the tail of our sparrow.
3. We combine both parts and smooth the connection with our fingers for a smooth transition. We have the base of the little sparrow ready.
4. Roll a sausage out of brown plasticine and attach small pieces of black plasticine to the sausage. We draw stripes in a stack. We got a small tail.
5. The resulting tail must be attached to the body, smoothing out the joints.
6. From soft yellow plasticine we form three flat circles. The larger one will be the breast, the two smaller ones will be the cheeks. Let's stick them to the appropriate places according to the picture.
7. Let's make wings for the sparrow. Roll two brown ovals and narrow the ends. We make several black and yellow sausages and place them on the wing as shown in the picture. We draw stripes in a stack along the growth of the feathers, giving the wing a natural look.
8. Attach molded wings to the sides of the body. They turn out to be slightly convex.
9. Let’s add the sparrow’s eyes, to do this we make circles of white and black colors. The beak will be from a small orange triangle, and we will make the paws by connecting three brown sausages at the base for one paw, and three for the second.
10. The desired craft was a success, the plasticine sparrow is finished. The main thing is not to feed him bread by mistake. He's beautiful no matter what!
If you find an error, please select a piece of text and press Ctrl+Enter.
Olesya Selikhova
About the author: Psychologist, specialist in the field of family relationships and raising children. I love drawing, modeling, needlework and any interesting creativity. Mom raising two children and a wonderful wife!
birds
Share with friends:
We also recommend watching!
How to make a road from plasticine.
How to make a cone from plasticine.
How to make a sunflower from plasticine.
How to make a rhinoceros from plasticine.
How to make a kangaroo from plasticine.
How to make a sleigh from plasticine.
How to make a deer from plasticine
How to make a winter from plasticine
How to make a hippopotamus from plasticine.
How to make a Hulk from plasticine.
How to make a cat from plasticine
How to make a tiger from plasticine.
DIY sparrow step by step
Connect a large and a small ball. Smooth out the transition and form a long tail. Let's make a light yellow spot on the bird's belly and eyes. We attach yellow and black stripes to the brown wings. We create a relief using a stack. We attach the eyes, beak, paws and wings to the sparrow. The craft for the older group is ready.
Bullfinch - making winter birds with your own hands
First of all, it is necessary to sculpt the body, which smoothly flows into the head. Next, add a yellow spot to the bird's breasts. We make white spots under the eyes and insert beads. We attach a green layer of plasticine to the back. Attach the blue-gray wings. Add a gray tail and paws.
Parrot - step-by-step modeling scheme for the older group
Making such a beautiful bird is not as difficult as it seems. First we will form the body. We attach white spots in the eye area and a crocheted beak. For the tail we will alternate blue and red plasticine. We create a relief using a stack. We'll make the wings in a similar way, but use red, yellow, green and blue. Add claws.
The simplest bird made of plasticine
If you sculpt with a child or have never touched plasticine in your hands, then it is better to start with simple models:
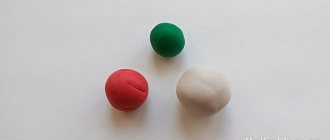
- Take modeling clay in blue, yellow and white. First, form two balls from the blue mixture. Make a head from one, and form a torso from the other.
- Stick the head to the body.
- Caulk the seams.
- Then roll one small ball and two large ones from the yellow mass.
- Form an elongated beak from a small ball, and teardrop-shaped wings from large ones.
- Also roll two small balls from a white piece of plasticine. Flatten them and make eyes by sticking them to the head.
- Form pupils from the blue or black mass.
- Attach the beak to the head and wings to the body of the bird.
Ready! Now you know how to make a bird from plasticine.
Peacock step by step for children - how to make an exotic bird
We form a body with a long neck. Add the head and eyes. Attach a small orange beak. From black flagella and blue balls we will make a crest for a peacock. The most interesting moment has come - creating the bird's tail. We sculpt six oblong feathers of light green color, and 3 dark green ones. For each feather we add three ovals of different colors. We press out the veins on the feathers. At the base of the tail we stick small balls and the tail itself. We press the balls with a match. All that remains is to install the peacock in the nest, or on a green ball with flowers. Ready!
Helpers from the Internet
Before you start sculpting a bird, you need to talk about it and be sure to show illustrations so that the children have a sample before their eyes. Just for this purpose you can use a set of educational cards “Birds”, which can be purchased in the online store “OZON.RU”. 20 large colorful pictures will help children expand their vocabulary, learn the names of birds, and develop photographic memory.
What else is needed to sculpt birds? It is clear that the material. In kindergarten we usually sculpt from plasticine, but it happens that we use other materials. An excellent choice on the same “Ozone”: plasticine of different colors and different manufacturers, modeling mass, dough, kinetic sand and the necessary accessories you can choose without getting up from your chair, as they say. All materials are certified, tested, and recommended for use in preschool, school and home settings.
Let's move on to books. “UchMag” offers a teaching method “Modeling in kindergarten with children aged 5-7 years”, which will help educators draw up a summary of a lesson on modeling, and active parents - in solving the problem of what to do with a child on a day off or during the holidays. In principle, additional cards with illustrations are not needed; the manual contains beautiful pictures.
The online store “Kniga.ru” presents two manuals on our topic: and. I like both books, I think they are worth purchasing for a teacher’s library to add something new to their methodology for planning developmental activities with preschoolers. The first manual is interesting because it shows how you can synthesize several types of arts (folk toys, small sculpture, drawing, music, artistic expression) in modeling classes.
Good notes, I recommend them.
And the second manual is more universal and is devoted not only to modeling, but also to appliqué and drawing. All classes are meaningful and interconnected; this is a whole system for the aesthetic development of preschoolers.
Crow – modeling with step-by-step MK
We attach the head to the oval and smooth out the transition. We sculpt wings from two pieces of plasticine and cut through the feathers. We attach them to the back of the bird and add a tail. We sculpt a large beak, black paws with claws and eyes.
Summary of a modeling lesson in the senior group Topic: “Birds at the feeder”
Summary of a modeling lesson in the senior group
Topic: " Birds at the feeder "
Goal: to teach children to convey the image of a bird
by using a variety of
sculpting
.
Program content: Educational:
- Learn to sculpt a bird in parts;
convey the shape and relative size of the body, head, the difference in size of birds of different breeds; correct position of the head, wings, tail. Developmental:
- Develop the ability to evaluate the results of sculpting, enjoy the created image;
— To develop children’s perception, the ability to identify various properties of birds (shape, size, location of body parts); compare birds. Educators
- instill respect and care for
birds
.
Material for the lesson
:
Images of birds in small sculptures, in decorative and applied arts, in illustrations. Clay (plasticine), modeling board, stack (for each child).
Progress: 1 part.
Organizing time:
- Children, sit up straight, back straight, legs together.
-Today a letter arrived in the group
, let's open. And here is a mystery.
She comes with affection
And with my fairy tale
Wave a magic wand
The snowdrop will bloom in the forest. (Spring)
- Why do you think there is a riddle about spring?
Educator: What kind of birds
stayed with us for the winter?
Children: Titmouse, bullfinch, sparrow, magpie, pigeons.
Before us are pictures of birds
, from them it is necessary to select only wintering ones.
Children go out one by one and find a painting depicting a wintering bird
and put it on a magnetic board.
1. This bird has a yellow breast,
And her name is titmouse. This is a wintering bird
.
2. In winter there are apples on the branches, pick them quickly!
And suddenly the apples flew up, because they were bullfinches.
(bullfinches come to us from the north, they are also wintering birds )
.
3. Chick - tweet! Jump for a grain! Peck, don't be shy!
Who is this? Sparrow. (sparrow is a wintering bird )
4. Vereshchunya - white-sided,
And her name is magpie (wintering bird )
5. Look around, he’s been cooing here since the morning.
He called his friends.
This is a flock of pigeons. (pigeon is a wintering bird )
Educator: Wintering birds
, children, you know. Well done!
Educator: Look at the sparrow and let's remember its appearance. Guys, now let's remember the birds that fly to us in the spring. 1. In spring, a bird as black as a raven rushes towards us from the south. For our trees, a doctor - Eats different insects (Rook) 2. A strong, big bird Not even afraid of a cat!.. A very important person - Black-gray... (Crow) 3. This bird is a symbol of peace, The attics are her apartment, Where squares, fountains, constantly looking for crumbs! (Dove) 4. What should we call this bird, Which looks like a titmouse: Same move and size, Only color - brown-gray? (Sparrow) Educator: Guys, describe the sparrow, what is it like?
Cockatoo - how to make it with your own hands
We form a rounded body from two balls. We sculpt the nose and twist it down so that it looks like a hook. We put yellow feathers on the bird's head. We attach wings and a long tail. All that remains is to attach the yellow paws. Modeling such a parrot is suitable for children in grade 3, because it is not at all difficult to make.
Rooster - we sculpt poultry
Mix red and green plasticine and roll the ball. We attach a neck made of yellow-green mass to it. We sculpt a red comb and black eyes. Attach the beak. For the tail and wings, mix green and red in equal quantities. It is important not to overmix the colors because we want a non-uniform mass. We make the tail from short strands. We construct the legs from matches covered with plasticine mass. Attach the legs to the cockerel and you're done!
More complex model
If you are no longer a beginner in modeling, then you can try yourself in creating more complex crafts.
Prepare plasticine in black, orange, blue, red, yellow, orange, brown and green. Now let's start sculpting:
- First, form a body with a head from the black mass.
- Then form a beak and breast from the yellow mass.
- Attach the beak to the head.
- Please note that the breast should be thin. Carefully stick it to the body under the beak.
- Make the bird's eyes from blue and black plasticine.
- Make two thin short sausages from yellow and stick them above the eyes.
- Decorate the beak with blue, red, green and orange plasticine as shown in the photo in the article. And make thin black sausages from black plasticine and also stick them on the beak.
- To make the legs, roll six orange balls. Form a droplet from each, and then connect them together in threes. Got legs!
- Stick them to the body of the plasticine bird.
Titmouse - crafts for the older group
We connect a small head and a large body. We add a yellow layer to the bird’s breast, and a green layer to the back. The wings at the base will be blue, and then black and white. We designate the feathers as a stack. We sculpt a blue tail and attach it along with the wings. We sculpt the beak, eyes and paws.
Abstract of GCD in the preparatory group on the topic “Migratory Birds” (modeling)
ABSTRACT
NODE ON ARTISTIC AND AESTHETIC DEVELOPMENT (STYLE)
ON THE TOPIC "MIGRATORY BIRDS"
Program content:
1. Expand and consolidate children’s ideas about migratory birds: cuckoo, nightingale, swallow, rook, starling;
about the body parts of birds. 2. Learn to sculpt a bird from plasticine using a plastic method, pulling out parts from a whole piece and in a constructive way, observing the location and relationship of body parts, connecting the parts, pressing them together. 3. Continue learning how to use the stack. 4. Develop the ability to work with your hands, fine motor skills of the fingers, eye, attention, memory, creative thinking. 5. Instill in children a kind attitude towards migratory birds and all living things in nature. Demonstration material:
illustrations of migratory birds, a swallow made of plasticine.
Handouts:
plasticine, stacks, modeling boards, rags, twigs.
Preliminary work:
bird watching while walking; conversation about migratory birds, reading stories about birds.
Progress of the lesson.
1. The teacher
invites the children to guess riddles: (5 min) 1. Who, without notes and without a pipe, is the best at trilling, more vocal, more tender? Who is this? ... (Nightingale)
2. She sits on a branch in the forest, She repeats one “peek-a-boo”, She counts the years for all of us, She loses her chicks. “Peek-a-boo” here and there, What is this bird’s name? (cuckoo)
3. Faithful guardian and friend of the fields, The first messenger of warm days. Blackens all migratory birds, cleans the arable land of worms. (rook)
4. On a pole is a cheerful house with a small round window. For the children to fall asleep, the house is rocked by the wind. The father is singing on the porch - He is both a pilot and a singer. (starling)
5. Flies to us with warmth, Having traveled a long way. Sculpts a house under the window from grass and clay. (martin)
Children
solve riddles.
Educator
exhibits illustrations depicting guessed birds.
The teacher
asks the children questions:
- What are the names of the birds that you guessed in the riddle? — Why are these birds called migratory? - Name all the migratory birds again?
Children
answer questions.
2. The teacher
makes a generalization and reports that the swallow sent a letter.
(2 min) (teacher shows the envelope).
Educator
offers to open the envelope, read and find out what the swallow writes.
(the teacher reads the letter).
| Hello guys! I hasten to write you a letter! I and my swallow friends were flying from a warm region. I was distracted from the flight, I wanted to see what nature looks like from a bird’s eye view, how I fell behind my friends. And now I’m alone and I don’t know what to do. Please help me find my friends! |
Educator
says that the swallow itself has arrived! It is not simple, but magical. The teacher offers to mold her swallow friends from plasticine so that she will not be bored and lonely, but first she suggests doing finger gymnastics.
3. Finger gymnastics (bend the fingers of both hands) (2 min) Sing, sing along, This bird is a crake, Ten birds are a flock, This bird is a starling, This bird is a sparrow, A gray feather. This bird is an owl, This one is a finch, A sleepy little head. This one is a swift, This bird is a waxwing, This one is a cheerful siskin. Well, this one is an angry eagle, Birds, birds, go home (hands behind your back).
4. Educator
invites the children to first look at the swallow.
(10 min) - What parts does a swallow consist of? (head, beak, eyes, body, wings, tail, paws). - What kind of tail does a swallow have? (forked). -What kind of wings does a swallow have? (wide). Children
look at the illustration of a swallow and note its structure and features.
Educator
informs the children that they are now starting to sculpt a swallow. From a piece of plasticine you need to separate a large one (for the body and tail) and 3 small pieces for the head and wings. From a small piece we roll a ball (the head, the beak should be pulled out with two fingers and made sharp, the eyes will be drawn in a stack. From a large piece we will roll an oval (the body, the tail should be pulled out with two fingers and the tail should be divided into two parts with a stack. This way we get a forked tail. U swallows have a white breast, for this, using a white cake, you need to make a white breast.
5. Exercise “Guess and sit down.” (2min) Teacher
invites children to stand up for a physical education session called “Guess and sit down.” The teacher names migratory and wintering birds; if he names the name of a wintering bird, then you need to sit down; and if the name is migratory, then wave your hands. Crow, nightingale, woodpecker, magpie, dove, swallow, tit, rook, starling, bullfinch, stork, crane, sparrow, heron, etc.
Children
take their seats.
6. Educator
reports that the work continues and wings are made from the remaining two pieces of plasticine.
The swallow has graceful, pointed wings, shaped like a comma. To do this, you need to roll out small ovals and flatten them on one side. The point of the stack will help create the illusion of feathers, you just need to make longitudinal furrows. Then connect all the parts. First attach the head to the body, and then the wings. The swallows are ready. (6 min) 7. The teacher
says that their swallows are ready and invites them to answer: - What did you do today?
(they sculpted swallows). —What were the swallows made of? (from dough) - Please tell us how you sculpted the swallows? Children
remember the work done.
Educator
notes that they made very good and beautiful swallows. The Swallow really liked her new friends. And now they will live, play and enjoy the warm sun together (3 min).
Literature.
Kazakova T. G. Develop creativity in preschoolers. – M.: Education, 1985. – p.181.
Swallow - modeling in the middle group with step-by-step instructions
Take a small ball for the swallow's head and attach it to a larger ball. Smooth out the neck well. We attach a white layer of plastic mass to the bird’s belly. We sculpt elongated wings and show the feathers in a stack. The tail will be slightly longer than the wings. Cut it in half almost to the base. Attach the wings and tail to the bird's body. We make pink paws, a yellow beak and white eyes. The migratory bird is ready.
Sculpting a woodpecker in stages
The next master class will be on sculpting a woodpecker from plasticine. Remember that the color of these birds is black and white with variegated splashes of red or yellow. Therefore, prepare the appropriate colors of regular plasticine or air plasticine.
Step 1 . As in the previous case, the main block of plasticine will be black. But in this case you need to add white fragments to the plumage. You will also need a small piece of red and brown or orange for the beak and crest.
Step 2 . Divide the black block to form the body, wings, head and tail.
Step 3 . Roll the largest piece in your hands, smooth it out, and turn it into a body.
Step 4 . Attach a small black ball to one side of it. For security, secure a toothpick inside. Glue 2 white cakes on the sides of the small head ball. Glue the chest on the front of the body.
Step 5 . Using additional pieces of black plasticine, fashion wings. Their shape has already been examined using the example of sculpting a crow. Glue the same long tail.
Step 6 . Glue thin white stripes across the wings. Do this on the first and second wing. Also attach a small red plasticine sausage to your head in the form of a tuft. On the reverse side, lift up a kind of comb; the woodpecker should have it.
Step 7 . Attach a long beak in front - a powerful weapon of a woodpecker, with which he heals trees, breaks through wood, and gets worms. Glue 2 small black balls, like eyes, onto white cakes on the head.
Step 8 . Glue the legs in the same shape as in the case of sculpting the crow. Only the paws themselves can be made from orange plasticine.
Step 9 . The bright woodpecker craft is ready.
We looked at a creative lesson in sculpting birds using the example of two individuals familiar to the smallest children of kindergarten age (preschoolers) and older children who have already started school.
Flamingos - we sculpt exotic birds in the senior group
Let's sculpt a graceful flamingo step by step. Take the wire and cover it with a thin layer of pink plasticine. Attach a round head to the tip and bend the neck in a wave. We roll an oval for the body and insert the neck into it. From three pieces we sculpt two wings and a tail. We use a stack to represent feathers. Let's make legs from wire and gray plasticine. We insert them into the body of the bird. We glue on the eyes and pink beak.
Similarly, you can make a swan, woodpecker, starling, heron or even a firebird. There are also Kargopol, Dymkovo, Kalinin birds or whistles, which can also be sculpted from plasticine. Crafts on this topic are suitable for children in the preparatory group or schoolchildren.
How to make a crow step by step
To sculpt a bird you need to prepare:
- plasticine set;
- stack.
Step 1 . Prepare a black block of plasticine. You need 1 or more pieces, depending on the size of the craft you plan to make.
Step 2 . Sculpt the body of the bird. Make an elongated part - a pear. If there is not enough plasticine, then inside mask any other shade, damaged plasticine, or a rolled up piece of foil.
Step 3 . Glue a small black ball at the wide part of the pear and smear the plasticine at the joint. Connect the head and torso. The skeleton of the crow will be ready.
Step 4 . Move on to the flat parts: the tail and two wings. Make models of triangles and drops, also leave a little black plasticine for the crow's beak, because it is also black.
Step 5 . Glue 2 wing drops on the sides of the body, and begin to bring out small hangnails in a stack, thereby imitating feathers. If the plasticine is dense, then at this stage you can use small scissors; they can simply cut out such small corners, completely filling the surface of the wings.
Step 6 . Perform identical operations on both wings. After you do this, do not touch the top with your fingers so as not to press down the selected corners (feathers). Attach a tail that flares to the bottom at the back.
Step 7 . All that remains is to design the head. Turn the last small piece of plasticine into a beak. This will be a small cone, glue it in front and carefully bend it down. Glue 2 gray circles as eyes with pupils. Only these lighter spots will stand out against the otherwise dark background.
Step 8 . The bird should also have legs; make these parts from black and gray pieces. Glue small cones in wide parts to the body, and on the bottom - legs.
The crow figurine is ready.
If desired, you can carefully mix blue into black plasticine to make the plumage believable, with a beautiful tint. Everything is simple and clear.