07.08.2019
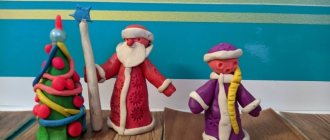
Modeling from plasticine step by step is the best educational technique for preschool children (from 2-3 to 7 years old)! Children love modeling with clay because they can create anything!
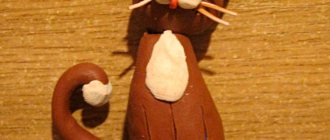
Most of all, children love to sculpt: animals, people, cars, cities. Nowadays it is very popular to sculpt Smeshariki, unicorns, cats, hedgehogs and dragons. Sculpting is very useful. Step-by-step modeling develops creative thinking, imagination, fine motor skills, speech, and logical thinking several times faster.
Children from 3 to 7 years old are especially passionate about modeling. Therefore, we have selected interesting craft ideas that are very popular among children. Stock up on plasticine of different colors to make it even more interesting for your child!
How to make a caterpillar and a bee step by step
How to make a ladybug
Snail step by step for children (spiral modeling)
How to make a teddy bear
An interesting idea for sculpting: a bird in a nest
We sculpt flowers and compositions step by step
How to make a car from plasticine
Bicycle step by step
Modeling should be interesting for a child. Therefore, choose the most interesting ideas for modeling. Let the child choose what he will sculpt. When the baby is engaged, discomfort, excitement and anxiety go away. When a child creates a favorite cartoon animal, be it a bunny or a kitten, a giraffe or a unicorn, he feels good and proud of his achievements. Therefore, mommies, do not forget to praise your baby for any achievement!
Choosing plasticine
When purchasing plasticine, you need to carefully read the instructions from the manufacturer and make sure that it is appropriate for the child’s age and suitable for modeling purposes.
Classic hard plasticine is a durable material, crafts made from which are durable, but this property can also be a disadvantage, since very young children may not be able to handle it.
Light plasticine is a soft, bright material with natural dyes, easy to clean, suitable for children of any age;
The modeling compound is a very practical and easy-to-use material, it doesn’t stick, it retains its plasticity for 12 hours; the downside is the high price.
Ball plasticine is an excellent material for small children’s hands; it is often used for additional decoration of ready-made figures; it is fragile, but due to its characteristics, the child must be under the constant supervision of adults while sculpting.
Floating plasticine will give children a lot of pleasure, as it is soft, does not stain hands and clothes, and figures made from it float on the water.
Modeling paste - resembles clay, ideal for creating solid figures, since parts made from paste do not stick to each other, suitable for painting.
Thus, for playing with children, it is better to take light plasticine in bright colors, as well as hard material to create more durable and long-lasting crafts. You should not choose sets with strong flavors and artificial colors - they can cause allergies.
Mental and personal development while sculpting
When doing sculpting step by step, do it in a fun and playful way. Create a story for the beast you create, and then act it out. Use ideas from fairy tales and cartoons, and act out stories from everyday life.
What do you need for a modeling lesson?
You need high-quality plasticine. For kids, choose very soft plasticine. If it is difficult for the baby to sculpt awkwardly, then his interest in such an activity will quickly pass.
Tools for modeling from plasticine:
- modeling board;
- stacks;
- rolling pins, including those with patterns;
- molds for modeling.
How to teach children to sculpt?
Many parents think that children will begin to sculpt and develop on their own. This is wrong. You will need to be shown how to do it, go through basic lessons. In the future, the child will come up with his own characters, but initially show him how to do it.
Learn how to sculpt basic shapes:
- ball;
- egg (ellipsoid);
- hemisphere;
- cake;
- sausage;
- cylinder;
- cone;
- brick;
- tourniquet;
- spiral.
After this, mold the figures step by step. Choose an interesting animal and make it together. Help the child, praise him!
Modeling in this age group usually takes no more than 20 minutes.
Cartoon characters
Peppa Pig is a popular pig from the children's cartoon and a good exercise for developing motor skills:
- Two balls are molded - pink and red.
- The pink ball is given the shape of a head with an elongated snout, and the red one should make a dress with a hem, the resulting parts are connected.
- Two thin arms, two thicker legs and a curled tail are sculpted from pink plasticine.
- Two pink ears are attached to the head, white eyes with black pupils, and the snout, cheeks and mouth are made of dark pink so that they stand out.
Making your own favorite cartoon character with so many small details is a real achievement and creative success for a child.
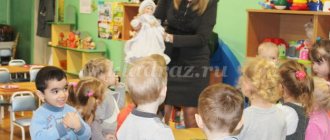
Progress of the lesson
Give the children a riddle:
I didn’t tremble before the wolf, I ran away from the bear, But I still got caught in the teeth of the fox... (Kolobok)
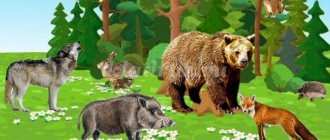
Ask the children: “If Kolobok found himself in a winter forest, what animals would he meet there?” (A white hare, a hungry wolf, a bear sleeping in a den, a cunning fox.)
Group children into groups of 6. Tell them that today in class they will make a winter forest through which Kolobok will travel. The box lid will turn into a forest using tree branches attached to plasticine. On blue cardboard you need to draw several snow-covered fir trees and trees, the sun, using white gouache using the dry brush method. Glue the cardboard perpendicularly to the back side of the box to create a forest panorama. Attach a den (a semi-oval jar, for example, from yogurt) to plasticine. Place cotton wool in the form of snow at the bottom of the box and on tree branches.
While two children are decorating the forest, the rest of the children can sculpt one animal each - an inhabitant of the forest: a body from a roller; paws and tail from columns, pull out a muzzle from a rolled ball and, where necessary, blunt it with your fingers; pinch your ears. The one who completes this task faster will have time to fashion a Kolobok (plasticine ball). All that remains is to place the heroes in the winter forest and hide the sleeping bear in a den.
Birds
Sculpting birds is quite difficult, but you can try to make a white swan:
- A body with an elongated tail is sculpted from an oval.
- Attached to the sides are two flat, smaller ovals, pointed at one end - wings.
- The long piece is used to make a curved neck and a larger head.
- Eyes are made on the head, the beak is made from a small piece of red color.
If you take black plasticine, you will get a swan of a rare shade.
Progress of the lesson
Read the poem “Turtle” by R. Desnos to the children:
I am a turtle, Therefore it is clear that I am both smart and beautiful.
And the fact that like a swallow, I am not winged, So it’s not me, But fate is to blame.
But being dissatisfied with your destiny does not mean being dissatisfied with yourself.
Ask the guys: “Who is this poem about? (About the turtle.) What does the turtle think about itself?” (That she is smart and beautiful.)
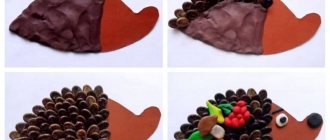
Invite the children to make a chestnut turtle. Explain the sequence of work: the nut is coated with plasticine on all sides. Then a pistachio shell is fixed on top of it, forming a turtle shell. The head with neck, legs and tail are created from separate parts of plasticine and attached to the lower part of the turtle's body. All that remains is to design the face.
Lesson 20. Turtle (Modeling from plasticine in combination with natural material)
Program content. Continue to teach children to combine natural materials (chestnuts, pistachio shells) with plasticine in crafts. Learn to apply plasticine to a round object. Learn how to independently bring a product to the intended image; give the image expressiveness (the turtle crawls, eats, looks, etc.). Strengthen the ability to understand and analyze the content of a poem.
Material. Chestnut fruits, pistachio shells, plasticine, stacks, cardboard stands, boards (for each child).