From an early age, children begin to draw and pick up pencils. It is known that visual activities develop a child’s brain and fine motor skills well. This article tells you how to teach drawing simple flowers with petals in a vase to older children.
A fine arts lesson in kindergarten “Drawing a vase with flowers in the preparatory group” can be timed to coincide with the holiday of March 8, Mother’s Day or Teacher’s Day.
Pictures with flowers
GCD tasks
Goal: developing skills in depicting flowers on paper, teaching the basics of composition.
Tasks.
- Educational: learn to correctly place and depict flowers on paper, build a composition.
- Educational: to cultivate love for loved ones, accuracy in work, patience and perseverance.
- Developmental: develop imagination, imaginative thinking, develop a sense of beauty, train fine motor skills.
Equipment and materials: landscape sheet, simple pencil, eraser, brushes, paints (watercolors are recommended, but gouache can also be used), a jar for water, napkins. Images of large flowers (gerbera, chamomile, poppy, peony, cosmos, zinnia).
Handouts: album sheets, vase templates cut out of cardboard.
Audio recording: A. Vivaldi “Spring”.
What to prepare for drawing?
Before creating a drawing, you need to prepare the following materials and tools:
- Set of pencils. Don't limit your work to one or two pencils. Only working with several at once, different in hardness, will provide a good drawing that will be as believable as possible.
- Colored ones are also used - they must be of high quality with a soft lead of intense pigmentation. Watercolor colored pencils are available for sale. They draw as standard, and then use a brush dipped in water to smear the image, achieving a watercolor effect.
- Soft and dense eraser.
- Ruler – needed to mark the drawing. Professionals will be able to divide evenly, but beginners will not succeed right away. It is advisable to use a tool.
- Watercolor or gouache to create a color image.
- Brushes of different thicknesses.
- And be sure to use high-quality paper. If you are planning professional training, then you need to buy special sketch paper for pencil drawings, and appropriate sheets for working with paints. Only they will allow you to distribute the paint correctly, and it will not blur.
Introductory conversation. Discussion of the topic
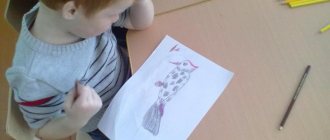
The teacher conducts a conversation with the children. Asks questions about what time of year it is? What holiday will be soon? Children remember that on this day it is customary to give gifts to all women in our country; they will love the flower painting they made with their own hands. The children's drawing can include tulips in a vase, roses, or other simple options for depiction in the preparatory group.
Important! The teacher invites the children to draw beautiful spring flowers for all the mothers and arrange an exhibition of drawings so that adults can look at the wonderful drawings.
First you need to look at the plants; children cannot draw them from life, so the teacher shows pictures with close-up photographs of flowers. You need to pay attention to the shape, it looks like a circle that consists of petals, ask the children what parts any flower consists of, in the middle they have a center in the form of a circle, specify the color, green leaves are attached to the stem. There are many beautiful plants around, but flowers are the most festive and brightest of them all; they will help create a joyful mood.
Important! If children draw tulips in a vase in the preparatory group or roses, then you need to select pictures with them, consider what shape the tulip has.
Drawing lessons in the senior group on the topic “Indoor plants”
Vase on the table with fruit
By starting to learn how to draw a vase correctly with pencil sketches and drawings, you can create a colorful, picturesque still life from this dish filled with colorful fruits.
Such a picture can be created without paints, using only regular or pastel colored pencils. For work you may need:
- simple pencils of different hardnesses for sketches;
- eraser for erasing;
- colored pencils, a set of crayons, pastels, felt-tip pens, optional;
- hairspray fixing the pastel in the drawing.
To start composing a still life, you need to draw two lines - horizontal and vertical - to find the location of the vase with fruit on the plane of the table. The front edge of the table is indicated by another horizontal line located below the first.
At the intersection of the upper horizontal and vertical is the location of the bottom of the vase. Its height is noted on the vertical, and then the proportional dimensions of the bottom and the maximum oval points of the sidewalls are found, which are located symmetrically with respect to the center line.
If the vase stands on a leg, then you should immediately determine the ratio of its height to the total height of the object on the sheet of paper. All extreme points of the convexities are connected by a smooth line according to the shape of nature.
After the sketch of the vase is ready, you can use general circles to distribute the position of individual fruits in it, outlining a banana with an oblong shape, and a bunch of grapes with arbitrary outlines of volume, which is then detailed down to each berry.
Apples, peaches and plums are easier to draw than pineapple or grapes, but each of these fruits has unique contours and sizes that you must try to depict as realistically as possible.
For a picturesque still life, you can place one of the fruits on the table, next to a vase, or draw a couple of fallen grapes. You should start coloring the picture with light colors, carefully and without pressure, choosing colors for each fruit. Shadows can be depicted with brown and purple colors.
In order to better learn how to draw beautiful and unusual objects that are not at hand, you can use pictures of a vase for sketching. This will help you better understand how shadows are placed or how patterns are drawn on the voluminous, round sides of an object.
Practical part of the lesson
Stage 1. Pencil sketch
Children take a landscape sheet and place it vertically in front of them. Select a vase template, prepared in advance, and trace it with a simple pencil. The teacher shows in advance on the sheet where the template needs to be attached; before the child traces it, you need to make sure that the template is correctly positioned on the sheet.
Important! The teacher draws the children's attention to the fact that the template needs to be placed at the bottom of the sheet in the middle, so that there is plenty of space left at the top.
Using a simple pencil, mark the center of the flowers at the top and draw three small circles; you may need the help of an adult to mark the circles on the sheet. If your child fails to draw it correctly, you can erase it with an eraser and draw it again.
With the help of the teacher, children draw lines from the circles to the vase with a simple pencil; these will be flower stems; the line can be curved. The vase will be opaque, so the stems are drawn only to the top edge of the vessel.
Note! Children should be told not to put too much pressure on the pencil, draw the lines lightly, barely touching, otherwise the sheet of paper can be damaged and the pencil will be visible through the layer of paint.
Stage 1. Pencil sketch
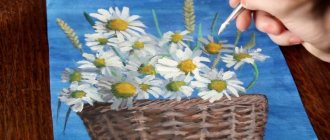
Stage 2. Picture of flowers
Children take brushes. Both watercolors and gouache are suitable for this type of work; you should definitely repeat the rules of working with brushes with your children.
The teacher helps the children choose a bright color that mothers will be pleased to see; it can be orange, yellow, blue, red. The teacher selects orange and shows on a sample how to draw petals. You need to dip the brush in a jar of water, wet it slightly, and dip the tip in the chosen paint.
Important! Children need to be reminded that there is no need to wet the brush too much in water; excess water should be wiped off on the edge of the jar. Do not shake the brush; you must carefully apply the liquid with the tip of the bristles.
The teacher shows how to find the center of a flower, draw a loop around it, then paint it orange. Draw another loop nearby and also paint over it until they finish drawing all the petals around the center. The circle in the center is not painted over, left white. For the remaining gerberas, you can take a different color and draw the same petals around the center.
Thematic planning in the preparatory group on the theme “Spring”
Now you need to paint over the middle, to do this you need to dip your brush in blue pigment and paint over all the flower cores.
Wash the brush again in water, pick up a grassy green color, draw it along the line outlined earlier, this is how you get a stem.
Note. The teacher reminds that you need to add plant leaves, ordinary semicircular leaves, to the stem.
Stems without leaves look unsightly and the flowers appear lonely. For each line you need to draw a leaf or two on the side. The teacher helps to draw an arc with a brush with green paint from above and below, and paint over the resulting leaf; you need to draw a line in the middle of the sheet. So we depict one leaf on each stem, or you can make several leaves. You need to look carefully at the stems, if there is empty space left, then you need to draw a leaf there to make the bouquet for mom seem more magnificent.
Stage 2. Flower image
Stage 3. Coloring a vase
The teacher reminds you that you need to paint the vase. To finish the drawing, you need to put yellow color on the brush, do not wet the sheet of paper too much. It is important to paint the pot without going beyond the contour line to make it look neat. When the moisture dries, you can decorate the vase with a pattern of your choice. Children take paint of a different color and draw a pattern of lines, dots and circles.
Note. For children who quickly completed the task, you can offer to decorate their vase with a pattern of peas, lines, dots, and sticks. To do this, the teacher needs to draw possible variants of the patterns in advance in order to clearly show the children what such an ornament might look like.
During the lesson, the music of A. Vivaldi “Spring” is played.
As the task progresses, the teacher monitors the correct observance of all stages of the work and provides assistance in the form of recommendations and brush movements. Ensures accuracy in work and correct application of paint, helps children if the paint has spread.
Stage 3. Finished drawing
Drawing a vase for beginners
At first glance, it seems that you can draw a vase very quickly and easily, but in the process of work, novice artists learn to correctly convey volume and symmetrical shape on paper, and also become familiar with the basic rules of perspective.
The rounded shapes of the accessory help to understand the patterns of distribution of light and shadow, and the acquired skill will be useful not only in drawing still lifes, but also in the transition to more complex forms of compositions.
The procedure for working on a drawing
Each image begins with a layout of the sheet, which is called a layout. To do this, an object elongated in height must be located along the main vertical line from which work on the drawing begins. Then horizontal lines are drawn to indicate the bottom and top of the vase.
Additional horizontal markings separate the complex shapes of the flower container into component parts, such as a round bottom and a narrowed neck.
At the same time, the novice artist learns to determine by eye the proportions and relationships of all the component forms of the vase, so that it turns out in the drawing as close as possible to the original.
When drawing auxiliary lines, you should use a hard pencil, which should not be pressed too hard, and can then be easily erased with an eraser.
When the main points of dimensions have been found on the preliminary marking, you can connect them with smooth lines that create the outline of the object. Elements of perspective are used to create ovals of the bottom and neck of the vase in relation to the plane of the table.
Simple drawing of a child
If children set themselves the task of drawing a decorative vase, then effort and involvement in creativity are important, even if the result is not too successful and similar to the original.
Complex proportions of an object are good for training skills and the first time the accessory may not turn out to be symmetrical enough, but the main thing is that the design is colorful and unique. To work on drawing from life you will need the following items:
- Simple pencils of varying degrees of softness and hardness - for sketches and final drawing.
- A ruler for constructing the shape of an object.
- An eraser for erasing extra lines.
- Colored pencils, markers or paints.
- A black marker can be useful for drawing an expressive outline after coloring the drawing.
Using a ruler, you can draw all the vertical and horizontal lines, which are then connected at the main points. Centimeter markings on a ruler will help to build a symmetrical basis for subsequent connection of the main points of the object’s figure with smooth lines.
The top of the neck and bottom of the vase must be circled with ovals in order to show the volume and fit it into the rest of the setting, which is shown as part of the table, wall, curtain drapery and other objects that create the surroundings in the paintings.
If the vase has decorative designs and ornaments, then you can also mark them with a simple pencil using a ruler, and then start painting.
After the outline is outlined, you can erase the extra construction lines and outline the main locations of the shadows - they will be painted over or shaded with a darker shade.
It is also important to immediately decide on the lightest spot on the side of the vase in order to leave a highlight. With the help of shadows and highlights, objects in drawings acquire greater realism, beauty and volume.
How to draw a hibiscus flower with a pencil, master class step by step for beginners with photos
Hibiscus is one of the most beautiful flowers that is not at all difficult to draw with a pencil. It is a symbol of happiness and peace, and therefore makes a great decoration for a greeting card, poster or holiday design. Learn more about how to draw a hibiscus flower with a pencil in a step-by-step master class with photos for beginners.
Instructions on how to draw a hibiscus flower step by step with a pencil for beginners
- The circle marks the basis for the bud of our flower. We also make a sketch for the trunk and stamen, as shown in the photo below.
- Now inside the large circle we make a light sketch of a smaller circle. Then we draw 5 petals with wavy edges. We erase the inner circle with an eraser and draw the stamen in more detail.
- Let's move on to drawing the leaves. We also sketch a small bud just below the main flower.
- At the next stage, we draw the stem and leaves in more detail. Hibiscus leaves are shaped like an oblong triangle with jagged edges. The leaves also have pronounced veins.
- Now, using colored pencils, we draw all the details of the flower. Using green color we decorate the stem, leaves and small bud. And with a light lilac pencil we draw the details of the large bud.
- Let's move on to coloring: first we decorate the bud with a light lilac color, and draw the stamen with a yellow pencil.
- Then paint the bud dark pink over the lilac, which will allow you to get a shade closer to the natural shade of the flower. Using dark blue we add depth to the bud.
- All that remains is to color the stem and leaves of the flower with a light green pencil and our hibiscus is ready!
Art for sketchbook (ld)
Drawing flowers in sketch style is a popular trend that expands the capabilities of a beginning artist. These can be not only classic bouquets, but also small sketches - simple, but no less charming!
roll-min
v880_riso2-min
il_794xN.1635106814_pswm-min
dff358040663865a801426b78376a4aa-min
d9ab769db79c4f5e372a699ac1c88771—hipster-drawings-colorful-drawings-min
d6cda79f4488337b296b7be6be01b535-min
a3d75a7b58e49d39cd48e7bc3e0dc4d9-min
902d7c8b334f282db9c82d42dde179f9-min
40da450819583e65d81ef5ced33ac754-min
12-min
8dae3be94ceac63f6740121fc0cbe155-min
3a9141b1e00de6b0222fde5f302f9f0b-min
0fbc569a18ca5759b7978ad2105f32d5-min
Progress:
First you need to outline the vase and flower buds.
First we paint the background from light to dark shades.
Using a medium brush, apply masks in the shape of leaves from light green to dark.
We draw the flower buds and the vase.
Add highlights and shadows to give the drawing volume.
It is better to issue the finished drawing in a white or gray passport.
Notes on the application for senior preschool age “Flowers in a Vase” Topic: “Flowers in a Vase.” Goal: to consolidate the ability to create a simple three-dimensional composition. Objectives: - develop aesthetic perception.
Master class on drawing for children and parents “Bear cub and winter” (drawing on fabric with putty and gouache) Master class on drawing for children and parents “Bear cub and winter” Conducted by: teacher Samtsova I. A. Topic: Drawing on fabric with help.
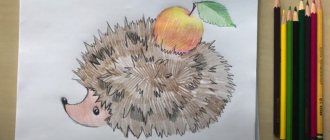
Drawing in the middle group with gouache using the poking method “The hedgehog has pricking needles” 1. Purpose: To introduce the child to the unconventional technique of poking drawing. “Poke” method (painting with a hard semi-dry brush)
Very important,
Drawing in the middle group with gouache using the poking method “The hedgehog has pricking needles” Drawing in the middle group using gouache using the poking method “The hedgehog has pricking needles” Rusinova Albina Veniaminovna Purpose: To expand and deepen children’s ideas.
Finished still life
The completed still life should work on two levels:
- As a realistic representation of a group of objects and as a dynamic composition of visual elements,
- Harmonizing and contrasting using line, shape and tone.
You shouldn't make mistakes. To learn how to draw well, you must learn to draw straight lines and round circles. I read it in my head and read it in an educational article. My lines are still crooked and my circles are not round. Well, it's a matter of time.
Learning without a plan and purpose is quite stupid and unproductive. Not everyone can draw portraits; it is quite difficult because there are a lot of details. But it’s worth trying to draw a still life.
Even if you haven’t discovered a talent for drawing until now, you should try it.
For a beginner in adulthood, the question “How to learn to draw?” It turns into the question “how to learn to redraw?” And then - “what should I redraw?” You need a step-by-step description of all stages.
If you are going to study as an adult, know what you will draw, this is necessary so that you do not get hung up on choosing the right image.