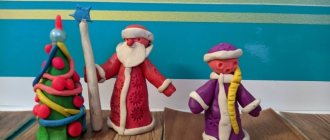
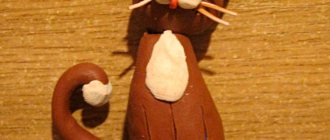
Plasticine cat
The step-by-step scheme consists of three stages:
- Warming of the selected layer and, as a result, softness and pliability of the material;
- Formation of parts;
- Final assembly.
Operating procedure:
- To make a graceful, beautiful cat or a rowdy, street cat, we tear off two larger round pieces from the total mass.
- This is the future head and body: smooth the muzzle as much as possible to the shape of a ball, but the base should be slightly rolled into a sausage.
- Not too much so that the slight roundness does not disappear. Tear off five more slices, but comparatively smaller in size compared to the previous elements.
- These are four legs, as well as a slightly arched tail. All that's left is just two ears, very tiny, in the form of small triangles.
- Now we connect everything, putting the parts in their places. As a result, a scorched cat standing on four legs.
- Using a plastic knife or toothpick, make slits like toes.
- Then we add a different color muzzle, eyes, nose and “apron”.
- That's it, the pet is no longer averse to having breakfast or dinner with dry food.
Plasticine caterpillar
There is nothing more fun and easier than making this cute insect. Soon he will have to take care of his temporary home so that after a few days he will mesmerizingly flutter away in the form of a butterfly.
- So, we make balls from plasticine, which we place tightly against each other.
- We arrange the craft so that it wriggles slightly.
- The length of the final work is discussed in person; if desired, it can be increased or made no more than 4-5 cm.
- The last part is comparatively larger than the others; it is the head of an insect.
- We close the eyes, roll out thin flagella and decorate the body with them.
- The caterpillar will become a butterfly, therefore, even in the first stages, its body is already decorated with spots and patterns.
A bee and a ladybug are identical.
- These are fat balls, which with a slight movement of the hand gave them an oval shape.
- In the first case, you will need to roll up one or two thin black strips and wrap them around the base of the craft, in the second, attach red wings to the black body and decorate with dark dots.
- Don't forget to make eyes so your pets can easily explore the house.
- A fun, easy activity; animals made from plasticine will not take much time, unlike the next master class.
Plasticine camel
An exotic two-humped beast that sedately strides through the desert. Its implementation will take a little longer than in all previous options.
- It's all about smoothing out the corners and "seams" between different parts. First of all, we sculpt the head, an elongated, slightly flattened neck and torso.
- We connect them together, using our fingers to smooth the joints of the elements.
- As it heats up, the plasticine will become even more pliable under your fingertips and soon the toy will look like one, single layer. Ready?
- Add two humps: for this you need to roll two balls, slightly press them on both sides and attach them to the body.
- Now it's up to the legs. Shape the joints, and bend the back ones slightly back. Camels, like horses, do not have perfectly straight limbs.
- Nature has taken care that staying on your feet for a long time does not cause discomfort.
- If desired, the animal can be made in motion.
- Don’t forget about your pet’s eyes, nostrils and mouth, otherwise how will he be happy with the child, his new home, or the smell of cactus on the window.
For children, animals made of plasticine are exciting fun and magic, when an unremarkable layer of material turns into a cute, graceful butterfly.
For adults, it’s an opportunity to spend an evening together by making tea, placing dessert in the center of the table, and continuing to laugh at the funny antics of the children. Isn't this happiness?
Preview:
Summary of direct educational activities on artistic and aesthetic development (sculpting)
in the preparatory group
on the theme “Child with a kitten.”
Educational field: artistic and aesthetic development (sculpting)
Integration of areas: physical development, speech development.
Children's age: 6-7 years
Teach children to depict a simple scene in modeling, to consolidate the ability to convey the proportions of a person and an animal. Strengthen the ability to use techniques: pinching, pulling, rolling, rolling, joining.
Developmental: develop techniques for creating proportions between humans and animals, a sense of composition, and imagination.
Preliminary work: Familiarizing children with animals (based on the works of V. Bianki, S. Marshak, E. Charushin, M. Chizhikov, etc.), their appearance, habits. Reading fairy tales, stories about animals, about their friendship with humans. Looking at illustrations.
Individual work: Continue to teach Egor and Raibek how to perform sculpting techniques correctly.
Motivation: let the children determine for themselves what we will sculpt (show illustration)
Source
Plasticine unicorn
The pattern of the unicorn, deer and giraffe is the same as in the case of the lion. The figurine is seated, so the parts are attached to the back, and the remaining parts are attached to the front, almost on the colored “collar”.
As an option, a unicorn can wear a decoration in the form of a motley mane, which is obtained by mixing several shades. Knead several pieces for five minutes, no more, otherwise you will get a dirty color instead of clear multi-colored stripes.
Making an elephant from plasticine
The only difference from previous products is that the base will require one oblong ball, to which smaller parts are attached.
- Long, elongated paws are not needed.
- On the contrary, they are round, slightly flattened, since the legs of an elephant are heavy, massive giants.
- It remains not to forget the ears, trunk, eyes and an almost invisible tail at the back.
To make it easier to sculpt animals from plasticine, prepare the material in advance by placing it on the battery.