Notes on non-traditional drawing "On a mushroom meadow" in the junior group
Lyudmila Pasikova
Notes on non-traditional drawing "On a mushroom meadow" in the junior group
Drawing foam rubber printing using a stencil
"In the mushroom meadow "
Program content: Teach children to depict mushrooms using a stencil using the “printing”
foam stick.
Practice drawing vertical short straight lines with your finger from top to bottom to depict grass. Develop a sense of color and rhythm. Cultivate curiosity and interest in drawing .
Materials, tools, equipment: illustration depicting mushrooms , stencils of mushrooms , sample teacher, foam sticks, sheets of A-4 paper, gouache, napkins.
The teacher shows an illustration of mushrooms and reads a poem:
We'll go into the woods, we 'll find a fungus ,
Small, okay, in a smart hat. (O. Vysotskaya)
Don't hide, mushroom in the grass ,
I'll rip you off anyway!
Examines parts of the mushroom , specifies color and size.
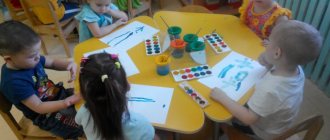
Then he turns his attention to the sheets of stencils. “You have mushrooms living in your clearing . But where are they? They hide behind the windows. Let's find them together? I dip the stick into the white paint and tap it on the “window”
.
Like this. Knock-Knock! Try it yourself.” Children accompany their movements with the words: “Knock-knock-knock
.
The teacher helps fill out the entire lower part of the window. mushrooms lack ? Now let’s fill the upper part of the “window”
. At the end of the work, the stencils are removed. The teacher reads a poem:
Look, mushrooms have appeared !
Brown cap, solid belly
You see, this is dad, it’s easy to recognize him.
We tried our best and found mushrooms in a green meadow .
fly agaric
This is the leader of the inedible mushrooms. Despite its beautiful coloring, it is strictly forbidden to eat. To draw it, you need to choose only bright shades of pencils. It is better to use watercolors. Additionally, you will need a black gel pen and an eraser. Let's get to work. We will depict a family of three representatives of the species.
- We draw three contours of future legs. The tallest one should be in the center.
- Adding hats. Fly agarics of different sizes have different shapes. For the central one, we make a circle with wavy edges at both the top and bottom. For the left mushroom, draw a circle and add an arc on top, dividing the entire cap into two parts. The top half is much smaller than the bottom. For the right one - a small elongated oval.
- Adding details. It is necessary to show folds on the legs: some in the center, others in several rows at the bottom. Add plates under the mushroom caps.
- We draw white dots on the head using circles of different sizes. Moss can be depicted below. Now everything needs to be outlined with a black pen. After it dries, remove all pencil lines.
- Let's color the picture. We make the legs gray. The cap plates are the same color. We use brown to show shadows. The hat consists of three layers of color. The top is orange. The edges are burgundy and the central part is red. We correct everything with smooth transitions. Paint the moss with a dark green shade. The work is completed.
On the topic: methodological developments, presentations and notes
Target. Teach the technique of smearing, i.e. pressing on the rolled ball with your index finger and pulling it up to obtain an image of grass; continue to teach yourself how to pinch off small ones.
Educational areas: cognition, communication, physical development. Goal: to consolidate and expand children’s ideas about spring, to cultivate a caring attitude towards nature; development of fine motor skills of the hands, development of...
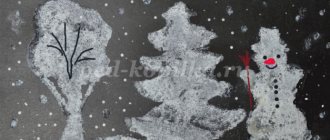
Summary of a finger painting lesson in the first junior group Topic: “Let's decorate the Christmas tree” Types of children's activities: playful, communicative, cognitive-research, productive.
Summary of a finger painting lesson in the first junior group “Beautiful cup with polka dots” Irina Shishkina Summary of a finger painting lesson in the first junior group “Beautiful cup.
a lesson on sensory development on the topic “magic meadow”.
Learn to draw in unconventional ways - with your fingers.
Source
Honey mushroom family
Small mushrooms with round caps are always arranged in groups. They grow on green meadows and stumps. Every mushroom picker loves these fragrant babies. When starting to depict these beauties, it is better to look at them in person. After all, it is so unusual for them to gather in friendly companies. But, if this is not possible, you can look at the photo and make our step-by-step lesson.
- Let's draw a cylinder - this is the future stump. We mark the location of the mushrooms with thin lines. Two will be at the bottom left, and a group of five will be at the top right on the edge of the stump.
- We thicken the legs. We draw semi-oval caps.
- Now we color the work with colored felt-tip pens. The mushrooms themselves will be light brown. Don't forget to show the skirt under the hat and on the leg. The stump is dark brown in color. The top of the cut is yellow.
- We add a little yellow to the mushroom itself, showing the transition from dark to light areas. We darken the bottom of the stem of each honey mushroom.
- Draw the roots of the stump and the grass.
You can make a drawing unique by adding just a little bit of your vision. Even following our general step-by-step master classes, each person’s paintings will be different. And that's great. After all, every video world is different.
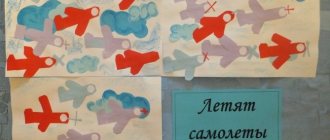
Application with drawing elements “Mushroom clearing” in the second junior group
Liliya Nasretdinova (Fatiykhova)
Application with drawing elements “Mushroom clearing” in the second junior group
Author : Liliya Nasikhovna Fatykhova, teacher of the first qualification category of MADOU No. 100 “Firebird”
city of Naberezhnye Chelny.
Goal: to develop imagination and interest in artistic creativity.
-learn to depict mushrooms using the appliqué technique : create images of contrasting sizes from ready-made elements;
— enrich children’s vocabulary and develop their speech;
— practice the technique of painting with gouache paints .
- cultivate curiosity and interest in nature;
- stimulate children's creative activity;
- cultivate independence, confidence, initiative.
— Develop communication skills, cognitive processes (mental operations, arbitrariness and concentration, memory capacity and others).
— Maintain children’s interest in the discipline being studied.
— Develop a sense of color, shape, size and composition.
Materials, tools, equipment.
Sheets of white paper for composing the composition, ready-made forms for gluing mushrooms - rectangular or oval legs and round or semicircular caps (2 sets of elements each, contrasting in size, glue, 2 brushes, gouache paints, cups (jars)
with water, paper and cloth napkins, oilcloths.
boletus
This mushroom has a high, curved stalk. The hat is thick and red. They have a spongy layer underneath. It won’t be difficult even for a child to draw it. Here is a small easy master class.
- 1 step. Let's draw a hat. To do this, draw a horizontal line. Its length is the width of the cap. From the ends of the line at the top, draw an arc.
- Step 2. We depict the leg in the form of an elongated vertical oval. That's the whole lesson. All that remains is to paint.
- Step 3. The hat can be dark brown or gray. The bottom layer is white. The pattern on the leg resembles birch bark. Everyone can imagine this tree and repeat a similar drawing, only in a smaller form.
Application options for children and sample scenarios for conducting classes
Different ages of children involved in creative work imply different levels of complexity of crafts:
- younger age - a simple application from two or three ready-made templates;
- middle age - children learn to cut elements from blanks;
- older age (preparatory group) - application from composite elements.
Junior group
A simple application is made: a pair of mushrooms (large and small) are located in the middle of the sheet, a currant branch on the side, and grass at the bottom.
Materials for a lesson on appliqué on the theme of mushrooms and berries in the younger group (blanks cut out of paper):
- sheet of cardboard;
- cap and stem of large and small mushrooms;
- twig with berries;
- grass;
- glue in the form of a pencil.
The teacher prepares in advance a finished application, a nursery rhyme.
Procedure for conducting the lesson:
- Show the finished work.
- They read out a poem.
- They look at mushrooms and berries together with the children (questions like: “What is this growing in our clearing?”).
- Explain the structure of a mushroom (questions like: “What does our mushroom consist of?”).
- Explain what materials are prepared for creativity;
- They ask the children to show one by one the cap and stem of a large mushroom (they call it a mushroom - dad or big brother), then - a small one (son or little brother).
- The children are asked to place the blanks on a piece of paper. Note! Some of the group may place the appliqué elements inaccurately (for example, place the mushrooms too close to the edge of the sheet), so they need to explain that there is grass, mushrooms, and berries in the clearing, which means that all the blanks must fit on the sheet.
- They show how to apply glue to the workpiece and how to perform gluing.
- They start gluing (phrases like: “first we will glue the leg”, “then the hat”, “here are the berries”, “now there is grass in the clearing”).
- They examine the resulting applications and praise the children.
Middle group
An application is made of several mushrooms in a clearing. Mushrooms of different sizes, currant branch, grass.
Materials for the lesson for everyone in the group:
- sheet of cardboard;
- blanks made of colored paper: circles (for hats) and rectangles with drawn rounded edges (for legs);
- a branch with berries drawn on colored paper;
- glue;
- glue brush;
- napkins.
The teacher prepares a version of the finished application, rhymes, riddles on the topic, and music for the game.
Procedure for conducting the lesson:
1. They offer the game “Mushroom picker”. While the music is playing, they can frolic, and as soon as the music stops, squat down so that the mushroom picker does not find them and take them into the basket.
2. They say about mushrooms that they come in different shapes and sizes.
3. They explain that the shape of the cap depends on how you look at it: if from above, then a circle, if from the side, then a semicircle.
4. Explain how to use scissors to cut blanks.
Working with scissors requires care. During this part of the lesson, the teacher should not allow children to be distracted, spin, walk or run around the group.
5. They show how to get two mushroom caps from a circle: fold the circle in half, smooth the fold line with your fingers, unfold it and cut along the fold line.
6. Cut out the legs from the blanks. They show the children how to make a rounded cut: smoothly turning the left hand with the workpiece towards the right hand with scissors.
7. They show how to cut grass from a strip of green paper: make a series of cuts diagonally along the upper edge of the strip.
8. Children are taught to spread glue on the workpiece with a brush: a little glue is spread in a thin layer from the center to the edges of the part.
9. Glue the mushrooms (first the stem, then the cap), then the grass so that the mushrooms “peek out” from it. The last one to glue is the currant branch.
10. They examine the resulting clearings and praise them for their efforts.
Children are not always able to immediately apply the correct dose of glue to the workpiece. When gluing, excess glue protrudes beyond the edges of the part. It must be explained that in this case, its remains are carefully wiped off with a napkin.
Senior group
For classes in the senior group you will need the following set of materials:
- a sheet of thick paper (or cardboard) as a base;
- sheets of colored paper with drawn squares and circles;
- a sheet of paper with drawn outlines of whole mushrooms;
- a sheet of red paper (future berries), a sheet of green paper (for a branch of berries), a sheet of white paper (for dots of fly agaric);
- colour pencils;
- glue;
- glue brush;
- napkins.
The teacher prepares in advance a version of crafts, rhymes and jokes on the topic, colorful pictures of forests, forest edges, and different types of mushrooms (edible and poisonous).
The procedure for conducting the lesson.
- Children are given a “tour” through the forest using pictures.
- Explain the difference between edible, inedible and poisonous mushrooms. They explain that although poisonous mushrooms are not eaten, when walking in the forest they should not be kicked or knocked down with a stick, since they serve as medicine for animals and decorate the forest.
- They suggest choosing the color of paper for the caps (for example, for fly agaric - red, for edible ones - gray, brown).
- Cut out circles from selected sheets of paper - blanks for hats.
- They show how to make two hats from one circle: fold the circle in half, smooth the fold line well with your fingers, straighten it, cut the workpiece along the fold line.
- They show how you can get two legs from one square: fold the square in half corner to corner, iron the fold line with your fingers, use scissors to round all four edges of the rectangle, bend it and cut along the fold line. They say that this method of cutting is called paired, so you can get two identical appliqué parts.
- Cut out the currant berries. You need a lot of them, so they show you how to cut two or four berries at once: fold a sheet of red paper in half or four, draw a circle - a currant berry, cut this circle with scissors, getting two or four berries in one cut.
- Just like the berries, cut out white circles - fly agaric specks.
- They tell you how to cut out a whole mushroom using a ready-made template. They explain that this template is easier to color first and then cut out. Color the cap and stem with different colored pencils and cut out along the outline.
- Cut out a currant branch from a green sheet of paper according to a pre-drawn template.
- They show how to cut grass from a strip of green paper: make paired cuts diagonally along the upper edge of the sheet.
- Place the applique details on the base sheet. They say that complex parts (a currant branch with berries and a fly agaric cap with specks) can be glued in different orders: first prepare the entire part by gluing specks on the cap and berries on the branch, and then glue the part to the base, or in the reverse order.
- Glue all the prepared parts onto the base.
- They show a little secret: the currant branch can be slightly under-glued and bent a little. Then the application turns out to be voluminous and the currant branches sway like real ones.
Children often make the mistake of cutting off the cap from the stem of the mushroom. In this case, it is best to explain that what happened is easy to fix. To do this, glue the cap and stem of the cut mushroom separately.
Games
Different pictures of mushrooms for children allow you to conduct many different kinds of speech therapy games. Here are some examples:
- Collecting mushrooms
Each player chooses one picture of a mushroom and tries to describe its external features. If the other player guesses right, the card goes to him. The one who collects the most pictures wins.
- How are we similar?
An adult chooses two cards (boletus-boletus, white-boletus, russula-fly agaric) and invites the children to see as many differences between them as possible. The last one to answer wins.
- Cheerful cooks
Invite the children to “cook” a lunch of different edible mushrooms that they know. Everyone must choose one picture and name a dish that can be prepared with one or another mushroom (for example: porcini mushroom soup, pickled boletus, boletus mushrooms in sour cream, salted milk mushrooms, etc.
- Oh, what a honey fungus we have!
The image of any mushroom is transmitted from one player to another. Everyone names one of its characteristics, distinctive features of the external structure. The winner is the participant who can see and name some detail last.
- Tales from storytellers
Ask each player to choose one specially selected picture of a mushroom for children. Then everyone must come up with a short story about their character. Tell about his character, habits, activities. For example, Borovik is the king of all mushrooms in the forest, he is strict and important, busy with government affairs from morning to evening, loves to play football and play the balalaika. Older preschoolers can be asked to come up (in a circle) with a whole story about the mushroom kingdom; everyone can draw illustrations for the fairy tale together.
- Mosaic: find a piece
Make cut-out pictures from the cards and invite your child to assemble them. You can use drawings of poisonous and edible mushrooms for this game.
- Full basket
Invite your child to select several cards (he will need a small basket for this), memorize them well and repeat all the names by heart without looking into the basket again. Each player can try to become a mushroom picker by collecting their own set of cards.
Puzzles
It is very useful to teach riddles on a chosen topic with children. This helps not only to train the preschooler’s memory and attention, but also significantly increases his vocabulary, and also allows him to automate difficult sounds. Here is a selection of suitable riddles called Basket of Mushrooms for Kids: