The essence of the application: goals and objectives in the middle group
Applique is a type of isotechnics that is based on the creation of a plot composition using paper, fabric parts, elements made from natural materials, cereals or grains, located and glued/sewn onto a dense backing - cardboard, paper or draped with fabric.
In the middle group, children become more independent when performing appliqué
The mission of appliqué classes is as follows:
- enriching children's ideas about the world around them, in particular about the concepts of shape, shades of colors, an initial understanding of proportionality and the arrangement of elements in a limited space (on a sheet of paper or cardboard);
- forming the basis of critical thinking, that is, the ability to compare, generalize, and draw simple conclusions;
- development of logic, imaginative thinking, speech through composing stories based on applications;
- hand motor skills training;
- awakening a taste for creative work, the desire to harmonize color and shape in holistic subjects;
- nurturing initiative, self-organization and the ability to work with a partner or in a group.
The objectives of classes in this type of visual creativity in the middle group are:
- mastering the skill of straight cutting in different (!) directions, as well as with elements of creating rounded shapes by cutting off the corners of a square;
- developing the ability to combine elements to obtain a complete composition (if you put squares on top of each other, you get a tower, and if you place a triangle over a square, you get a house);
- training in composing plots from geometric shapes of different sizes (10–12 parts), in particular in the shape of a triangle, circle, square, rectangle;
- developing the skill of finding aesthetically attractive combinations of appliqué with other types of art;
- develop the skill of working in pairs;
- develop the ability to evaluate your work.
Children learn to work just side by side, and in pairs, mini-groups
New appliqué skills for the middle group
The main “acquisition” of middle preschool age is training in the ability to use scissors. In addition, children 4–5 years old:
- arrange and glue plot elements onto a base that has an irregular shape;
- learn to form parts of the required shape and size by cutting off corners, cutting an element around the entire perimeter or only from the bottom/top/right/left, for example, making a circle by cutting off the corners of a square;
- improve the cut-off appearance of the applique, including during the preparation of materials (cut off or tear off the corners of the rectangle so as to give the workpiece a square shape, etc.).
Article Perspective plan in the middle group on application. Author: Rusyaeva Natalia Nikolaevna
Author: Rusyaeva Natalia Nikolaevna
2.
"Me and the street"
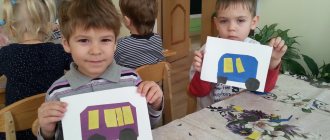
1. "Truck"
Koldina D. N. Application with children 4-5 years old. Class notes, page 22.
Continue to teach correctly, hold the scissors.
Learn to cut out round shapes from squares by rounding the corners, create an image from pre-cut parts, and place the object in the center of the sheet.
Practice the ability to carefully and evenly glue parts onto a sheet of paper.
½ landscape sheet, a rectangle of colored paper (body) 9x3 cm, a square 5x5 cm with the upper left corner cut off (cabin), two squares 4x4 cm; scissors, glue, rags, oilcloth linings.
Reading of A. Barto’s poem “Truck”; conversation; independent work; folding a truck from parts; solving a problem situation; showing how to use scissors to round the corners of squares, summary.
Observing moving vehicles while walking, looking at illustrations on the topic “Transport”.
Individual conversations.
Recommendations.
Author:
Rusyaeva Natalia Nikolaevna
Application
| Topic of the week | Topic, literature | Software content | Materials and equipment | Methods and techniques | Cooperative activity with kids | Joint activities with parents | ||
| September | ||||||||
| 2. "Me and the street" | 1. "Truck" Koldina D. N. Application with children 4-5 years old. Class notes, page 22. | Continue to teach correctly, hold the scissors. Learn to cut out round shapes from squares by rounding the corners, create an image from pre-cut parts, and place the object in the center of the sheet. Practice the ability to carefully and evenly glue parts onto a sheet of paper. | ½ landscape sheet, a rectangle of colored paper (body) 9x3 cm, a square 5x5 cm with the upper left corner cut off (cabin), two squares 4x4 cm; scissors, glue, rags, oilcloth linings. | Reading of A. Barto’s poem “Truck”; conversation; independent work; folding a truck from parts; solving a problem situation; showing how to use scissors to round the corners of squares, summary. | Observing moving vehicles while walking, looking at illustrations on the topic “Transport”. | Individual conversations. Recommendations. | ||
| 4. Monitoring | Identification of skills and abilities in children in educational activities “application”. | Individual recommendations. | ||||||
| October | ||||||||
| 2. "Autumn. Vegetables, fruits" | 2. “Screen with fruit” Koldina D. N. Application with children 4-5 years old. Class notes, page 13. | Expand and clarify children's ideas about the variety of fruits. Learn to distinguish between vegetables and fruits. Reinforce techniques for careful gluing. Develop mindfulness. | Cut out images of fruits and vegetables made of colored paper, cardboard folding book ka (page size 12×10 cm), glue, rags, oilcloth linings. | Looking at pictures of fruits and vegetables, putting them into 2 groups; game "Fourth wheel"; group work on making a folding book; result. | Conversation with children about autumn, about harvesting vegetables and fruits. D/i “Who is most likely to collect vegetables and fruits” | Exhibition of works from natural materials by parents and children “Gifts of Autumn” | ||
| 4. "My family" | 3. "Tumblers" Koldina D. N. Application with children 4-5 years old. Class notes, page 35. | Continue to learn how to cut out circles, smoothly rounding the corners of the squares, and compose a depicted object from several circles, placing them correctly on the sheet. Learn to convey the words of a poem with actions. | Tumbler; ½ album sheet; squares 6x6 cm (torso), 4x4 cm (head), two squares 2x2 cm (arms), scissors, glue, napkins. | Examining a tumbler; tumbler dance; independent work; result. | Conversation, looking at illustrations, photographs, reading literature on the topic of the week. | Exhibition of works. | ||
| November | ||||||||
| 2. "Late fall. Trees" | 4. “Christmas trees” Shvaiko G.S. “Fine art classes in kindergarten. Program, notes", page 139. | Teach children to cut triangles from squares; make an applique of two items, placing them side by side at the bottom of a sheet of paper; stick triangles (tree branches) in descending order. | Landscape sheet, three green rectangles measuring 5x10 cm, 4x8 cm and 3x6 cm, scissors, glue, napkin. | Storytelling, explanation, examination, physical education, demonstration of a method of action | Guessing riddles conversation about trees in autumn, looking at illustrations depicting autumn trees | Individual conversations Recommendations | ||
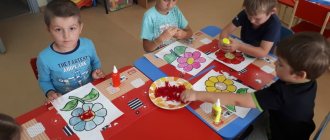
| 4. "Mothers Day" | 5. “Decoration of a handkerchief” Komarova T.S. “Art activities in kindergarten”, p.50. | Learn to identify corners and sides. Reinforce knowledge of round, square and triangular shapes. Practice choosing color combinations. Teach transformation shapes, cutting a square into triangles and a circle into semicircles. Develop compositional skills and color perception. | Samples of work; ready-made circles, squares, scissors, glue, napkin, trays. | Consider the square, the location of the pattern on the square; showing the technique of dividing a square and a circle in half; independent work; result. | Examination of decorative items with a simple pattern. | Exhibition of works at the stand. | ||
| December | ||||||||
| 2. "Winter. Clothes, shoes" | 6. “Hat and mittens for a doll” Koldina D. N. Application with children 4-5 years old. Class notes, page 22. | Continue learning how to apply glue to parts and stick them evenly onto a sheet of paper. Strengthen the ability to correlate a color with its name. | Three dolls in different dresses colors (blue, yellow and red). Hats and mittens cut out of colored paper in the same colors as the dolls' dresses, album sheets, glue, napkins. | Looking at dolls; playing out the situation; selection of mittens and hats for the doll, independent work; result. | Examining patterns on mittens, game “Pick a Pair” Guessing riddles. Productive activity. | Exhibition of works at the stand. | ||
| 4. "Wild Animals in Winter" | 7. “Zayushka” A.N. Malysheva, N.V. Ermolaev “Applique in kindergarten”, p. 42. | Teach children to cut round and oval-shaped objects from other geometric shapes (a circle from a square, an oval from a rectangle) | Tinted album sheet, white blanks measuring 6x4 cm, 3x4 cm, 1.5x1.5 cm, strips measuring 1x6 cm, 1x4 cm, scissors, glue. | Conversation, problem situation, storytelling, examination, physical education explanation, showing the method of action, the result. | Looking at a bunny toy Reading poems that describe the habits of hares, looking at illustrations. | Individual conversations, exhibition of works. | ||
| January | ||||||||
| 2. "Winter Fun" | 8. "Snowman" Malysheva A.N., Ermolaeva N.V. “Applique in kindergarten”, p. 40. | Train the ability to cut corners, evenly round them, to obtain round and oval parts from square blanks; develop imagination, eye, fine motor skills. | Blue cardboard, white blanks, scissors, paste, glue brush, oilcloth, cloth | Conversation, game motivation, storytelling, examination of physical education, explanation, demonstration of the method of action, independent work, analysis. | Looking at illustrations of snowmen Reading poems about snowmen | Individual conversations, exhibition of works. | ||
| 4. "Food" | 9. "Mushrooms" Shvaiko G.S. “Fine art classes in kindergarten. Program, notes", page 121. | Learn to cut out rounded shapes; continue to learn how to create a symmetrical composition from several objects; stick objects in sequence; consolidate in children’s speech the names of colors: orange, gray, brown and the ability to distinguish between dark and light shades of red; consolidate gluing techniques. | A wooden mushroom and its image in the picture, a landscape sheet, 3 rectangles for cutting out caps, green stripes (grass), 3 mushroom legs, scissors, glue, napkin. | Conversation, play motivation, storytelling, examination, physical education, explanation, showing the method of action, analysis | Guessing riddles, talking about the structure of a mushroom, drawing in the air, game situation “Mushroom Forest” | Individual conversations. Recommendations | ||
| February | ||||||||
| 2. "Crystal winter" | 10. “White Snowflake” Koldina D. N. Application with children 4-5 years old. Class notes, page 23. | Continue to teach correctly, keep scissors, cut the square into narrow strips. Exercise in composing the intended object from strips. Fasten skill of neat and even gluing. Learn to analyze and understand the content of a poem. | Cardboard circles with a diameter of 10 cm, squares of white paper 8x8 cm, scissors, glue, napkin. | Reading a poem by E. Bulgakova; conversation about winter crystal; explanation and demonstration of the technique for making a snowflake; independent work of children; result. | Looking at illustrations depicting the theme of the week Reading poems about winter. | Exhibition of works at the stand. | ||
| 4. "Visiting a fairy tale" | 11. “Ice and bast hut” (based on a Russian folk tale) I.A. Lykova Visual activities in kindergarten. Middle group, page 92. | Teach children to create, on the same applicative basis (wall - large square, roof - triangle, window - small square) different images of fairy tale huts - bast for the bunny and ice for the fox. Fix the method of cutting a square diagonally to obtain two triangles. | Landscape sheet 7x7cm squares for the walls of the huts (brown and white). Squares 7-7cm for the roof of the houses (white and brown). Squares 3x3 cm for the windows of two houses (yellow). Scissors, glue. | Acting out dialogue using puppet characters; examination of samples, conversation, explanation; independent work; result. | Reading a fairy tale, showing a puppet theater. Looking at illustrations for a fairy tale. Conversation: the hare is kind, the fox is cunning, insidious. | Exhibition of works at the stand. | ||
| March | ||||||||
| 2. "Spring is beautiful" | 12. “A beautiful flower as a gift for mom” Komarova T.S. “Art activities in kindergarten”, p. 96. | Learn to cut and paste a beautiful flower, using the technique of cutting corners, rounding them. Learn beautifully, place the image on a piece of paper. | Landscape sheet, flower blanks, scissors, paste, glue brush, oilcloth, cloth. | Conversation, problem situation, telling, looking at, explanation, showing the method of action, analysis. | Conversation about flowers. Conversation about the holiday of March 8 Reading poems about mom. Productive activity. | All works will be displayed on the stand to please their mothers. | ||
| 4. "Folk toy" | 13. “Multi-colored nesting dolls” A.N. Malysheva, Ermolaeva N.V. “Applique in kindergarten”, page 28. | Cultivate interest in Russian folk art. Learn to place a pattern within an irregularly shaped base (matryoshka silhouette) | Matryoshka, silhouettes of nesting dolls, ready-made shapes: circle with a diameter of 1.5 cm, colored ovals 1.5x2.5 cm, colored circles, glue, napkin. | Game situation, reading to children, viewing, physical education, explanation, showing the method of action, analysis. | Guessing riddles A story about the matryoshka doll, about its different variants (Semyonovskaya, Zagorskaya, Polkhov-Maidanskaya) | Design of the exhibition “Multi-colored nesting dolls” | ||
| April | ||||||||
| 2. "Cosmonautics Day" | 14. “The rocket flies into space” Shvaiko G.S. “Fine art classes in kindergarten. Program, notes", page 125. | Teach children to round two corners of a rectangle on the narrow side; determine the initial shapes for cutting out rocket parts; place the image (rocket) diagonally on a sheet of paper; consolidate the ability to cut triangles from a square by cutting it diagonally; stick the item starting from the largest part. | Sample; portrait of Yu.A. Gagarin. Landscape sheet dark blue; a light gray rectangle (13x3 cm) for a rocket, a square of the same color (3x3 cm), narrow stripes of red and orange; small circles for depicting portholes, glue, napkin, scissors. | Examination of a photograph of Yu. Gagarin and a sample, conversation; demonstration of techniques for rounding the nose of a rocket; independent work; result. | Conversation about space and astronaut; Yu. Gagarin. Guessing riddles. Looking at illustrations. Productive activity on the topic of the week. | Exhibition of works. | ||
| 4. "Book Week" | 15. “Decorative bookmarks” Malysheva A.N., Ermolaeva N.V. “Applique in kindergarten”, page 38. | Mastering new techniques for working with paper: folding strips of paper like an accordion, cutting off corners, rounding them along a contour line. Cultivate a caring attitude towards books. | White strips of thick paper measuring 5x20 cm, red blank 4x6 cm, blue - 1.5x10 cm, scissors, paste, glue brush, oilcloth, cloth. | Conversation, problem situation, reasoning, physical education minute, explanation, showing the method of action, analysis. | Problem situation “The book is sick” Discussion “Who needs a bookmark and why” Laying out patterns on stripes Productive activity. | Individual conversations. Recommendations. | ||
| May | ||||||||
| 2. "Blossoming Spring" | 16. “Spring Flower” Shvaiko G.S. “Fine art classes in kindergarten. Program, notes", page 129. | Teach children to cut out a circle by smoothly rounding the corners of a square, cut the circle in half; make up from parts - circles, semicircles and a narrow strip - an image of unblown and blossoming flowers; reinforce neat gluing techniques. | A postcard or illustration depicting a flower and buds, a landscape sheet, blanks of colored paper, scissors, glue, napkin. | Conversation, looking at, telling, physical education minute, explanation, showing the method of action, analysis | Conversation with children about spring. Looking at illustrations. Reading poems about flowers. Guessing riddles. Productive activity. | Exhibition of children's works. | ||
| 4. Monitoring | Identification of skills and abilities in children in educational activities “application”. | Individual conversations. Recommendations. | ||||||
comments powered by HyperComments
Place of appliqué lessons in the educational program for the middle group
Application is not only a separate lesson in the artistic and aesthetic cycle of lessons, which includes a detailed consideration of the topic and the implementation of application in one technique or another, but also:
- a way to consolidate the learned material in classes within other educational vectors (for example, in a lesson on speech development on the topic “My City,” children make a geometric appliqué “My Street”);
- assignment of project work (for example, kids, together with their mothers and fathers, make an application on the topic “Unusual professions,” which is accompanied by a story about the specialist presented in this way);
- the essence of the activities of the art activity circle.
For children 4–5 years old, an appliqué club is possible only if the group is mixed - middle-high, since in the middle group the applique club gives way to a drawing circle.
How is the time spent working on the application distributed in the middle group?
A lesson within the framework of a creative course of the educational process lasts 20 minutes, and all this time is allocated for preparation - up to 3 minutes, execution - up to 12 minutes, and evaluation of the application - up to 3 minutes (the remaining minutes are left for organizing the work of the group). Finger gymnastics is introduced into the preparation stage, and at the stage of performing crafts there is a mandatory (!) physical education break - up to 2 minutes.
Finger gymnastics is a mandatory element of appliqué classes.
If the application is a separate type of work in non-creative lessons, then a quarter of the class time is usually allocated for its implementation. As a rule, the application is part of the stage of consolidating the material, that is, it is performed at the end of the lesson.
Typically, a project, the ultimate goal of which is to complete an application, in the average group is limited to a fairly large time period - from two days to a week. In addition, the project requires the active assistance of parents. However, if a project application is a task that is performed during the educational process in a group, then the timing of its creation will be the same as in a regular lesson.
Work on applications in a circle activity can be carried out according to a lesson or project scenario, depending on the topic of the lesson.
What is the teacher's participation?
When working with children 4–5 years old, the teacher voices the task, shows a sample, and then gradually completes the task, which the children repeat step by step. In addition, the teacher:
- provides practical individual assistance with the implementation of individual details of the composition, for example, cutting out small details (for example, grape leaves in the “Fruit on a Plate” appliqué);
- helps to arrange the elements of the composition on the substrate;
- controls the accuracy of applying glue and pressing down elements;
- gives recommendations on the most harmonious use of decorative elements (for example, for a paper “Matryoshka”, sundress decorations can be made of plasticine and buttons, but rhinestones and sequins will violate the style of the folk costume).
Video: teacher’s activities during an application lesson on the theme “Tulips” in the middle group
What artistic techniques can the applique be combined with?
By the middle group, children are familiar with all visual techniques designated as software in the Federal State Educational Standard (FSES). However, the level of proficiency in many of them is still low. For example, design is mastered at the initial stage. Therefore, the application can only be combined with a drawing or plasticineography.
Photo gallery: examples of combinations of applications with other types of isotechnics
To make the work look neat, there should not be a lot of plasticine elements
Some crafts combine not only isotechnics, but also different types of applique
Children in the middle group can make hand-drawn additions to the applique in the form of non-solid elements themselves.
Table: types of applications for children of middle preschool age
| Technique | Application type, material | Features of use in the middle group |
| Traditional | Flat - solid elements cut out of paper are glued onto a backing. | In the second youngest group, children used the parts that the teacher prepared; in the middle group, they cut out large parts themselves without unnecessary bends. In addition, children 4–5 years old master the skills of multi-layer appliqué, when parts overlap one another. |
| Mosaic - cut pieces of paper are laid out within the boundaries of the design. It is mastered in parallel with the tape one. | On a mosaic applique, children practice direct movement with scissors to cut out parts. The ribbon type involves children folding paper like an accordion and then cutting it into pieces. | |
| Geometric - the composition is made up of elements of geometric shape. | Children aged 4–5 years practice laying out plots in triangles, squares and rectangles of different sizes. Last year, parts of the same shape were used to create compositions; in the middle group, kids combine several. | |
| Unconventional | From napkins - elements or individual parts are made from napkins, often folded in several layers to give the image volume. | In the middle group, children learn to fold napkins to create a multi-layered piece. |
| Tear - paper or napkins are torn into pieces of different sizes, which are then used to lay out the picture. | The type of appliqués familiar from last year in the middle group can be complicated by the fact that children twist balls from torn parts with their palms, which are then laid out in mosaics along the contours of the image. | |
| From cotton wool or cotton pads - the image is filled with pieces of cotton wool or discs (whole or cut). | In the middle group, cotton wool and discs become an additional element of other types of applications. | |
| Palm - the composition is made up of children’s palms outlined and cut out. | The teacher is responsible for cutting out palms, since children 4–5 years old do not use scissors at such a level to cut out rounded parts. | |
| From cereals, grains - individual elements of the composition are filled with buckwheat, rice, semolina, etc. | Kids are familiar with this type of crafts from the second junior group; in the middle group, children learn to combine cereals in one composition. | |
| Fabric, that is, suggesting that some elements are cut out of fabric. | Working with fabric is a very troublesome task, so the fabric elements are prepared by the teacher in advance, the children only glue the blanks onto the base. | |
| From dry leaves, pine needles - the image or its elements are laid out with natural material. | When performing such applications, it is important to apply the required amount of glue so that the fliers “do not drown,” so children master the technique under the guidance of a teacher. | |
| Quilling - a picture or its details are laid out with elements of paper twisted in different ways, usually in the form of circles or loose circles. | Children 4–5 years old learn to twist tight circles, loose ones, that is, with a displaced center, are made by the teacher. |
Photo gallery: examples of different types of applications in the middle group
For cotton wool applications, children 4–5 years old learn to pinch off small pieces of cotton wool.
Cotton pads can be applied in two layers to add volume to the application.
When performing flat appliqué, children independently choose the location of the composition elements
The fabric elements are prepared by the teacher, the children just place them in the picture and glue them
Working with leaves requires kids to carefully select the material according to shape and size.
The broken look is the most commonly used type of applique in the middle group
Children try to twist parts themselves using the quilling technique
For napkin applique, children roll balls from pieces of thin paper and lay out a picture with them.
Geometric applications are familiar to children from the second junior group
In the middle group, kids lay out cereal elements that require delimitation by contour lines
The teacher cuts out the palms for this type of applique.
Mosaic applique is most often combined with a broken one
Video: lesson on flat appliqué on the theme “Flag” in the middle group
Video: lesson on flat multi-layer appliqué on the theme “Flowers” in the middle group
Important issues of individualization of work with children
The key factor determining the degree of adult participation in the application is the child’s degree of confidence in using scissors. If a child copes well with cutting out large silhouettes, rhythmically squeezing and unclenching scissors to perform forward movements, then he will be able to work in ribbon appliqué. But if the baby cannot hold the scissors and has difficulty cutting, then he should practice: perform finger exercises more often, cut out silhouettes with right angles, gradually moving to round shapes.
From my experience, I can say that the cutting skill is perfectly trained by the “Labyrinth” exercise: the teacher draws lines on a sheet of thick paper (in the case of children 4–5 years old, the lines should be straight, with turns at an angle of 90º), and the child “looks for a way out” from the labyrinth, cutting through the passage. Moreover, in the second half of the year, when the skill has already been mastered, this simulator can prepare children to become familiar with the basics of cutting out rounded silhouettes. To do this, the guys also practice the size of the paper cut: opening the scissors wide, they take “giant’s steps,” and as soon as they open the blades, they “walk like dwarfs.”
Small details of the applique are cut out by the teacher
Application on the theme “Spring” in the preparatory group
In the older age group, children are already familiar with more complex techniques for creating applications.
Apple tree branch in spring
The paper applique “Spring” allows children to get acquainted with creating three-dimensional images by folding paper. To practice, find a large and well-branched tree branch.
Next, make paper blanks of apple blossoms:
- Take white paper squares with sides of 5 or 7 cm. Fold in half twice.
- Holding the corner of the fold with your fingers, cut out a heart from the workpiece.
- Open the resulting flower. Do not straighten it too much, it should remain voluminous.
- Make the leaves in the same way. Just fold the green square once, not twice. And cut out not a heart, but a semi-oval.
- Glue the tree branch to the cardboard base. And to it - made leaves and flowers.
Swallows
Swallows arriving in the spring hatch their chicks. The lesson introduces preschoolers to creating crafts from pompoms.
To make a house for swallows, you need to cut a plastic plate in half. Glue the halves together, cover the front with glue, sprinkle with hay, sawdust, and other materials to imitate a bird's nest. Next you need to teach children how to make pom-poms. Let them use this method to make the heads of the chicks looking out of the nest, glue on the eyes and beaks.
Sample lesson notes on applications in the middle group
An application lesson in the middle group is held once a week and, as noted above, lasts 20 minutes. This time includes:
- the introductory stage, at which the teacher updates the children’s knowledge on the topic - 2-3 minutes (usually in the form of solving riddles, reading poems or watching a cartoon);
- the main stage, divided into a preparatory stage - preparing the background, materials, tools for appliqué, performing finger exercises - and doing crafts - children, with the help of an adult, create, cut out parts, stick them on a backing - 15 minutes (in the middle of the main stage there is a physical education break);
- final stage - the teacher thanks the children for their work, gives an assessment of their activity - 2 minutes.
An example of the implementation of all three stages could be a lesson on geometric appliqué on the topic “Decorating a Handkerchief” by O. Rasseikina. A sample lesson summary, which combines application with drawing, is presented in the work of I.E. Ulyanina "Skiers". An interesting version of the technique for practicing direct movement with scissors is presented in V. Zolotareva’s summary “Colored Cubes.”
Tear-off applique occupies a special place in the system of practicing this type of creativity, since children really like to tear paper, and this, in turn, is an excellent training for fine motor skills. In addition, crafts made from scraps of paper or napkins look original. An example of a lesson on broken appliqué can be found in the notes “Letter from an Unknown Friend” by O.G. Lebedeva.
Subjects for application in the middle group
The composition for applications in the middle group is selected according to the theme of the lessons of the cycle “Artistic and Aesthetic Creativity”, designated by the Federal State Educational Standard, as well as to the theme of lessons in other areas, if this type of work is appropriate for its disclosure.
The list of application lesson topics includes, among others:
- "Kindergarten";
- "Garden. Fruits";
- "Vegetables. Garden";
- "Forest. Mushrooms. Berries";
- "Trees";
- "Wild animals";
- "Furniture";
- "Transport. Traffic rules";
- "Winter";
- "Birds";
- "Toys";
- "Dishes";
- "Space";
- "Victory Day";
- "Summer is coming soon".
In classes on speech development, applications are used on the following topics:
- “Friendship” (kids make a palm applique “Tree of Friendship”);
- “Professions” (children stick blanks of tools onto the “suitcases” of representatives of a particular profession);
- “My City” (children do the craft “Winter covered the houses on my street” using geometric shapes and cotton pads).
Lessons on FEMP can be diversified by performing applications on the study of the following topics:
- "Form. Color" (the guys make an applique of geometric shapes "Traffic Light");
- “The simplest geometric shapes: rectangle, square, circle” (if this topic is close to the celebration of National Unity Day, then the kids can be invited to make a craft from colored napkins “Flag of Russia”);
- “Quantitative and ordinal counting. Day" (children perform a flat applique "Night").
Another educational cycle where applications are very appropriate for reinforcing material is classes on familiarization with the outside world. In particular, topics such as:
- “Fire” (the guys perform the applique “Fire Truck”);
- “Harvest” (children make an applique of paper and seeds “Golden Sunflowers”);
- “Zimushka-winter” (pupils of the middle group make snowmen from blanks cut out of cotton pads).
Photo gallery: samples of finished work during appliqué classes
In the “Toys” theme, special attention is paid to nesting dolls as a type of folk art.
When making the “Summer is Coming” applique, kids roll up small scraps of napkins for the flower head.
For the application on the theme “Vegetable Garden”, the children cut out the dish themselves
Carrying out an application on the topic “Vegetables”, the guys make a carrot for the bunny
When working on the “Birds” theme, children themselves choose color combinations of parts
By working to fill in the outlines of the dishes with scraps of paper, children learn to combine two colors
An application for Victory Day can be used as a postcard design
The theme “Trees” in non-traditional appliqué technique can be a project task
The geometric applique “Rocket” is a kind of puzzle, which the children first fold and then glue to the base
In the middle group on the topic “Wild Animals”, children learn to combine two types of cereals or grains
When making an applique on the “Mushrooms” plane, the children’s task is to correctly position the parts on the backing for the collective applique
Photo gallery: examples of applications for speech development lessons
When creating a collective application on the theme “Friendship”, the teacher helps to cut out palms
One of the options for an application on the theme “Professions” is to create a composition from the tools of representatives of various types of activities
In the “Houses on Our Street” applique, kids combine several types of isotechnics: applique on a plane, geometric and from cotton pads
Photo gallery: examples of applications in FEMP classes
For the flat applique “Traffic Light”, children use three round and one rectangular element
Night in applications is shown as a background, that is, a black or dark sheet of colored paper
In the “Flag of Russia” applique, children repeat geometric shapes in the process of cutting elements to fill the borders of the image
Photo gallery: examples of applications in lessons on familiarization with the environment
In the “Golden Sunflowers” applique, children combine the cutting technique with multi-layered
To complete the “Fire Truck” applique, children cut out the body of the machine and the window themselves; the teacher helps with the rest of the elements.
The “Snowman” applique can be made from cut white sheets that are laid out within the borders of the image
Application on the theme “Spring” in the senior group
Kindergarteners of the older age group must develop the skill of working with colored paper, stationery, and plastic materials. They should already have knowledge that flowers bloom on trees in the spring so that fruits form in their place in the summer, that birds return from the south to hatch their chicks in their native lands.
Application "Spring" made of colored paper
To create an applique, you need to prepare a thick paper sheet for the background, a set of colored paper, an insert from a gift box of chocolates, markers, glue, scissors, and a simple pencil.
Instructions on how to make the “Birds in Spring” applique:
- Cut out a tree branch from brown paper. Glue onto the cardboard base.
- Cut out a beige or yellow circle - this is the base of the bird's nest. Glue it onto the branch.
- Cut the candy liner into thin strips. Glue randomly along the contour of the circle. You will get a real nest.
- Cut out the yellow sun and its rays. Glue onto cardboard above the branch.
- Make leaves from green paper. Stick it on the branch.
- Make chicks that will sit in the nest. From colored paper, cut out the body, head, beaks, wings, paws, eyes. Draw the pupils with a marker.
- Glue the finished chicks to the nest.
For another version of the “Birds in Spring” applique, see the following video.
Spring bouquet
Plasticine crafts are useful for developing finger motor skills. Let the children roll thin ropes from red, yellow or orange plasticine and twist them like a snail. You will get flower buds. Next, you need to cut out a large circle from colored paper and fold it so that it looks like a bouquet bag. It remains to glue the plasticine buds to its upper free part. If you have mother-of-pearl beads, you can decorate the center of the buds with them.
Tit in spring
Older preschoolers will find it interesting to work with yarn. For applique you need threads that match the color of the tit: yellow, white, black, gray, blue, green.
Draw an outline image of the bird on the cardboard.
Cut the yarn into small pieces in separate piles according to color.
Show your child a realistic picture of a tit.
Let him coat each section of the outline with glue and sprinkle it with pieces of yarn of a suitable color.
Spring nightingales
Spring is associated with the arrival of birds. Make the following craft with your child:
- Cut out silhouette blanks of nightingales from light paper.
- Make bird cages. Glue a ring - the base - from a wide strip of colored paper.
- Attach thin paper strips to it, making a dome-shaped lattice structure.
- Place the paper birds inside the cages.
- Hang the nightingales on a string in the children's room or in the playroom of the kindergarten.
Methodology for preparing an open lesson on application in the middle group
The work of drawing up a script for an open lesson on application in the middle group is not much different from writing notes for a regular lesson: the same three stages, the same distribution of time between them. However, there are a number of features at the content level:
- An open lesson must have a plot basis; in the middle group it is convenient to work with fairy tales, the heroes of which come to the kids for help or advice on the topic;
- For the lesson to be successful, the type of application being practiced must already be familiar to the children;
- At the final stage of the lesson, children should be given the opportunity to evaluate their application - like it/don’t like it and why.
From the standpoint of implementing these conditions, the summary of an open lesson on application on the topic “The Best House” by E.A. is interesting. Iyutinskaya.
Criteria for assessing an open lesson by inspectors
The demonstration lesson is assessed both by the teacher himself and those present according to a single scheme:
- compliance of the goals and objectives of the lesson with the topic and requirements of the Federal State Educational Standard;
- effectiveness of techniques;
- the presence of suitable and understandable visuals for children;
- consistency of types of work and teacher’s explanations;
- conducting physical education breaks during class (finger exercises and physical education sessions);
- forms of implementation of an individual approach;
- the general atmosphere of the lesson, its pace;
- evaluation of finished work;
- recommendations to the teacher (what levels of methodological work need to be adjusted).
If the analysis by those present involves a written form, then you must first indicate the full name, regalia of the teacher, as well as the age of the children and the number of people present at the lesson.
In the middle group, children learn to give their own assessment of their work in class
Methodological literature on application
When preparing lessons on application, the teacher will find the following manuals useful:
- Applications and paper crafts. - M.: Dragonfly, 2012.
- Grigorieva G. The use of gaming techniques in the management of visual activities. / Preschool education, 1991.
- Gusakova, M.A. Application. - M.: Education, 1987.
- Dubrovskaya N.V. Applications made from natural materials. - M.: Astrel, Sova, 2012.
- Dubrovskaya N.V. Applications from seeds and seeds. - M.: AST, Sova, 2013. Dubrovskaya N.V. Application from corrugated paper. - M.: Detstvo-Press, 2013.
- Komarova T.S. Methods of teaching visual arts and design. - M., Education, 1991.
- Kosminskaya V.B., Khalezova N.B. Fundamentals of fine arts and methods of guiding children’s visual activities: Lab. workshop: Textbook for pedagogical students. Institutes - M.: Education, 1987.
- Malysheva A.I., Ermolaeva N.V. Application in kindergarten. – M.: 2000.
Samples of drawing up lesson plans for applications can be found in the manuals:
- Koldina, D. N. Application with children 4–5 years old. Lesson notes / D.N. Koldina. - M.: Mosaika-Sintez, 2021.
- Komarova T.S. Lessons in visual arts in the middle group of kindergarten: lesson notes. – M.: 2008.
- Lesson notes on application in the middle group.
A lot of time is devoted to the creative development of children aged 4–5 years in the kindergarten educational program. At the same time, applique classes are of particular importance, allowing children not only to learn how to use scissors, practice skills in working with glue and brushes, but also to learn about the visual possibilities of paper and other materials for crafts. All this develops important learning skills in children and introduces them to an interesting activity that awakens their imagination.
Application for the younger group on the theme “Spring”
From the age of 2, children are able to work creatively with paper and natural materials. Thematic applications and crafts give younger preschoolers an idea of the changing seasons and the awakening of nature.
Snowdrops
To make cute snowdrops, you need cotton pads, colored paper and cardboard. The application does not require templates, but if necessary, an adult must help the child.
The process of making the first flowers of spring:
- Take pale blue cardboard - this is the spring sky.
- Cut out leaves from green paper.
- Shape the cotton circles into snowdrop buds and make petals.
- Using a green marker, draw flower stems on the cardboard.
- Glue the leaves and buds.
Spring sun
To make rays of bright sunshine, the child uses his hands, places them on a cardboard base, and the adult traces his fingers with a pencil. If the cardboard is not colored, but white, the preschooler paints the resulting rays with a yellow or orange marker, or gouache paint, and cuts them out with scissors. You should get at least 6 blanks.
Next you need to cut out a large yellow circle - this is the sun. Glue it to the sky-colored cardboard, leaving the edges unglued. You can also use a plastic plate and paint it with yellow gouache. To complete the application, all that remains is to slip the rays of your hands under the edges of the circle and glue them. To make the resulting sun really look like spring, you can draw eyes and a smile on it.
Chestnut flowers in spring
To make an applique, you need blue cardboard, a branched tree branch, and popcorn without dye.
The branch needs to be pasted onto the sky background. For better adhesion to the cardboard, press the workpiece with a weight. Glue roasted corn flakes to the branches - these are chestnut flowers. Leave the application to dry.
Greenery in spring
It will be very interesting for preschoolers to grow fresh herbs on their own; with the help of crafts, they will learn how nature comes to life in the spring.
Give the pupils egg shells with the top cut off and prepare the planting substrate. Let each child draw a funny face on his shell. Then he will pour soil inside, moisten it with a spray bottle, and plant the greens. You can use a lawn mixture: it takes root well and germinates quickly. By placing the shells on the windowsill in the spring, children will watch the seedlings develop every day.
Early spring
Tree branches collected on a walk can be used to create a spring landscape.
Children cut out the earth from brown paper, the remaining snow here and there from white paper, and the spring sun from yellow paper.
All this is glued to cardboard.
They also stick on branches, which become young trees in the landscape composition.
Finally, all that remains is to glue pre-cut small green leaves to the branches.