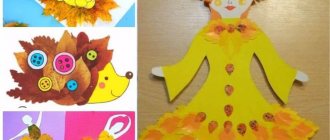
Master class on handcrafts “Flower of Friendship”
Ekaterina Savastyanova
Master class on handcrafts “Flower of Friendship”
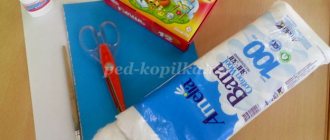
For our craft “ Flower of Friendship ”
we needed colored xerox paper in pink, yellow and orange , a simple pencil, PVA glue, a white cardboard sheet and scissors.
We take pink and orange photocopier paper, trace the children's palms and cut them out with scissors. Then we take white cardboard and cut out a circle, this will be the basis for our flower and begin gluing the boats in a circle using glue
first pink, and then on top of the pink ones we also glue orange palms
After this, using a simple pencil, we begin to twist our orange palms one finger at a time in the center of the flower and so on all the fingers in a circle
after we have reached the end we take yellow colored paper and cut out a circle, this will be the core of the flower and glue it in the middle
This is the “ Flower of Friendship ”
we succeeded.
In the middle you can place a photo of a child or mom and dad.
“Tree of Friendship” made of multi-colored palms While observing children during communication, it was noticed that not all children know how to cooperate. Some find it difficult to negotiate and defend theirs. Children's master class "Hedgehog made from paper palms" Children's master class "Hedgehog made from paper palms" I continue the palm epic. The lesson was held in the second younger group, children from my small group.
Summary of the lesson “Flower of Friendship” Summary of an open lesson in the preparatory group on social and communicative development “Flower of Friendship” Purpose: Consolidation of ideas.
Master class “Carnation flower made of paper” Flowers are a festive attribute that gives a great mood to the one to whom they were presented, as well as an excellent way to decorate the interior. Master class “Flower using origami technique” This is the kind of paper flower I propose to make. To make our flower you will need paper squares of any size, it all depends. Master class “Lilies from palms” I work with the youngest children in our preschool educational institution. I would like to share my experience of making flowers from children's palms. The youngest children participate. Crafts made using children's handprints Crafts made from children's palms are easy to make. Making them is not difficult, exciting and fun, and the result is unusual. All will be.
Source
Children's master class “Tree of Friendship” for 1st junior group
Irina Tripalina
Children's master class “Tree of Friendship” for 1st junior group
Hello, dear colleagues and guests of my page.
I bring to your attention a master class , the purpose of which is to create a collective work on an autumn theme using non-traditional artistic techniques.
- development of ideas about the surrounding world, about autumn features of nature, about types of vegetation;
-development of fine motor skills, creative thinking, attention;
- formation of aesthetic skills;
- establishing emotional contact between children, forming initial ideas about the team.
Materials: 2 sheets of A4 blue colored paper, 1 sheet of green, gouache in 4 colors (red, yellow, orange, brown, black and green markers, brush, jar of water.
A friend will help us in the rain and heat,
He will stretch out dozens of hands
Let's have a short conversation about trees , their differences from bushes, about the color of foliage in summer and autumn.
a tree from their palms together .
One by one, apply gouache to the child’s palm with a brush and leave a “print” on pre-attached sheets of colored paper.
After final drying, we invite the children to look at our tree .
This work is suitable for decorating a group reception .
Wood using the Origami technique. Children's master class Children love to draw with colored pencils, wax crayons, and paints. Often they pick up crayons and white paper and begin. Children's master class “Blossoming Dymkovo tree” Good evening, dear colleagues! Today I bring to your attention a children's master class on making wood decorated with Dymkovo. Children's master class “Autumn Tree” You and I already know that great potential for revealing children's creativity lies in productive activities - this is appliqué, modeling, etc. Children's master class on applique "Autumn Tree" Children's master class on applique "Autumn Tree" was made by the children of the group using an unconventional technique. Material for making master. Children's master class in plasticineography technique “Autumn tree” Leaf fall, leaf fall, Yellow leaves are flying. Yellow maple, yellow beech, Yellow circle of the sun in the sky. Yellow yard, yellow house. The whole earth is yellow. Master class “Tree of Friendship” for families on Valentine’s Day February 14 is an amazing day, a bright holiday, when you can safely confess your love. Those who celebrate this holiday give gifts to their loved ones.
Source
DIY crafts about friendship
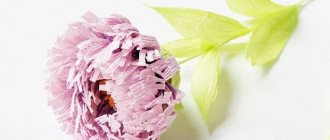
Bouquet of roses from pine cones
One of these unusual crafts is a bouquet of roses. Creating such a bouquet with your own hands will not be difficult, and besides, you can involve children in such an interesting and exciting activity.
Materials needed for work:
• pine cones • tree branches • paint • scissors • colored paper • hot glue.
Before you begin, it is recommended to prepare the surface on which you will work; it is best to cover everything with newspaper so as not to get dirty.
Before painting the cones, it is best to blow them with a syringe to remove dust and dirt from the inside.
Trim the branches to fit the vase and paint them green.
For each flower you will need a pair of leaves, which can be cut out of colored paper.
To glue the flowers to the stems, use hot glue.
Then glue leaves to each stem.
Arrange the flowers in the prepared vase and enjoy the view.
Crafts from pine cones “HEDGEHOG”
For such a hedgehog we will need:
-a lot of pine cones; -an old deep plate or bowl; -plastic bottle; - covers; - glue “Moment”; - paint on glass; -scotch; -an old flat tray or flat plate; moss, leaves and berries.
Leaves, moss and berries can be replaced with paper leaves, green yarn and plasticine berries.
Let's start making a hedgehog.
Cut a piece from the bottle. Cut the base into “petals”, bend them over and glue them to the bowl. Additionally, cover everything with tape.
Paint on all sides.
Glue cones onto the bottle and eyes onto the corks.
Glue the hedgehog to the old pallet. Cover the hedgehog with moss and berries. Don't forget to put some of the leaves and berries on the thorns. Glue on the eyes.
CREATIVE ACTIVITY “Hand Caterpillar”
We will need: -album sheet; -Finger paint; - a jar of water; -tassel; -wet wipes.
CRAFTS: Plastic caterpillar for the garden
This craft made from plastic bottles will fit perfectly in the countryside. Make it together with your child, at the same time explaining that by making new things and remaking unnecessary ones, we are a little helping nature not to suffocate from landfills, and also developing a creative eye.
Pasta crafts for children
Unusual pasta crafts for children are becoming more and more popular due to their simplicity and beauty. They make paintings, boxes, vases, snowflakes, people, houses, appliqués, and interesting pasta crafts for children.
It is very interesting and exciting not only for children, teachers, but also for parents to engage in such developmental activities with children. And in an hour we ourselves become very interested in such creativity and create real masterpieces.
When choosing what to start doing using pasta, you must, of course, first focus on the age of the child. The little ones can make crafts more simply, preschool children are a little more complex, and children aged 12 can create entire compositions, flowers, bouquets, vases, Christmas trees, decorations, toys and more on their own.
Children can make crafts from pasta by several people at the same time.
Here's what we need for pasta crafts
√ Pasta. Any colors and shapes, the more the better
√ Paints for coloring crafts (if necessary). In my opinion, the best option is acrylic paints. But, if they are not available, then gouache, watercolor and food coloring, as well as aerosol paints in cans, will do.
Acrylic paints - can be painted before crafts, and the finished product can be painted. After drying, they do not get dirty.
Gouache - can be painted before crafts, and the finished product can be painted. After drying, it does not get dirty unless wet with water.
Watercolor – paint the finished product. You need to paint without diluting the paint too much with water. Poorly colors areas where glue has come into contact. It takes a long time to dry. It can stain even slightly damp hands.
Food coloring - color before starting work. The dye from the Easter kits will do. We paint according to the instructions. The downside is that the pasta swells from water and will have to be thoroughly dried before you start making it.
Aerosol paints in cans – we paint the finished product. It is very convenient to use when you need to paint the entire pasta craft with one color. For example, paint a pasta snowflake on a Christmas tree silver.
You need a different varnish. The easiest option is clear nail polish (for small pasta crafts). Hairspray – Great for coating pasta applications. For New Year's applications, you can use glitter varnish. Wood varnish and decoupage varnish are good options for large, complex projects. For example, a box of pasta.
√ Other materials for crafts.
Boxes for boxes, cocktail tubes and wire (flower petioles), paper, beads, sparkles, strings, plasticine, salt dough and other additional material. It all depends on the craft and your imagination.
Source