Every interested parent goes through the experience of decorating children's themed corners with their own hands. The pets themselves and teachers participate in the creation of this mandatory element of the interior in preschool and school institutions.
The items that make up the composition can be crafts made during classes or specially selected items (souvenirs, printed materials) that have developmental significance.
In kindergarten and elementary grades, parents can also be involved in equipping the corners. Their indirect participation is also implied at subsequent stages of study, when students, having received an appropriate creative task, turn to family members for help.
Interior features in kindergarten
Decorating rooms for games and activities allows you to zoning the space and optimally use visual attributes in the process of raising and developing a child.
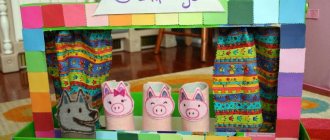
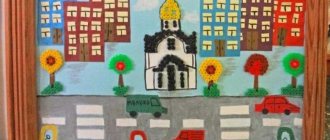
In addition to permanent corners with toys, construction sets and materials for manual labor, stands and shelves with children’s work are organized, which are periodically updated.Thematic exhibitions with crafts and drawings complement the theme of the matinees; they can change in accordance with the seasons and holiday dates.
To create an exhibition board for drawings, the most suitable material is considered to be a lightweight cork sheet on which the paper can be fixed using buttons. It can be rectangular or with a curly cut.
The cork board is installed on a wooden, plastic or aluminum frame, which is firmly fixed to the wall. The surface of the stand can be painted or decorated with figures made of self-adhesive paper.
To create a display board, the content of which is updated daily, you can use a frame with stretched fabric, while the drawings are secured with safety pins.
Making your own passe-partout and special pockets for paper is an integral part of decorating corners in kindergarten.
The ability to abandon buttons and other metal fasteners will protect children and they will be able to change exhibits on their own.
To place bulky crafts, it is convenient to use narrow wall shelves. You can creatively add images of fairy-tale characters in poses supporting stands for figurines made by children into the background of the design.
Home Garden Ideas – Create an Elegant Nature Corner in Your Home
Very often we want to bring a piece of nature into our homes, offices and apartments. Plants have always been and remain faithful green companions of humans.
Decorative gardening is developing rapidly in our time, unusual forms and styles are being created, embodied in the interiors of houses, which often do not have sufficient space for growing a real garden. But you can always find the opportunity to plant trees or other areas in the house, which will significantly transform the interior.
There are many possibilities for designing spaces using living plants. Now more than ever, the art of gardening is adapted to the interiors of small spaces with balconies and terraces. Small spaces encourage many creative ideas.
Are you looking for an opportunity to add some greenery to your windowsill? It's not a problem! Do you want to grow emerald weed indoors? Then read on...
The size of the green corner in the room can be very different. Plants can even be placed in small pots. However, they all look very beautiful and stylish!
We invite you, our dear readers of the Design Museum, to enjoy viewing ready-made design solutions from which you can draw inspiration for your own original ideas for creating a green corner. And it will change your home beyond recognition.
Plant collection
Do you want to feel the grand impact of a garden created indoors? We'll start by presenting an interior photograph from the Mandarin Oriental Hotel in Barcelona.
Here the entire room is filled with tropical greenery. Palms and ferns growing in pots evoke an indescribable feeling of unity with nature. An additional sense of beauty is created by pots of plants hanging throughout the space. Notice how wonderful they look against the background of the white palette of the room. Thus, if you want to favorably emphasize the greenery in the interior, then choose a very light background for it.
Below, take a look at the image of one residential project. A collection of three plants with long leaves is located in deep rectangular pots in a rather original way.
Particularly striking are the ceramic pots, created in collaboration with designer Jason Lane. They have an otherworldly appearance, which is especially noticeable when they are grouped. Using creative vases will help you perfectly decorate your personal green space.
Another residential project showcases placing tall plants on either side of floor-to-ceiling glass doors, creating a visually smooth and invisible transition from room to room.
For growing grass that needs a lot of light, a window sill is ideal. To give a vintage look to the landscaping, large tea boxes were used, into which the grass was sown.
Vertical gardens created against the background of a snow-white wall are an ideal option for those who are friendly with bright spaces. If you don't want to create such a garden from scratch, check out a modular green wall.
For another original version, you can use small closed containers with soil. Fill empty spaces with plants of your choice. By placing the drawers vertically, you will create a miniature green wall.
Unusual creative pots
Succulents are most often used as an ideal option for indoor landscaping, especially since they can be chosen from many interesting varieties. They can be combined in individual creative containers or arranged separately in an unusual way. This brings a unique charm to modern, bright spaces.
The composition below is central to the design of this residential project. She gives your creativity a boost by arranging these succulent plants on plain white bowls or plates. Feel free to turn your plants into true works of art by adding glass beads, driftwood, shells, rocks and other eye-catching trinkets.
Succulents love sunlight very much. Therefore, the best place for their location may be aluminum gutters located on the sunny side along the window opening. Sometimes just a few types of individual potted plants can create an original indoor garden.
Using a set of small pots in your room will add some coziness and depth to your green space. Containers in pastel colors and shades of jade, mint or rose are the perfect complement to these original plants.
Display your luxurious indoor garden on floor-to-ceiling shelves. Try placing pots of succulent plants interspersed with various decorative items such as vases and sculptural balls.
Terrariums
We couldn't finish our little review of home gardening without mentioning the latest design solutions - terrariums. They are a kind of mini-gardens, enclosed in open or closed glass containers, and add personality and special appeal to the premises.
Often this effect is enhanced by grouping them against the background of one window. Designers also add small animal figurines to them, adding originality to their creations. If you look closer at the photos, you will notice the presence of plastic dinosaurs in the containers.
Everyone can create a small garden that will become the central element of the interior in your room with their own hands. Clear pots (glass bowls) always look great and are becoming increasingly popular. A row of pots placed in the center of the table shows the successful use of uniform containers and a variety of plants in the design.
The designers used very original solutions, creating true mini-worlds with miniature people, which are located in stylish glass containers. These humorous scenes from life are a new level of organization of closed terrariums.
Unusual mini-gardens floating in the air can be created by hanging pots at different levels. This compact and ultra-modern design is ideal for rooms with floor-to-ceiling windows.
And we will finish by introducing you to a giant terrarium from architectural designer Emmanuel Moureaux.
The images above are proof that there is no space too small for an indoor garden. Let it be very simple for now, consisting of only a few pots. But maybe then you want to go further and organize chic vertical or hanging gardens.
Most importantly, don't be afraid to experiment and be prepared to make small mistakes. Don't be discouraged if some of your pets are thriving while others are struggling. It is in your power to fix everything and create comfortable conditions for their growth.
If at first it doesn't work out, try again. Remember that the unique conditions of your home may be home to many rare collections of living plants...
A corner to connect with nature
The concept of decorating a corner of nature with your own hands depends on the age group and the ability to regularly care for the exhibits.
If the exhibit will be within reach of children, it should include only harmless items.You can create a model of a farm or savannah with plastic figures. Nearby you can place cards with images of animals, insects and plants.
For children who can take part in watering and care, you can create a picturesque corner with climbing and exotic plants.
Nearby on the windowsill you can set up an indoor vegetable garden for germinating seeds.
As additional attributes, you can use temperature and humidity sensors, spray bottles and water containers, special cloths for cleaning plants, and spatulas for loosening.
You can use tree bark, pine cones, and herbariums to decorate the corner. In the common playroom, if regular specialized care is possible, you can also place an aquarium with fish.
Crafts “Take care of nature”
Children love to color. Therefore, print a poster on this topic in black and white and give the children freedom of creativity. Let them use crayons, pencils, felt-tip pens or paints to add bright colors to the canvas. Tell them what color the elements of the poster should be, but if the children want to show their vision of the plot, do not interfere with them, let them show their individuality. Then teach them how to make crafts with the theme "Take care of nature." Prepare everything you need in advance.
Craft “Waterfall”
If you go on a picnic with your children, after the feast tell them that plant remains can be buried in the forest, they will rot. But this trick won’t work with plastic bottles. Therefore, you need to take them with you to throw them in the trash container or to do a wonderful job for which you need:
- plastic bottle;
- cardboard;
- scissors;
- water;
- cup;
- beads;
- colored paper;
- markers;
- gouache.
Help your child cut the plastic bottle in half crosswise, almost in half, with scissors. The top part should be slightly smaller than the bottom. The child will paint this half with a neck to turn it into a fish, then draw an eye on it with a felt-tip pen. The blue cardboard sheet will turn into water. You need to glue beads at the bottom, and cut out something like pebbles from multi-colored paper.
All that remains is to glue the “fish” onto the blue cardboard and draw air bubbles in the water.
Crafts made from natural materials
To create it you will need:
- Walnut;
- cone;
- dry grass;
- tree branches;
- sawed from a dry tree trunk, which will become a stand;
- glue.
Place a wooden stand on the cut tree, the child will glue dry grass and attach twigs using plasticine.
Lesovichek will live in this forest. The baby will make it out of a walnut, which will become the head and cones - this is the body. These parts need to be connected with plasticine. Facial features are also made from it. But it is necessary to use plasticine of appropriate colors, as for plants and mushrooms that need to be attached to the stand. Use a bright marker along the edge of the stand to write “Take care of the forest!”, and if the child is already familiar with literacy, let him do it himself.
Rack for sports equipment
Decorating a sports corner with your own hands is done in the active games area. For bright hoops, clubs, balls and jumping ropes, it is necessary to organize aesthetic and convenient storage with special holders, nets and shelves.
To equip the corner, you need to use the safest plastic or fabric products.
The contents of the exhibition can be supplemented with homemade items, such as fake fishing rods or other devices for developing dexterity.
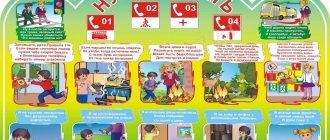
Information board in children's institutions
When decorating a corner for parents with your own hands, the overall aesthetics of the institution are preserved. The composition, as a rule, is placed in the reception area, the most optimal place is above the changing lockers or at the entrance to the room.
A section of the wall is decorated with bright, cheerful drawings or wall relief figures, the details of which can be supplemented with seasonal or festive elements.
Crafts from garbage
Children love Kinder surprises, so they almost always have packaging for the gifts inside. Teach children by showing them what can be made from such waste material.
The result will be wonderful funny chickens. To make them, the kids will need:
- plastic containers for kinder eggs;
- glue;
- beads or pins;
- yellow and red cardboard;
- scissors.
To one plastic package you need to glue wings made of yellow paper and scallops made of red paper, and attach beady eyes in the same way.
You can pierce the top of the Kinder egg package with two pins. Then the remaining beads on the outside will become the chicken's eyes.
To make the shells, have parents cut the top of each package half in a zigzag pattern. This will be more difficult for children. Together with them, make a nest from straw or dry grass, or from thin twigs, fastening the elements with threads or glue.
You can make such a picturesque bouquet out of garbage. To create it, take:
- Kinder egg packaging of different colors;
- scissors;
- sisal or green plastic bottles;
- cocktail straws;
- nail.
Making master class:
- Also cut the egg halves in a zigzag pattern. On the reverse side, use a heated nail to make a hole.
- Insert a straw into each, first push the edge further to cut it into 2 parts. Then tie them in a knot, then this “stem” will be firmly fixed in the flower.
- Arrange them all in the same way. Connect the flowers, cover with sisal, tie with ribbon.
- If there is no sisal, then you need to cut off the top and bottom of the green plastic bottle and cut the remaining part into a thin strip in a spiral.
For the next craft on the theme take care of nature you will need:
- Kinder egg packaging;
- toothpicks;
- scissors;
- plasticine;
- paints;
- thin colored rope;
- flat lid from a cardboard box;
- green colored paper;
- glue.
Step-by-step production:
- Let the child glue colored paper inside the lid of the box, this is a carpet of green grass. Toothpicks need to be pre-painted, when dry, stick along the edge of the box, like a picket fence. These pickets are tied with rope in several rows to form a fence.
- Pierce the bottom parts of the plastic blanks with an awl and have the child insert toothpick legs here. He will coat them with black plasticine, make small circles from it, and attach them to the cow’s body. Then you need to sculpt the horns, and the muzzle from yellow plasticine.
- In the same way, let the child create other animals: a pig, a cat, a dog, a sheep. Then you’ll get a whole village farm, and you already know how to make kinder chickens.
The following crafts, take care of nature, are no less interesting in execution. After all, after a feast or celebration, plastic cups and disposable plates remain. Make a clown out of them together with your children.
For it you will need:
- strong wire;
- disposable plates and glasses;
- plastic tray;
- latex gloves;
- padding polyester;
- buttons;
- multi-colored threads;
- cardboard;
- plastic bottle;
- glue.
Manufacturing sequence:
- Make a frame of a man out of wire. Thread cups onto each wire that became arms and legs, piercing their bottom.
- Glue 2 plates together, first placing plastic hair between them. Glue threads in the shape of a mouth, cheeks, eyelashes onto your face. And the pupils can be made from a plastic bottle.
- Two trays will become the back and front of the clown. Decorate his clothes with buttons, sparkles, cardboard, which will turn into a jacket collar.
- Stuff the gloves with padding polyester and attach them in place. This is how the theme of natural ecology came into play. After all, this garbage will not harm her if you make crafts like this for the dacha or for a competition.
And an empty container from “Toilet Duck” or other household chemicals can easily become a toy bus. And the other bottle - by helicopter.
To make the first toy, you need to take an empty plastic bottle of a similar shape, for example, from a “toilet duck”, rinse it well, and remove the label.
Draw the windows and doors of this minibus with a felt-tip pen, cut them out with a knife and scissors. To prevent your child from getting hurt on the sharp edges of the plastic, sand them first with coarse, then fine sandpaper.
The covers can be glued with super glue, making wheels or using wire axles. Use an awl to make two punctures on one side and the same number on the other side of the bottom of the bottle. Insert one and a second wire into them, onto the ends of which you need to glue the lid, which will become the axes.
And to make a helicopter, you will need:
- 2 bottles of drinking yogurt;
- glue;
- 2 plastic bottle caps;
- cocktail straws;
- 2 nails;
- scissors.
The first bottle of drinking yogurt will be the main one.
You can simply draw a cabin on its bottom or cut off the bottom and glue half of a plastic package from a Kinder egg here. Make runners from two straws, attach them to strips of plastic cut from the second bottle.
Using a hot thin nail with a wide head, make a hole in the lid and its attachment point, as well as at the ends of the straws. Match these parts to create the top propeller. In the tail part, make it out of straws.
If you need to quickly make a craft about the ecology of nature, use plastic bottles. Tell your child that those who throw them away in the forest harm nature. After all, such containers will rot only after 200 years! It’s better to make a craft out of it for a competition. It will take very little time and materials to make the next one, here they are:
- milk bottle;
- plasticine;
- 2 buttons;
- black and white cardboard;
- glue;
- pliers;
- wire in a white winding.
Cut 4 pieces of wire with pliers and glue them to the bottom of the bottle, turning it horizontally.
Make a tail from the thinner wire in the winding. Have your child smear black play dough onto a bottle cap to create a nose for this rat. He will cut out ears from white cardboard, and a mustache for her from black cardboard. Using plasticine, attach the eyes to the muzzle.
To make fun snowmen, show children how to draw on Actimel bottles with a marker to create the characters' facial features. You can teach your child to knit. Cast on 2 knitting needles and show him how to knit a rectangular fabric using garter stitch. Then you need to sew it on the wrong side. After that, thread the needle and pass the thread into the upper part of the cap, tighten it.
How to make a fan from forks was described in the corresponding article. Next to him, such an animal made from a plastic bottle will look wonderful.
You need to cut off the necks from the other two and glue them directly with the partings to the main container. The legs are done. The ears are cut out from the remains of the auxiliary bottle.
It's easy to create an adorable horse using two colorful bottles and a thread mop attachment.
To make a cat you will need:
- 3 identical bottles;
- scissors;
- paints;
- brush;
- glue;
- piece of fur.
The necks of two bottles are cut off; they need to be inserted one into the other to form the body of a cat. From the third bottle you will only need the bottom; glue it instead of the head. Make ears from scraps of plastic and glue them in place. All that remains is to paint the base to make a cat, glue a piece of fur on the head, and the tail can be made from cardboard or plastic.
Flowers from a plastic bottle will also help turn waste into a decorative item or into an entry for a competition. Petals are cut out from this container. In order for them to bend like that, you need to hold the workpieces over the flame for a short time.
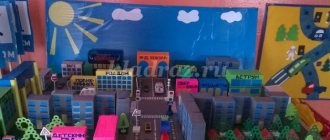
Subject developmental compositions in kindergartens
Exhibits with special paraphernalia on traffic rules, hygiene and healthy eating, shelves with musical instruments, books or pencils are also located in separate areas with a thematic design.
According to the requirements of modern pedagogy, privacy zones can also be created in playrooms and classrooms - houses, tents, curtained areas with upholstered furniture.
In the process of decorating corners with your own hands, you can use photo collections with successful solutions.