Volumetric applique on the topic: Flowers in spring. Junior group
Spring crafts in the second junior group
Volumetric applique on the theme: “Flowers in spring.” Second junior group
Do-it-yourself volumetric applique. Master class with step-by-step photos and description.
Master class: “Lonely Dandelion” Author: Eva Derevyankina 3 years old, a student at MBDOU kindergarten No. 1 in the village of Staroye Melkovo, Tver region, Konakovsky district. Head: Oksana Sergeevna Mantsigina, teacher at MBDOU kindergarten No. 1 in the village of Staroye Melkovo, Tver region, Konakovsky district. Description of material: this master class is designed for preschool children, teachers and parents. Purpose: the work can be used as a decoration for a group or as a handmade gift for parents. Goal: to teach how to make a three-dimensional applique with your own hands from cotton wool. Objectives: to develop fine motor skills and creativity in children; develop the ability to compose an image given by an adult; fix the names of colors; develop accurate work skills.
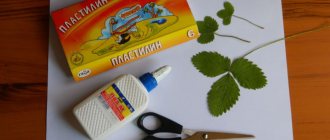
Dandelion Dandelion wears a yellow sundress. When he grows up, he will dress up in a little white dress. Light, airy, obedient to the breeze. (E. Serova) To complete the work we will need: 2 cardboards of white and blue colors, PVA glue, scissors: simple and curly, gouache: yellow and two different shades of green, cotton wool.
Work order:
1. On a blue sheet of cardboard, carefully retreating 1 cm from the edge of the paper, cut all 4 sides of the cardboard with curly scissors. You will get a frame (an adult does this work).
2. Take a sheet of white cardboard for the background and glue a frame on it in the middle. This creates the basis of the application.
3. Take cotton wool (we used cotton wool as a sheet), cut off a strip and twist this strip with a flagellum. Flagellum - stalk is glued with PVA glue according to class=”aligncenter” width=”625″ height=”469″|fcw3qayjh5a| src=»https://ped-kopilka.ru/upload/blogs/10897_18ece036bc3d6bd2b01fff476cb53508.jpg.jpg» class=»aligncenter» width=»625″ height=»469″[/img] 4. Cut off another piece of fleece.
5. And we form this piece in the form of a leaf, glue it to the stem.
6. We do the same work with the second leaf.
7. Next, cut off another piece of cotton wool.
8. Form and glue the grass.
9. From the next piece of cotton wool we make a sun, glue a circle of cotton wool into the corner of the applique.
10. Next we make rays of the sun from cotton wool flagella and glue them.
11. We make a blank dandelion “cap” in the shape of a circle and glue it.
12. This is what happens. Dandelion I was the Radiant Sun. I became a fluffy cloud. (S. Pshenichnykh)
13. Then we take gouache of yellow and two shades of green.
14. And we begin to decorate, first the sun and rays in yellow. And so that it really is a dandelion, beloved by all children, we glue “umbrellas” from blanks in the form of small flagella.
15. We paint the leaves and stem with light green gouache.
16. This is what happens
17. Paint the grass with dark green gouache.
18. Our dandelion is ready.
Parachutists Made of fluffy balls Over a colorful summer meadow Parachutists are flying, chasing each other. As soon as they touch the ground, they fall asleep, as if on a sofa. And in the spring they will wake up... and there will be dandelions! Author: I. Tokmakova
We recommend watching:
DIY dandelion made from natural material. Master class Flowers made of polymer clay. Master class with step-by-step photos DIY dandelions from threads. Master class DIY thread dandelions. Master class with step-by-step photos
Similar articles:
Quilling dandelions. Master Class
Volumetric applique “Dandelions on the lawn” using quilling technique
Drawing dandelions in the preparatory group
DIY thread dandelions
Application. Dandelion using the isothin technique
Postcard “Gift for Mom”
A preschool child can handle this work independently. Dad's help is welcome. For the background of the card and flowers, you should choose light, soft colors. For work you will need:
- Cardboard, which will play the role of the base of the product.
- White and colored paper (the color scheme should be adjusted with the child).
- Narrow satin ribbon of a suitable shade.
- Glue, scissors, pencil.
You can start making the gift. It is important to follow the sequence:
- colored cardboard needs to be folded in half (you should decide in advance on the size of the future postcard);
- next step: cutting out tulip buds; small multi-colored paper rectangles are folded in half, the silhouette of the petals is lightly drawn from the fold with a pencil and carefully cut out;
- cut narrow stems and leaves from green paper;
- the bottom of the tulip bouquet can be cut out separately: cut a rectangular strip of green paper from bottom to top, leaving the upper part of the part intact;
- fold all the received elements into a bouquet, placing it beautifully on the base, and glue it;
- a satin ribbon bow will be a wonderful decoration for a bouquet;
- as an addition - small white circles placed above the flowers.
When working on a postcard, it will be useful to give your child more freedom to realize his imagination.
The “flowers” theme is quite common in appliques due to the variety of design options available to adults and children.
"Daisies"
Preschool children will enjoy making this application because it is not difficult to complete. The result will be a colorful craft.
You need to prepare:
- drawing “bouquet of daisies”;
- pencil, PVA glue, scissors, brushes, paints (preferably acrylic);
- colored woolen threads, matching the color of the flower in tone;
- frame.
Master Class:
- First, prepare a frame for the future picture. On thick rectangular cardboard, draw a frame of the desired thickness and cut out the middle. Paint the resulting product (light-colored paint is best). Leave until completely dry.
- Make small flat buttons from threads (the diameter should match the width of the frame) from woolen threads (color at your discretion) and paste them over the entire area of the frame.
- It is enough to finely chop the woolen threads. Place the thread mass into separate containers: white for the petals, yellow for the center of the chamomile, two shades of green for the leaves and stems.
- Place a stencil of the design on the base and carefully trace it with a pencil.
- Carefully grease the centers of the drawn daisies with glue and thickly glue pieces of yellow thread.
- Make the petals in the same way using white threads.
- Create stems in a similar way using dark green threads.
- For the leaves, use threads of a lighter green tone.
- Insert the picture into the frame. This is both a good gift and an interesting home decor.
Applique is a type of creativity accessible to all ages. A huge range of available materials, such as paper, fabric, plastic, cereals, glass, allows you to create beautiful products.
Appliqué practice is very beneficial for a child’s development. Since this is most often a collective work, the child learns to create together, while helping and accepting help.
Children's imagination, thinking, and imagination also develop, and the quality of attention, perseverance, and perseverance gradually increases.
The application in its own way is a guarantee of friendly creative relations between parents and children.