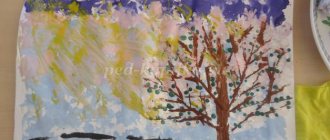
Summary of the drawing lesson “Rainbow-arc, don’t let it rain”
Olga Penkovskaya
Summary of the drawing lesson “Rainbow-arc, don’t let it rain”
Summary of drawing lesson " Rainbow - arc , don't let it rain "
(middle group)
Penkovskaya Olga Vladimirona, Novokuznetsk MBOU "Kindergarten No. 44", teacher.
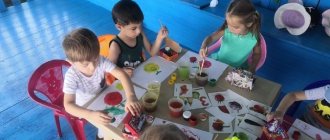
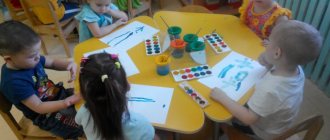
educational - continue to teach children to independently and creatively reflect their ideas about beautiful phenomena using various visual and expressive means; arouse interest in the image of a rainbow ; give basic information on color science, continue to consolidate and enrich children’s ideas about the colors and shades of natural objects, teach how to mix paints and get the desired colors and shades, reinforce the ability to cleanly rinse a brush before using a different color of paint, continue to teach how to draw wide lines in only one direction ( in the form of an arc)
and the whole brush.
developing - develop a sense of color.
educational - to cultivate an aesthetic attitude towards nature.
Pre-work: viewing illustrations, postcards, stamps depicting rainbows and other natural phenomena to enrich children's artistic experiences.
Guessing the riddle of G. Lagzdyn:
What's the name, tell me
The rocker that arcs in the sky
Equipment: sheets of white paper, watercolor paints, brushes of different sizes, jars of water, paper napkins, stands for brushes, pictures of a rainbow , multi-colored droplets in the colors of the rainbow , glued to children’s chairs, “Melody of Rain ”
.
On the topic: methodological developments, presentations and notes
continue to teach children to reflect their ideas about a beautiful natural phenomenon - a rainbow, using expressive means (color, shape, size). Make free hand movements when drawing.
A fun and interesting activity with elements of experimental activity (getting rainbow colors in a jar of water). Children draw in an unconventional way (with a foam sponge), finish drawing the river.
A comprehensive lesson on ecology (plasticineography) in the senior group with children with disabilities.
With the help of this presentation, material on introducing children to the colors of the rainbow is studied and reinforced. And a creative teacher will be able to apply it to other GCDs.
Municipal preschool educational institution Kindergarten No. 52 “Lukomorye” Author of the project: Ekaterina Aleksandrovna Orlova, teacher of the highest category. Wed.
Goal:1. Continue to teach children to independently and creatively reflect their ideas about beautiful natural phenomena using various visual and creative means.2. Arouse interest in.
OD summary for drawing in the middle group “Rainbow - arc, don’t let it rain.”
Source
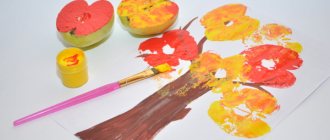
How to draw a rainbow with colored pencils and paints, gouache: colors in order
The rainbow contains wonderful colors. Each of us knows the verse about the hunter and it is in it that the names of those flowers that are included in this natural phenomenon are hidden. You can depict a rainbow using any materials you have at hand. The most important thing is that each color goes in order.
The most interesting and accessible method is to draw a colorful rainbow using cotton swabs. Soak each stick in the required paint, connect it to each other, and then run them over the paper.
You can also use a wooden stick or sponge that is designed for washing dishes. Carefully squeeze out the paints onto a special palette, soak a sponge in them, run it over the paper - that’s it, the rainbow is completely ready.
If you want the transitions to be smooth, apply paint with a wide brush:
- Wet the paper thoroughly with paints.
- Leave it for a while so that the moisture is absorbed.
- Wait for the paint to flow and you will end up with a wonderful rainbow.
Drawing with gouache
Now let's directly figure out which colors should be included in the rainbow. Please note that all the letters with which the colors begin have their own meaning:
- Red . This color is deciphered as follows: “every ”.
- Orange. But this color comes in count number 2. It stands for "hunter" .
- Yellow . Next comes this color, which means “wants .
- Green . The color of the grass means "to know" .
- Blue. This color is number 5. It means "where" .
- Blue. After blue comes the color blue, which stands for “sitting.”
- Violet . In last place in the rainbow is this color, which means “pheasant” .
Lesson 32. Drawing “Who lives in which house” (“Who has which house”)
Program content.
Develop children's ideas about where insects, birds, dogs and other living creatures live. Learn to create images of objects consisting of rectangular, square, triangular parts (birdhouse, beehive, kennel, booth). Tell children about how a person takes care of animals.
Methodology of conducting the lesson.
Talk with the children about which living beings live in which house. Ask what other houses there are. If the children do not name the home of any animal, complete their answers.
Show the children the illustrations, ask them to trace the shape of the houses one by one, and then show them with their hands in the air how to draw them. During the lesson, help children with advice, repeated showing (individually) illustrations; ask questions about the sequence of images of houses. Children who can quickly complete the work are asked to draw next to the house the animal that lives in it.
Consider all the drawings created by the children, invite the children to talk about their drawings, and praise them for their efforts.
Materials.
1/2 landscape paper, colored pencils (for each child).
Connections with other activities and activities.
Conversations about nature, the life of insects, birds, animals; observations on walks, reading books, looking at illustrations.
Lesson 33. Application “Cut out and paste whatever building you want”
Program content.
To develop in children the ability to create a variety of images of buildings in applications. Develop imagination, creativity, sense of composition and color. Continue to practice cutting strips in a straight line, squares diagonally, etc. Learn to think through the selection of parts according to shape and color. Reinforce techniques for careful gluing. Develop imagination.
Methodology of conducting the lesson.
Invite the children to look at the strips of paper lying on their tables and ask about their color. To say that from these strips you can cut and paste a beautiful building - whoever wants what. Remind the children how they created buildings from parts of different shapes, show them the parts lying on the teacher’s table (cube, brick, triangular prism). Ask how to cut the strip to get the parts of the desired shape; If the children miss something, remind them. Ask them to think about what colors look beautiful in combination and choose them for the applique.
Materials.
Designer parts (wooden and plastic, different shapes: cubes, bricks, triangular prisms). Strips of paper of different colors measuring 3x8 cm, square sheets of paper 16x16 cm, scissors, glue, glue brush, napkin, oilcloth (for each child).
Connections with other activities and activities.
During games and activities with building materials, clarify with children the shape of structural parts and their location; pay attention to the beauty of the buildings being created.
Lesson 34. Modeling “Girl in winter clothes”
Program content
. To evoke in children a desire to convey the image of a girl in a sculpted image. Learn to highlight parts of the human figure in clothing (head, fur coat widening downward, arms), convey them in compliance with proportions.
Methodology of conducting the lesson.
Examine the girl doll with the children, ask what parts the figurine is made of (head, coat, arms). Note the size of the parts and their position in relation to each other.
Discuss with the children how to divide the clay into parts in order to correctly sculpt the girl.
Materials.
Doll. Clay (plasticine), modeling board, stack (for each child).
Connections with other activities and activities.
Looking at dolls in winter clothes, illustrations.
Lesson 35. Painting “Snow Maiden”
Program content.
Teach children to portray the Snow Maiden in a fur coat (the fur coat is widened downward, arms from the shoulders). Strengthen the ability to paint with a brush and paints, apply one paint to another after drying, when decorating a fur coat, rinse the brush cleanly and dry it by blotting it on a cloth or napkin.
Methodology of conducting the lesson.
Consider the Snow Maiden with the children. Suggest using hand movements to show the fur coat, widened downwards. Say that you need to start drawing from the girl’s head. It should be placed at the top of the sheet, but not at the very edge, so that the drawing turns out beautiful. Each child can draw the Snow Maiden's fur coat in the color he likes.
During the work, remind the rules of drawing with a brush and paints, monitor their implementation, direct the children’s attention to conveying the details of decorating a fur coat, hat, discussing them individually with each child.
Examine all the finished drawings with the children, enjoy their beauty and diversity.
Materials.
Snow Maiden toy. Rectangular sheets of paper of different soft tones, gouache paints, brushes, a jar of water, a napkin (for each child).
Connections with other activities and activities.
Telling fairy tales, looking at illustrations, artistic postcards with the image of the Snow Maiden.
Lesson 36. Modeling “Duck with ducklings” (Collective composition)
Program content.
Continue to introduce children to Dymkovo products (duck with ducklings, rooster, turkey and others). Learn to highlight the decoration elements of toys, notice the beauty of the form. Create a desire to sculpt toys. Learn to sculpt figures on a stand, convey differences in the size of objects and individual parts, and divide clay in appropriate proportions.
Methodology of conducting the lesson.
Consider the Dymkovo duck with your children. Say that the big duck has little ducklings. Note that the ducklings have an oval body, a round head, and a flat beak.
Examine all the sculpted figures. Emphasize their imagery.
Materials.
Dymkovo toys. Clay, modeling board (for each child).
Connections with other activities and activities.
Enriching children's ideas about folk toys. Looking at toys in class and in free time. Children playing with toys in the play corner.
Lesson 37. Drawing “New Year greeting cards”
Program content.
Teach children to independently determine the content of the drawing and depict what is intended. Reinforce painting techniques (use paints correctly, rinse the brush well and dry it). Foster initiative and independence. To develop aesthetic feelings, imagination, the desire to please loved ones, a positive emotional response to a self-created image.
Methodology of conducting the lesson.
Show the children several postcards one by one and ask what is depicted on them. Invite the children to think and say what they will draw. If the child finishes the drawing quickly, give him the opportunity to draw more. Encourage independence in determining the content of the drawing.
At the end of the lesson, review all the drawings with the children, marking the most interesting and expressive works. Ask the children who they would like to give them to; emphasize that everyone is pleased to receive a greeting card.
Materials.
Postcards about winter, Christmas trees, and New Year's holidays that are accessible in content. Landscape leaves, gouache paints, brushes, jars of water, napkins (for each child).
Connections with other activities and activities.
Preparing for the New Year's holiday, learning poems, songs, round dances. Reading books, conversations and conversations with children about the upcoming holiday.
Lesson 38. Application “Beads for the Christmas tree”
Program content.
To consolidate children's knowledge about round and oval shapes. Learn to cut corners of rectangles and squares to obtain oval and round beads; alternate beads of different shapes; stick carefully, evenly, in the middle of the sheet.
Methodology of conducting the lesson.
Consider several different beads with your children and offer to make beautiful beads to decorate the Christmas tree. Show cutting techniques. To say that when gluing it is necessary to alternate beads of different shapes. Invite one child at the board to show how he will cut out the beads. Show the children how to glue beads onto a string. Give them the opportunity to practice cutting.
Help children in need glue beads onto a string. To do this, one cut out circle (oval), not smeared with glue, is placed under the thread. Another circle (oval) is smeared with glue and placed on the thread so that it coincides with the circle (oval) located under the thread, and is gently pressed with a cloth. Continue, alternating beads according to shape.
Admire the resulting bright multi-colored beads with your children.
Materials.
Beads, paper rectangles and squares of different colors, thread (not very thin, about No. 10) for gluing cut out beads, glue, glue brush, napkin, scissors (for each child).
Connections with other activities and activities.
Preparing for the New Year's holiday, singing songs, learning poems.
Lesson 39. Drawing “Our decorated Christmas tree”
Program content.
Teach children to convey the image of a New Year tree in a drawing. To develop the ability to draw a Christmas tree with branches lengthening downward. Learn to use paints of different colors, carefully apply one paint to another only after drying. Lead to emotional evaluation of work. Induce a feeling of joy when perceiving the created drawings.
Methodology of conducting the lesson.
Reminisce with your children about the New Year tree in kindergarten and talk about how it was decorated. Clarify the techniques for depicting a Christmas tree by calling 2-3 children to show to the board. Emphasize the variety of Christmas tree decorations, recall the techniques of painting with paints and the need to paint, applying color to color only when what was previously drawn has dried.
At the end of the work, display all the drawings on the board and invite the children to choose the most elegant Christmas trees. Everyone can rejoice together at the decorated Christmas trees painted by the children.
Materials.
Sheets of white (or any soft tone) paper, gouache of different colors, brushes, a jar of water, a napkin (for each child).
Connections with other activities and activities.
Preparation for the holiday. Singing New Year's songs, decorating the Christmas tree in a group, participating in a festive matinee.
Lesson 40. Modeling according to the plan “Mold what you want”
Program content.
Continue to develop independence and creativity, the ability to create images according to your own plans. Reinforce a variety of sculpting techniques.
Methodology of conducting the lesson.
Remind the children that they have learned to sculpt different objects and can sculpt whatever they want: mushrooms, vegetables, fruits, a doll, birds, animals. Invite them to think and create something interesting, but first determine the shape of the intended object, the location and shape of the parts. Approach each child while working, ask what he is sculpting, how he operates. In case of difficulties, help with guiding questions and advice.
At the end of the work, place all the molded products on a stand and examine them with the children.
Materials.
Clay (plasticine). Modeling board, stack (for each child).
Connections with other activities and activities.
Various games with toys.