Fans of modeling from plasticine can try their “creative” capabilities in working on crafts on a human theme. Creating various human figures (adults or children, fairy tales or “ordinary” ones from life) at the beginning, the most ordinary ones, will allow you to develop sculpting skills. Gradually, you can begin to make “naturalistic” copies of people in reduced sizes using sophisticated technology. We offer you interesting information about how to mold a person from plasticine - video lessons, assembly diagrams, manufacturing methods and examples of spectacular finished crafts.
- Step-by-step instructions on how to mold a person from plasticine
- Step-by-step photos of how to make light little people with children or beginners
- Video tutorials on modeling
- Sculpting detailed figures
- How to shape a figurine: general recommendations
- How to sculpt the face of a man from plasticine: sculptural modeling to resemble reality
- Video lessons on how to achieve a portrait resemblance in a plasticine person
- What kind of person/character can be molded from plasticine?
- spider man
- iron Man
- Venom
- Father Frost
- Snow Maiden
- Characters from the game Minecraft
Step-by-step instructions on how to mold a person from plasticine
It is better to construct the craft from light plasticine - it is malleable and holds its shape, the finished work looks neat. Let's look at how to mold a person from plasticine step by step:
- A piece of white, pink or beige plasticine is lightly rolled into an oval shape and stacked into three equal parts (stripes).
- The upper third is cut in a stack into three equal vertical “bases” - this is the future head and arms.
- The lower third is divided by a stack into two equal pieces - these are the future legs.
- At the top, the side blanks are lowered down, shoulders and arms are sculpted, given a natural shape, and can be slightly bent at the elbows.
- The middle blank is made round - the neck and head are formed.
- The legs are sculpted - they should, in accordance with reality, be thicker and longer than the arms.
- Natural shapes are added to the figure - a physiological deflection is made in the back/lower back, a rounded “mass” is added to the buttocks area.
- Small details are decorated - feet, hands, nose, eyes, eyebrows and mouth are added to the face.
The basic modeling of a man from plasticine is completed.
You can create a figure in two ways - plastic, when the silhouette is worked out entirely from one whole piece of plasticine, or from separate modules, when the arms, legs, head with neck and torso are molded from separate pieces and then joined together.
Step-by-step photos of how to make light little people with children or beginners
For children, there are many simple options for making a plasticine man. For example, kids will be happy to create the following figures:
- balls are rolled from plasticine of different shades - large and small;
- give the large ball a slightly flattened shape, and stretch out four rays - you get an asterisk;
- a small ball is “planted” in the upper part - this is the head.
A simplified version of the figures is ready.
Girls, who especially love to play with dolls, will eagerly start creating a little man:
- a body is formed from the workpiece in sliders;
- add hands, head;
- decorate the suit with a collar and buttons;
- feet are sculpted and secured.
The baby is ready, add the indispensable and main attribute of the pacifier.
For older children, it will be interesting to learn how to make a man in the form of a teenage boy out of plasticine step by step:
- the body is assembled from 6 modules;
- legs - in the form of a thick tourniquet, bent in half, feet are added;
- they sculpt the head, design the eyes and nose on the face.
Add a beret and mittens.
You can also make a girl using this method by adding a skirt (instead of trousers) and braids.
Video tutorials on modeling
Continuous coating
An interesting craft using the smearing technique, suitable for very young children who are just learning how to sculpt from plasticine. A pre-printed drawing is used as a basis (you can take any picture from a children’s coloring book) and soft and pliable plasticine is used for filling.
It is best to choose a high-quality product from well-known manufacturers that does not leave greasy or colored marks on the hands of children. The drawing is filled with plasticine along the contour; under the influence of the warmth of the hands and light pressure, it should be gently distributed over the entire area without going beyond the outlined contours.
Sculpting detailed figures
The plasticine person must have the appropriate dimensions; the body parameters of an adult differ from those of a child. It is believed that in a child’s figure one can “mentally” place his head in a vertical position 3-5 times, and for an adult this ratio is 7-8 times. If they sculpt a fairy-tale hero, then this scheme is not followed.
The more individual, small components there are in a craft, the more complex it is, but also the more impressive. Children in the 6th grade will already be able to easily create an original figurine from a large number of parts if they have a visual assembly diagram of how to sculpt a person:
How to shape a figurine: general recommendations
In order to make a person in motion, you can use the following options:
- use wire - it is given the desired shape, then layers of plasticine are applied, sculpting a silhouette;
- in oval bundles-blanks (for arms/legs), small cuts are cut in stacks - they help to easily bend the limbs at the “joints”;
- the silhouette is assembled from separate modules, fastened with a toothpick or wire - this allows the parts to “move”.
Depending on the gender of the person, the workpiece is given appropriate differences - broad shoulders (for men), feminine shapes (for the fairer sex).
To sculpt a human figure, head and carefully sculpt the face, you will need tools - a classic stack, and with a wavy edge, plasticine sticks, attachments in the form of concave spatulas, wire, toothpicks.
How to sculpt the face of a man from plasticine: sculptural modeling to resemble reality
When sculpting a human head from plasticine, three main criteria are determined:
- location of parts (anatomical);
- maintaining proportions;
- finding and transmitting the features of forms.
If you set yourself the goal of recreating a face/head (on a pedestal), then it is better to choose a frame. Plasticine is already applied to it. Then they determine the location of the main lines and proportions. Create volume by adding plasticine strokes.
They work out small details, taking into account the nuances:
- close-set eyes, squinting;
- shape of the nose, forehead, lips;
- presence/absence of dimples and folds.
The shape of the ears, hairstyle, and neck length are also important. This can be done without a frame, from sculptural plasticine, it is as flexible as possible.
The ratio of high and wide points on the face is determined, and “marks” are placed on the most protruding parts of the face on a plasticine blank. If necessary, adding or removing plasticine (with strokes).
Video lessons on how to achieve a portrait resemblance in a plasticine person
A sculpture created by yourself will be as similar as possible to the original if you use video material from a pro, and do not forget about the tips:
- the shape of the head can be elongated or round;
- It is better to calculate the ratio of proportions in cm; if the scale is not life-size, then it should be reduced (to the required numbers).
You definitely need to pay attention to the features of the head and face and emphasize these nuances in the sculpture.
For greater similarity, it is advisable to create a schematic drawing or use a photo on which a square grid is drawn with a pencil. This will help to “catch” the features of the face.
Christmas tree
If the winter holidays are at stake, then green plasticine will come in handy for sculpting a Christmas tree. The corresponding process does not take much time:
- First, a large cone and a wide trunk are molded from green and brown plasticine;
- Next, the cone is placed on the barrel;
- The next step is to thin out the needle patterns from the very top to the bottom (for thinning, use the corner of a bank card or the edge of a coin);
- Small balls are rolled out from bright plasticine;
- Variegated toys are attached to the Christmas tree.
What kind of person/character can be molded from plasticine?
spider man
Detailed instructions on how to do it are shown here.
iron Man
Instructions on how to do it are shown here.
Venom
Instructions on how to do this are shown here.
Father Frost
Detailed sculpting instructions are shown here.
Snow Maiden
Modeling of Snow Maidens is shown here.
"Plasticine" design
In addition to traditional creative tasks for creating three-dimensional figures, there are other ways to work with this magical material. For example, designing from plasticine parts is also modeling.
A lesson in the preparatory group on creating a car, bus, wheelbarrow for transporting soil, manure, bricks, helps kids learn the basics of constructing objects that move with the help of wheels. True, for such activities, little craftsmen will need axles to attach the wheels. These could be matches with broken sulfur tips, toothpicks with sharp ends ground off, or pieces of wire with twisted ends.
An arm, a leg, a cucumber - here comes the little man!
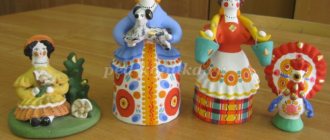
The modeling of a person in the preparatory group can also be associated with the Dymkovo toy. It is best to start working with a female image, since a girl or “young lady” is usually depicted in a long dress reaching to the ground, which greatly simplifies the process. Clay should be used for production - this is the material that is traditional for Dymkovo toys. But there’s nothing wrong with trying your hand at using plasticine.
It is impossible to make a person realistically at this age. Therefore, you should not set impossible tasks for your kids. Let the man be “cartoonish”, completely different from the real one. It is important in this type of creativity to give the child the opportunity to fantasize using existing skills. Children really like to sculpt story compositions on the theme of famous cartoons and fairy tales - so let them create for their own pleasure!
Classes on working with clay, plasticine, and salt dough are fertile ground for raising a well-rounded personality. There is a place here for developing speech, and for replenishing vocabulary, and for gaining knowledge about the world around us and art. And, naturally, for the opportunity to realize creative potential.