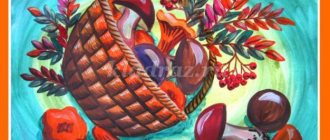
Notes on application in the preparatory group “Autumn Still Life”
Notes on application in the preparatory group “Autumn Still Life”
Notes on application in the preparatory group “Autumn Still Life”
Goal: Implementation of independent creative activity of children (constructive-model).
Program content
Educational objectives: teach children to create plot compositions using the entire area of the sheet;
Developmental: develop children's creative abilities, fine motor skills;
Educational: to cultivate interest in artistic creativity; independence; artistic taste.
Preliminary work: Excursion along the ecological trail. Consideration of autumn compositions.
Vocabulary work: reading poems about autumn by A. S. Pushkin “The sky was already breathing in autumn”, A. Fet “In autumn”, K. Balmont “Autumn”.
Materials and equipment: scissors, cardboard of different colors, colored paper of different sizes and shapes, glue, glue brush, napkins; autumn leaves, rowan branch, vase.
Progress of activities
1 part. Organizational
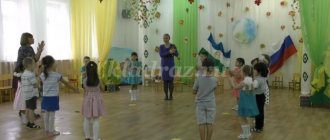
Educator: Guys, look what's new in our group?
Children's answers: Autumn bouquets, rowan branches.
Educator: Children, what is autumn?
Children's answers: Autumn is when the leaves on the trees turn yellow or red, they fall and cover the paths in the park, the tropics in the forest... There are a lot of fruits and vegetables in autumn. Collective farmers are reaping a rich harvest. They take him in cars to the city.
Educator: Why do you think the harvest is brought to the city?
Children's answers: People and pets need vegetables, fruits, and grains for nutrition.
Educator: What do birds and animals in the forest eat?
Children's answers. Berries, mushrooms, forest apples.
Educator: That's right.
Part 2. Practical
Educator: Children, you would like to create an autumn still life.
Children's answers.
Educator: But first, remember what colors autumn gives us.
Children's answers: yellow, red, brown.
Educator: Okay. Try to create an autumn composition yourself. Children, you can create the same still life, only with paper, scissors and glue.
Children's answers: Yes, we'll try.
Educator: Guys, our leaves are square. How to make berries from them?
Children's answers: Cut off the corners and you will get a circle. It will look like a berry.
Educator: Well done. Please look at our composition. What shape are the leaves?
Children's answers. Carved, oval.
Educator: Yes, they are carved. Guys, aren't you tired? Isn't it time for us to get some rest?
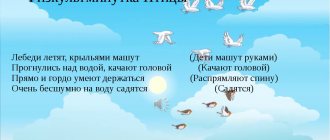
I ask you to rise this time.
The head turned - that's two.
Hands up, look forward - that's three.
Let's spread our arms four wide.
Squeeze your fingers with force, unclench them - that's five.
All the guys sit down quietly - it's six!
Educator: Guys, what do we have left to make an autumn composition?
Children's answers: Cut out a vase, a basket.
Educator: Correct.
Part 3. Independent work of children
Educator: Let's prepare our fingers for difficult work with paper.
One two three four five! (bend your fingers, starting with the thumb);
We will collect leaves. (clench, unclench fists);
Birch leaves (bend your fingers, starting with the thumb);
Rowan leaves,
poplar leaves,
Aspen leaves,
We will collect oak leaves.
Let's take an autumn bouquet to mom! (“walk” on the table with the middle and index fingers
fingers).
Educator: Have you rested? Fine. Before we get to work, let’s say the magic words: “I’ll sit up straight, I won’t bend, I’ll get to work.” Now you can get to work.
Part 4 Final
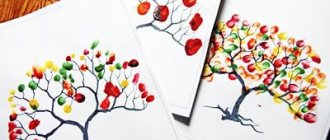
Educator: Well done, guys! Look how beautiful our pictures turned out! What are the names of these compositions?
Children's answers: Still life. "Autumn still life"
Educator: Correct. Children whose work did you like best? Why? What should we do now with our still lifes?
Children's answers: You can make an exhibition; I can hang my work on a stand so mom/dad can see my work.
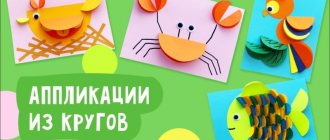
Caterpillar
Let's take a closer look at how to make a caterpillar from bottle caps.
You need: colored paper, colored cardboard, scissors, glue, markers, 5 bottle caps. The photo shows an option made from chestnuts, but the same thing can be made from bottle caps.
STEP 1. Using a template, cut out a large sheet from a sheet of green cardboard.
STEP 2. Draw the leaf veins.
STEP 3. Glue the lids to the sheet.
STEP 4. Cut out circles with a diameter slightly larger than the lid, and glue them to the top of the lid.
STEP 5. Add the caterpillar's face and legs.
STEP 6. Decorate the work according to your own wishes. This work is ready!
Banana
To make a banana like this, you will need to use a small template.
Crafts such as fruits will find their place in your kitchen for an amazing and impressive decoration.
Children will also be able to use their work to create an unusual painting to decorate their room. For example, by making a still life.
You can simply cut out the fruits you need and then stick them together with your child in a paper vase. Like this. In the form of an application.
Watch the video below for an easy technique for creating a beautiful fruit bowl. I think children and their parents will really like this process, because... Fine motor skills of the fingers will be involved here. And this is very useful. In addition, children will be happy to tear so much paper into small pieces, which will amuse them a lot.
Let's not forget about vegetables for our interesting compositions.
A pineapple
A craft in the form of a pineapple can be created using the same principle as a grape branch.
- You can slightly change the appearance of the craft by cutting out the base from cardboard in the shape of a fruit, and not just gluing rings onto the sheet.
- In this case, a yellow oval is cut out of thick paper, and many strips are cut out of ordinary colored double-sided paper and rings are also glued together from them.
- You need to fill all the free space on the form.
- Then a green tail is glued on top, like a real fruit.
Vase with Flowers
Let's consider the option of a combined application as a craft for March 8th for the preparatory group.
To complete this you will need: cardboard, colored paper, buttons, glue, scissors. Children work on ready-made cut out flower details.
STEP 1. We attach the vase template to a sheet of colored cardboard, trace it and cut it out.
STEP 2. Glue the resulting vase to cardboard of any color.
STEP 3. Next, the children gradually collect and glue the flowers, starting from the largest to the smallest petal.
STEP 4. Place buttons in the centers of the flowers.
If desired, you can decorate the vase.
The gift is ready!
Ideas for preschool crafts
Children's crafts for the preparatory group can be made on a variety of topics. As a rule, every child starts making crafts for the New Year, for mother and grandmother on March 8, for father and grandfather on February 23, also for Easter, cards for Mother’s Day, and for relatives on their birthday. In kindergarten, children also make themed crafts for the seasons, as well as their favorite fairy-tale heroes, cartoon characters...
There are many options for crafts for every occasion, and you can also come up with your own. Children in the preparatory group very often create postcards, appliqués, sculpt from plasticine, and draw.