Goals:
introduce the history of the Russian nesting doll;
consolidate children's knowledge of techniques for working with various materials using the collage technique;
develop horizons, fine motor skills, aesthetic taste and imagination;
cultivate perseverance and accuracy;
realize the connection between the labor training lesson and the decorative work lesson: painting the “matryoshka doll” pattern.
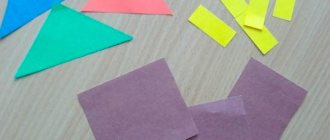
Equipment: a set of nesting dolls, pictures with Russian toys, cardboard, colored paper, scraps of fabric, scissors, braid, glue, buttons, pencils, felt-tip pens, oilcloth.
DURING THE CLASSES
I. Introductory part
1. Greeting, organizational moment.
2. Repetition of safety rules.
– When a person works, he often uses various tools and assistants in his work. Let's remember them and check if everything is ready to go. I’ll tell you one poem, and you check your workplace:
To get started we'll put everything in its place. Scissors, paper, glue Be careful, don't spill! Markers and pencils, put them aside for now! Cardboard, templates, scraps Bows, laces and curls Place everything on oilcloth! Tell me what I forgot!
– Do you have dangerous objects on your table?
– How should we treat them?
II. Work on the topic
1. Teacher's message
– The world of toys is surprisingly diverse. Fairy tales and reality live side by side here. The toys reflected people's life, habits, and mood in their own way. Each nation created its own toys, conveying its life into them. We won’t talk about all the toys today. Our conversation will focus on folk toys. Look at them, here they are (exhibition on the board). What are these toys? Can someone help me and name them? Different toys are made from different materials: clay, wood. They are in great demand and serve to decorate people's lives. Try to guess the riddle about one such toy:
“The girlfriends are different in height. And they look alike. They all sit next to each other, And there’s only one toy.” (Matryoshka)
– That’s right, our lesson today will be dedicated to the Matryoshka – a symbol of friendship and love, wishes for happiness and prosperity. Do you want to know how the nesting doll was born? One day, a Japanese wooden toy fell into the hands of Moscow region artists - a Japanese man, and in it, little by little, his whole family. That’s when they decided to ask the famous craftsman from Zagorsk, Vasily Zvezdochkin, to carve (carve) his own national toy – the Russian nesting doll – from wood. The wooden nesting doll was painted by artists. They dressed her in a beautiful sundress with an apron (textured), an embroidered blouse and tied a scarf on her head. That’s how the matryoshka was born - a Russian one, and (show) there were small, small, smaller girls and boys in it, and the last one was a swaddled baby. The first matryoshka was held in the hands of a cockerel (show). Both adults and children immediately liked the matryoshka doll. She became a welcome guest in every home and Russian souvenirs abroad. Many poems and songs have been dedicated to this toy, let's listen to one of them. If you want to learn more, you can ask the library for help and borrow additional material.
2. Reading poems (children)
I don’t know who created the nesting doll. But I know that for hundreds of years, together with Vanka-Vstanka, as if alive, the doll has been conquering the white light.
Where did he get the paints, a skilled craftsman, in the noisy fields, in the fairytale forest? Created an image of unearthly passion. True Russian beauty.
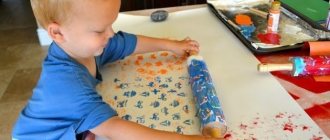
3. Working with the product.
– Today in class we will try to make a flat matryoshka doll. For this we will need various materials: fabric, buttons, lace. Often in the house you can find many such unnecessary small things, don’t think about throwing them away - with their help you can create amazing works called “collage” (French word) (on a board). Collage (applique) - this means gluing various materials onto a base at the same time: pieces of fabric and photographs, biscuits and lace, beads and old letters. To make it more clear to you, we will conduct a collage warm-up. Before starting serious work, let's try to use this technique in a simple way.
(1. A drawn shoe, but without laces: “What are your impressions?” 2. “We make a hole with an awl and insert a lace”) 3. Collage: “What are your impressions?”).
– Today you will be authors-artists. Your work is “Matryoshka”. Let's make a work plan:
1. Cut out all the parts from thin paper (symbol on the board)
2. Cut out the details of the sundress from the template and fabric.
3. Glue the fabric parts onto the base – matryoshka doll
4. Decorate (decorate) the nesting doll with braid, ribbons, buttons, etc.
5 . Color the face and remaining parts with markers and pencils.
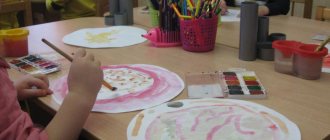
III. Practical work
IV. Lesson summary
Analysis of finished works. Finished works are displayed on the board. Express exhibition “Round dance” in a circle.
– What new did you learn in class today? – What French word did you become familiar with? – What does it mean translated into Russian? – Look at the Round Dance of nesting dolls, which ones do you think are the most successful? – What mood do they evoke in you? – Let's applaud all of us for our creative work in today's lesson. Thank you for the lesson.
Summary of direct educational activities in the senior group “Matryoshka”
Lesson notes on the application “Matryoshka”
MBDOU No. 62 “Rodnichok”
Authors: Kazachkova Elizaveta Sergeevna - teacher,
Dvoretskaya Elena Arkadyevna - teacher
Age:
senior group
Subject:
"Matryoshka"
Purpose of the lesson:
To promote the ability to create an image of a folk toy (matryoshka) using the appliqué technique.
Tasks:
1. Teach children to analyze a sample to identify characteristic features
(Components: face, hands, sundress, scarf)
2. Teach children to consciously select matryoshka parts in the chosen color scheme.
3. Continue training in work planning.
4. Teach how to capture an idea in an original artistic image.
5. Continue teaching how to cut out an object using a stencil and carefully stick on the applique elements
Equipment:
paper, fabric, glitter, scissors, glue, brush, pencil.
Bibliography:
Arapova S.V. Fine arts training. Integration of artistic and logical. - St. Petersburg: KARO, 2004. - (Modernization of general education).
Gusakova M. A. Application. - M.: Education, 1982.
Dubrovskaya N.V. Invitation to creativity: teaching preschoolers the technique of appliqué and collage. - St. Petersburg: “CHILDHOOD-PRESS”, 2004. - 128 p.
Progress of the lesson:
Organizing time.
Hello guys.
What could such a box be filled with?
Of course, with old Russian things. I'll tell you a secret. The box is filled with toys.
So, let's open the box? I'm looking for a wonderful toy. Guess which one?
We're at the fair
They brought you a chest - a gilded barrel. That chest is not simple, and the goods in it are painted. We take it out for display - And we tell a story about it.
A scarlet silk scarf, a bright sundress in a flower, resting the hand on the wooden sides. And inside there are secrets: Maybe 3, or maybe 6. She didn’t blush a little (children’s answers...? Matryoshka)
Presentation and conversation.
Now I’ll tell you guys about this wonderful toy – a matryoshka. After all, you probably have such a house and a toy?
Who has?
The first Russian matryoshka was an eight-seater: a girl with a black rooster was followed by a boy, then a girl, and so on. All the figures were different from each other. The last one, the eighth, depicted a baby.
Initially, this doll didn’t even have a name. But when the turner made it out of wood, the artist painted it with bright colors, then the name appeared - M?atryona. Perhaps this is due to the fact that at various evenings tea was served by a servant with that name. Why was everyone’s favorite Russian doll-toy called “matryoshka”? Many believe that this name comes from the female name Matryona, very popular at that time in Russia. The name Matryona, translated from Latin, means “noble woman.” Looking at the matting doll, the image of a portly, noble and toy really appears.
Design ideas
We decorate the nesting doll in accordance with any preferences and desires. The base can be cardboard or thick colored paper, but for decoration it is easy to use accessories, rice, beans, beads, and plasticine.
Other decorative principles can be used. Naturally, you can also use colored paper to work on the decoration.
Making a matryoshka doll with your own hands is quite simple - just determine the child’s skills and abilities, and then choose the appropriate operating algorithm. At the same time, you can create three-dimensional and flat figures of various shapes and colors. When working on a craft of this type, it is worth using bright colored paper, since the product must have folk motifs in its decor.