GCD modeling in the middle group theme "Fish"
GCD Artistic and aesthetic development. Modeling
Middle group
Theme: Fish
Conducted by a teacher
Sarycheva Lyudmila Viktorovna
Goal: to develop in preschoolers the ability to create the image of a fish using modeling.
Visual tasks: teach children to correctly convey the structure of a fish’s body, proportions of parts, shape, size; develop coordination in the eye-hand system, synchronize the work of both hands.
Technical tasks: learn to divide a block of plasticine into parts; continue to teach children to pinch and pull plasticine away from the main shape (ventral and pectoral fins), to work with stacks (notch, cut plasticine); improve techniques: rolling, unrolling, smoothing.
Educational objectives: to cultivate independence and accuracy in work in preschoolers.
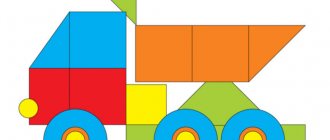
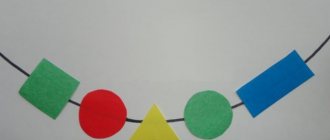
Preliminary work: examination of pictures depicting sea and freshwater fish, game “Loto. Inhabitants of reservoirs”, integration of educational areas: cognitive development, speech development, artistic and aesthetic (drawing), reading the book “To Little Why About the Sea”, riddles, coloring pages “Magic Fishes”, p/i “The Sea Is Worried”, p/i “ Pike and fish”, laying out fish from geometric shapes, “Tangram”, “Fold a square” with the aim of laying out pictures “Underwater World”.
Demonstration material: a large toy fish, a flat fish “Sazan Ivanovich”, on whatman paper there is an image of a lake (“School for young fry”) with algae (desks for fry), technological maps depicting the sequence of actions for creating elements.
1 Organizational part.
Guys, guess the riddle.
Wherever we want, we sail there.
The river is our home, we live in it... (Pisces)
I'll tell you a fabulous story about a fish. In a clear blue lake, next to green algae, lived a good old and wise fish. And the fish's name was Sazan Ivanovich. He had seen a lot in his time, he knew a lot. And Sazan Ivanovich decided to open a school for small fish - fry, in order to teach them wisdom. I wrote an advertisement in the lake newspaper and put up a sign with the inscription “School for Young Fry.” He waited a long time for the young students. He swam to the shore, swam far into the middle, but still didn’t wait. I was upset. Sazan Ivanovich really wanted to tell the kids important and necessary secrets...
Guys, I'm very sorry for the fish teacher. Do you want to help a kind and smart fish? But how can we help Sazan Ivanovich? Right. We will sculpt little fish and students will appear in the “School of Young Fry”.
2. Main part.
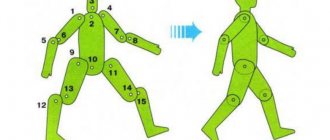
Look at the fish toy. Tell me, what parts does the body of a fish consist of?
Sensory examination. The teacher asks leading questions, helping the child to independently identify and compare the main parts and some details.
Finger gymnastics.
| A small fish swims along the river | put your palms together and tilt them to the sides |
| The little fish beats its tail | Stretch your arms forward and alternately wave your hands up and down, imitating waves or a ponytail. |
Teacher: - To start sculpting a fish, you need to divide a block of plasticine into parts. Visually divide it in half and draw a line with a stack. Then we visually divide one half in half again and cut it off - this is the “secret”. We put the “secret” in the upper right corner of the board. From a large piece we will sculpt an ovoid - a body along with a head and tail.
The teacher clarifies how the children will sculpt the ovoid and asks them to accompany the story with hand movements. Then he shows the children how to cut the narrowed part of the ovoid in stacks and move the two resulting halves to the sides - this is the tail.
The teacher calls the child for a demonstration. - Alena, show how you cut the narrowed part of the ovoid and move the cut parts to the sides (show on the finished model).
The teacher reinforces all explanations and demonstrations with mnemonic diagrams.
Teacher: - To make the tail flat and beautiful, we flatten the cut parts and cut them from the inside. Now we make the ventral fins, pinching them on both sides of the body. Nastya, how will you make the dorsal fin (child’s explanation). Do any of you have another option? (child's explanation)
Teacher: - That's right, the dorsal fin can be made by pinching, or it can be done in a constructive way: a small ovoid, flattened and stuck to the top of our fish. To do this, we use the “secret”. We coat the joint and smooth out all the irregularities.
The teacher offers to sculpt small fish. Turns on the music. During modeling, the teacher approaches the children, providing assistance and reminding them of the need to use a wet wipe. Each time he clarifies how the child will do this or that part of the craft. Let's release your fry into the lake. Let's put them at algae desks.
3. Analysis.
The teacher asks the children to tell about the most beautiful fish. He asks why they like her? Notes expressive eyes, a flat beautiful ponytail and a voluminous body, etc. He asks what the names of the fish they sculpted are, and how the dorsal fin was made.
- Guys, hear the bell ringing. A lesson begins at the School of Young Fry. Let's not disturb them.
The P/I “Pike and fry” is being held.
Children tidy up their workspaces, put boards and plasticine back in place, and place napkins to dry.
Plasticine goldfish step by step
In the middle group of kindergarten we suggest making a goldfish. The “Prestige” set for children's creativity includes not only yellow, but also gold plasticine. In this case, your fish will be truly golden. We show you step by step how to do this.
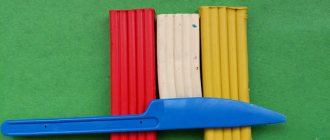
You will need: plasticine, plastic knives for it and a set of toothpick sticks.
Roll a small ball out of plasticine.
Flatten it with your finger to make a circle.
Using a spatula, cut a circle on one side and turn the cut plasticine to the left and right sides, then use your hands to shape the turned pieces into triangles. The tail is ready.
Make another ball and attach a tail to it.
Make another ponytail and divide it in half. You now have a fin for the back. Attach it on top.
Make the circle smaller. Cut it in half, flatten it and mold each half into leaf-like figures.
It turned out to be two fins.
Attach them to the sides of the fish. Now take a toothpick and draw stripes on the tail and fins.
All that remains is to make the eyes. Form six small balls: two larger white ones, two smaller blue ones and two very small black ones.
Flatten the balls and stick large white circles on the goldfish’s head, then attach smaller circles to them and place black dots in the very center.
Do the same with the second eye.
The goldfish is ready. Stick it onto a piece of blue cardstock. Decorate the cardboard with pebbles and shells.
Cartoon fish with big eyes for kids
Sample of a finished fish with big eyes.
Roll a ball out of plasticine.
Flatten the ball a little and form a figure in the form of a truncated circle. Warm it in your hands and knead a piece of yellow plasticine well, tear it into 4 different pieces of irregular shape. Shape the pieces into different leaf shapes.
Attach the tail and top fin. Apply stripes on the fins and tail. We form thin sausages from pieces of green plasticine and attach them to cardboard on both sides of the fish, then flatten them a little. The result was seaweed.
Sculpt eyes from 2 flat pieces of plasticine - blue and white.
Finish the eye - add a black pupil, a white highlight and long black eyelashes. Add two small circles for the mouth.
Sample of the finished figurine.
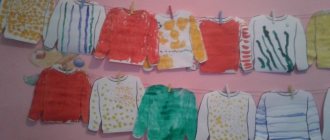
Various options for crafts with comments and descriptions of execution methods
Most of the fish (photos 1–6) are made using a combined method: the head and body are sculpted from one large piece of plasticine, while the remaining elements (tail, fins, eyes) are attached separately.
The fish in photo 4 “Goldfish” looks very impressive - a beautiful long red tail, detailed scales and bulging beady eyes.
Photo 5 “Aquarium with fish” shows modeling using the bas-relief method - the fish are attached to the surface, protruding approximately halfway. The original composition is complemented by pebbles, shells and algae.
The “Magic Fish” craft is of interest (photo 7): the body is made of a twisted flagellum. The gradient color (transition from pink to lilac) will look interesting.
Photos 9 and 10 show volumetric aquariums. Sea creatures are attached to the walls of the cans or fixed in the center on special fasteners.
Video: cartoon “Wow, the talking fish” (1983)
https://youtube.com/watch?v=LUYHnRAinJEVideo can't be loaded because JavaScript is disabled: Cartoon “Wow, a talking fish!” (https://youtube.com/watch?v=LUYHnRAinJE)
Video: cartoon “In the blue sea, in white foam” (1984)
https://youtube.com/watch?v=wCpIuwelvwkVideo can't be loaded because JavaScript is disabled: In the blue sea, in the white foam cartoon, 1984 (stay with us boy) (https://youtube.com/watch? v=wCpIuwelvwk)
Video: “The Tale of the Fisherman and the Fish” by A. S. Pushkin
https://youtube.com/watch?v=D07xru9L7JkVideo can't be loaded because JavaScript is disabled: Pushkin's Tales - The Tale of the Fisherman and the Fish (https://youtube.com/watch?v=D07xru9L7Jk)
Most preschoolers love to sculpt, because this is an opportunity to create a new toy for themselves. Object modeling, which includes creating a fish, will certainly captivate children in the middle group, especially if the teacher introduces them to various options for creating the image of sea creatures. And the use of additional materials will make the lesson bright and memorable.
Plasticine fish on cardboard - plasticineography for children
For children in the older group of the kindergarten, we invite them to do more complex work - plasticineography or plasticine appliqué on paper. Such figures can be sculpted flat or three-dimensional, leaving thickness. On this topic, we suggest making a plasticine fish on paper.
Roll into a ball. Place it on the cardboard and use the pad of your index finger to flatten it to form a circle.
Now use a knife to cut the circle into 4 parts, as shown in the picture. The result was fins and a tail.
Attach them to the fish's body.
Using a comb, apply stripes to the fins and tail of the fish.
Using a cup, make a notch on the body of the fish as shown in the picture. The result is a head.
Blind your mouth and eyes. Using the back of a pen or pencil, make small indentations imitating scales. Plasticineography is ready.