It is interesting to create small copies of houses, villages and entire cities. Such models will allow you to make the layout of a future country house or build an entire city at your dacha, but in a reduced form. If you want your apartment to have a real village house, only smaller in size, then buy a prefabricated wooden structure and glue the parts together. To instill interest in such activities in very young children, we suggest first starting with a picture that will help recreate a country corner.
How to make a winter picture with your own hands?
It consists of only two colors, but this does not lose its charm. To work you will need:
- Whatman paper;
- wax crayons;
- gouache;
- PVA glue;
- cotton wool;
- sponge.
Show your child how to draw with wax crayons on whatman paper. Let the child now feel like a real artist, dipping a sponge in paint and painting the background of the future picture.
When the paint is dry, you need to draw here with wax crayons. Help your child draw village houses, let him draw the road and Christmas trees himself. He will also be able to create the features of future clouds and the sun. Now you need to apply glue to the markings and attach twisted cotton wool here. This way the outlines of trees and clouds are created.
Also, you first need to create edgings for trees and houses, and then fill them with soft wool. Let the child also attach it with glue.
All that remains is to create the remaining details from twisted cotton wool and after the glue has dried, you can frame such a beautiful work.
In kindergarten, children are often asked to make crafts at home. This could be a model of a village yard. See how to make it from scrap materials.
Country yard craft for kindergarten
To create such a model of a village yard, you will need:
- cardboard;
- PVA glue;
- colored paper;
- scissors;
- twigs;
- miniature jigsaw or stationery knife;
- tree branches;
- acorns;
- figurines of village courtyard inhabitants;
- plasticine;
- colored paper;
- hot glue gun;
- cardboard box.
The cardboard box must be cut so that the bottom and the corner of the two walls, as well as themselves, remain. The bottom of the cardboard needs to be peeled off with green paper to create such a beautiful grass. A house will be fixed on one of the walls, and the second and a fragment of the first should be painted. To do this, let the child paint here with blue and white colors the sky with clouds, and when this background dries, depict trees with leaves and green hills on it.
Tell him how to make a house out of colored paper. It needs to be glued onto a rectangular sheet of cardboard, and acorns or hazelnuts should be attached to the side using a hot gun. They will become the ends of the logs.
You need to cut out the frame for the windows from colored cardboard, and make the glass from white colored paper.
Let the child first glue them to the marked places, and then draw pots of flowers here. Now you will need to glue the strips of cardboard so that they turn into frames. The roof for the house is cut out of red cardboard or ordinary gray cardboard, and a triangle of scarlet paper is already glued onto it. The roof can be tiled, then you need to draw wavy lines in a checkerboard pattern with a pencil.
Here's how to proceed with the layout of the village. With your own hands, let the child cut out a rectangle from colored cardboard and fold it in half. To this bench below you need to glue small rolls of cardboard, which will become logs. The bench rests on them.
It's nice to sit on it surrounded by flowers. Your child will create them from colored paper. To be able to admire a small pond, surround it with your child with acorns or nuts, and the child molds the water from plasticine, giving it a semicircular shape.
You can focus on highlights made from plasticine of other colors.
Perhaps it will be a fire pit. Then you can put a few sticks here, which will give the picture more realism.
Make a canopy on the roof, then you can put a toy cat here, attach it with silicone from a hot gun.
There is also a place for other animals. Let the child make a kennel out of cardboard for the dog. It is not difficult to create this structure. You will need to cut two identical walls for the side and two for the back and front of the kennel, with a pointed top. You need to cut a large hole in the front to put the dog here. The roof is created from a rectangle of cardboard, which needs to be bent in half and glued.
The layout of the village will be incomparable if you and your child also create a lake with a bridge. Let your beloved child crush the blue and white plasticine and cover the oval area with it. This water is surrounded by an acorn or nuts glued directly to the plasticine or using a hot gun. Attach the duck and her babies in the same way. The bridge needs to be made of cardboard.
Using cardboard, it is also quite easy to create a stable, and glue pieces of twigs onto the roof, which will turn into a roof.
In the same way, a barn is created where the heifer and foal will live.
To make a sheep pen, you need to cut a wide strip of cardboard and glue it to the clearing, and also glue the ends together to make a circle. Inside you will place sheep. Glue pieces of twigs to the outside of this pen to make the fence look more realistic. Inside you can place an inverted cap from a plastic bottle, into which you need to place food made of green plasticine.
This village layout will accommodate many characters. Pigs will be next. The pen for them is made from twigs glued together.
Using the same material, you and your child can create a stall for a goat. And the roof for it is made in a very interesting way. To do this, you need to glue twigs onto an old CD, and on top of them? hazelnuts. Using these same gifts of nature, you can decorate the cardboard walls of the building so that they look like logs.
The child will be happy to fashion bowls from plasticine and place them next to the animals.
All that remains is to make some small accessories:
- Make firewood from wine corks, which need to be cut lengthwise into 4 parts with a stationery knife and painted in the appropriate color.
- It is also used to make a spinner for a well. You will need to make holes in the wine cork with an awl, insert a wooden skewer and wind the thread. A shampoo cap is attached to the rope below, which acts as a bucket.
- And the well itself was made from a bottle of Agusha yogurt. You need to cut out the side walls, leaving only one vertical post on both sides.
- A spit for the well is attached to them, and its roof is made from a bag taken from thermal milk. Now all that remains is to paint these masterpieces and admire the results of the work.
Who knows, maybe your child, when he grows up, will want to recreate such a model of the village, but more realistic. We invite you to familiarize yourself with one of these projects, which was created in England.
DOMOSTROYPlumbing and construction
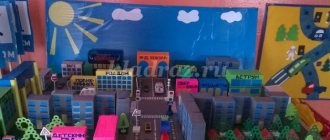
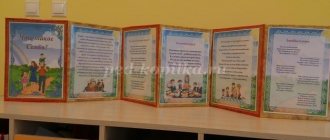
This is the game layout that appeared in our group at the beginning of the school year. I wanted to share with you how we created it - maybe it will be useful to someone.
To make the base of the game model “City Street” we will need: 2 pieces of MDF panel (I have them 53 cm), a piano hinge, screws and nuts for fastening
Using a drill, we drill holes in the MDF panels in selected places, attach the piano hinge to the MDF panels
To ensure that the model stands at an angle of 90 degrees and does not fall back, we screw a corner stop on one side (for me it is part of the fastening from an old curtain), and paint the lower part of our model with black paint.
choosing clipart of houses for the street. for my layout I put it together like this
We print the pictures in duplicate and laminate them; if you don’t have a laminator, you can simply cover them with tape. The picture becomes brighter and it is easier to care for the layout - wipe off dust, for example. We paste one copy of our laminated pictures, joining them on the layout, this is what we should get.
Now we will give our picture volume. To do this, we cut out buildings from second copies at our discretion, and glue them onto pre-prepared ceiling tile blanks - single background and double foreground, in my work I used “Master” ceiling tile adhesive
Cutting out buildings with a utility knife
We paste it (I still use the same “Master”) on our layout, our street now has “depth”
Let's move on to the design of the roadway. We take construction tape, highlight the pedestrian crossing, the dividing strip, that is, what we will paint over with white, and cover everything else.
In my work I usually use ordinary aerosol paints in a spray can, sold at any hardware store, dry quickly, and are easy to use. We highlighted all the lines with white - remove the tape. The roadway and crossing are ready.
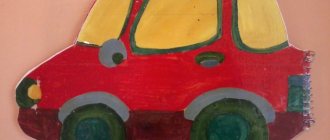
We laminate the printed templates (1 sheet of laminated film - 2 sheets of templates with cars), fold the sheets with the white sides inward. We laminate them so that the cars are tougher, brighter and can be wiped clean. When a sheet is laminated, we cut it along the contour and we get 2 sheets laminated on the colored side, the second side remains unlaminated (paper) - the paper sticks together better, and laminated machines shine. This is what a laminated sheet with templates, cut on 3 sides, looks like.
Cut out car templates and glue them together
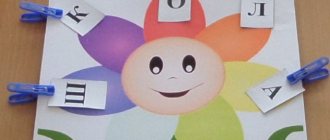
Now let's move on to making road signs. Materials: I used 2 sheets of regular white office paper, ceiling tiles (better washable), a stationery knife, toothpicks, master glue, mosaic in 3 colors (red, yellow, green), laminated sheet with blank signs, I used this one. Honestly, I don’t know how to indicate the authors; everything was cut out from so many places (((
We cut it out, glue 1 copy onto the tile, cut it out, and stick 2 copies on the other side. We make a stand for our signs. Take a sheet of white paper and cut strips of 4-5 mm along the long side of the sheet. For one sign, you need 5 strips. We take one strip and wind it onto a toothpick, forming a tight “roll” - this is the upper part of the stand. Glue 4 strips into a long strip and roll them into a “roll”. Place a small one on top of a large “roll” and glue it together. We dip the edge of the toothpick with glue, pierce our “rolls”, and with the other edge of the toothpick we pierce the blank with a road sign. All our sign is ready
English village model
Here is a small copy of the village of Bourton-on-Water on a scale of 1:9. The houses are made of the same material as the original. The craftsmen did their best, because they even made shop windows and signs, just like in that real village.
The streets here are quite spacious so that visitors can walk freely and admire this layout of the village.
The gardeners here also work hard.
After all, ordinary trees near such buildings will look too tall. Therefore, low bonsai were used. They are periodically pruned to resemble real trees. The lawns are made in the English style and also require periodic maintenance. They are watered, fed, trimmed.
Do you think that only professionals can build such miniatures? No, if desired, people without special construction or architectural education can do this. You will see this now.
Miniature city in the country - layout
Please note that there are houses of different shapes and purposes, and even a pond with a bridge.
To have such a miniature in your garden, you first need to choose the place where it will be located. Draw a plan of houses and other buildings first on whatman paper. Now we need to start creating individual objects.
By making templates from plywood, you can pour cement into them and thus create some houses. When it dries, you need to paint these buildings and install them on a flat cement area or on blocks.
Fences can be made of wood, they are painted to make it seem as if they are made of brick.
It will be necessary to lay a canal according to the markings, which will turn into a river. Strengthen its banks with stones and cement.
Make a metal bridge or from other material that is available at the dacha. If the river is not in a lowland and the water dries up, you can fill it by placing a special water pump at the mouth.
And if the reservoir is located in a low place and there are no problems with water, then it may be necessary to install a durable bridge. To make it possible to walk along it, reinforce it from below with reinforced concrete pipes. Fill the space between them and the bridge with stones and cement.
Of course, such painstaking work takes a lot of time. After all, you need to make not only the structure and other objects of the city, but also plant plants that will look natural here.
You can start with a small fragment of a village or city. And if you like this kind of work, then make these settlements more numerous.
Such village and city models will allow anyone to feel like builders of a large territory, architects and make their dreams come true.
To make it easier for you to cope with construction work, first see how you can assemble a model of a wooden house. The second video will teach you how to make a model of a village in order to then take the craft to kindergarten.
Do-it-yourself game layout according to traffic rules for kindergarten
Master class on making a game model “City Street”
Author: Oksana Sergeevna Norkina Teacher, MADOU kindergarten No. 21 “Rosinka” of the combined type of the urban district of the city of Kumertau, Republic of Bashkortostan The master class is designed for educators, but can also be useful for parents. Purpose: teaching game modeling, developing safe behavior on the roadway. Goal: making a model for game modeling in working with children of senior preschool age. Objectives: - introduce children to the rules of the road, the purpose and signals of traffic lights, road signs, expand knowledge about the rules of safe behavior for children on the street; — to encourage children to engage in independent activities in the traffic rules corner. The game layout can be used to develop fine motor skills, visual perception, social and everyday orientation, and spatial orientation.
Description: Stage I - the basis for the layout To make the basis for the game layout “City Street” we will need: 2 pieces from an MDF panel (I have them 53 cm each), a piano hinge, screws and nuts for fastening.
Using a drill, we drill holes in the MDF panels in selected places, and secure the piano hinge with screws and nuts.
So that our model stands at an angle of 90 degrees and does not fall back, we screw a corner stop on one side (for me it is part of the fastening from an old curtain), and paint the lower part of our model with black paint.
Now we will design the upper vertical part of the layout. To design it, we take 2 pictures depicting houses (I put together these for myself).
We print the pictures in duplicate and laminate them; if you don’t have a laminator, you can simply cover them with tape. The picture becomes brighter and it is easier to care for the layout - for example, wipe off dust. We paste one copy of our laminated pictures, joining them onto the layout, this is what we should get.
Now we will add volume to the card. To do this, we cut out buildings from second copies at our discretion, and glue them onto pre-prepared ceiling tile blanks - single background and double foreground, in my work I used “Master” ceiling tile adhesive
Cutting out buildings with a utility knife
We paste it (I still use the same “Master”) on the layout, our street now has “depth”.
Let's move on to the design of the roadway. We take construction tape, highlight the pedestrian crossing, the dividing strip, that is, what we will paint over with white, and cover everything else.
In my work I use ordinary aerosol paints in a spray can, sold at any hardware store, dry quickly, and are easy to use. We highlighted all the lines with white - remove the tape. The roadway and crossing are ready.
Stage II - Paper machines. Now he prints out paper machine templates; there are a huge number of them on the Internet; let’s take these as an example.
The image has been reduced. Click to see original.
The image has been reduced. Click to see original.
We laminate the printed templates (1 sheet of laminated film - 2 sheets of templates with cars), fold the sheets with the white sides inward. We laminate them so that the cars become tougher, brighter and can be wiped clean. When the sheet is laminated, we cut it along the contour and we get 2 sheets laminated on the colored side, the second side remains unlaminated (paper) - the paper sticks together better, and laminated machines shine. This is what a laminated sheet with templates, cut on 3 sides, looks like.
We cut out the car templates and glue them together.
Stage III - road signs. Now let's move on to making road signs. Materials: I used 2 sheets of regular white office paper, ceiling tiles (better washable), a stationery knife, toothpicks, master glue, mosaic in 3 colors (red, yellow, green), laminated sheet with blank signs, I used this one.
The image has been reduced. Click to see original.
We cut out and paste 1 copy onto the tile, cut it along the contour with a stationery knife, and on the other side we glue 2 copies (if you wish, you can not paste the second part of the sign. We make a stand for our signs. Take a sheet of white paper and cut strips of 4-5 mm along the long side sheet. For one sign, you need 5 strips.. Take one strip and twist it onto a toothpick, forming a tight “roll” - this is the upper part of the stand. Glue 4 strips into a long strip, twist it into a “roll”. On a large roll, put a small one on top, glue it together. Dip the edge of a toothpick in glue, pierce our “rolls”, pierce the blank with a road sign with the other edge of the toothpick. Our sign is ready.
To make the traffic light more voluminous, add a small mosaic of the appropriate colors to the lights, pierce the holes with an awl, and insert the mosaic.
Our fleet
Our signs
Thanks everyone for your attention!
We recommend watching:
Summary of the travel game “Lessons of Caution” for older preschoolers Didactic game on traffic rules for kindergarten “My Native Village” Educational and entertaining game on traffic rules for older preschoolers Competitive game program on traffic rules in the senior group “My Bicycle Friend”
Similar articles:
Scenario for children's traffic rules competition in the preparatory group
Long-term plan for the development and management of role-playing games
Scenario for a parent meeting on traffic rules in a preschool educational institution
Project on traffic rules in the senior group
Summary of a lesson on life safety in the preparatory group