Work: Master class “Atelier” Didactic manual. Designed for children from 4 to 7 years old. Goal: make an educational game.
Goals and objectives: Know the profession of a hair stylist.
Learn to select material for a specific clothing model, taking into account the color and texture of the fabric. The game promotes the aesthetic and sensory development of the child. Description: The manual consists of cards with clothing patterns and a set of cards - inserts with fabrics of different colors and textures, from light fabrics to draperies and fur. Didactic manual Master class “Atelier” Designed for children from 4 to 7 years old. It consists of cards with clothing patterns and a set of cards - inserts with fabrics of different colors and textures, from light fabrics to drapery and fur. Children are advised to choose the material for this clothing model. In this case, it is necessary to take into account not only the color, but also the texture of the fabric.
Photo No. 1 Children are encouraged to look at some types of fabrics and talk about their production. Threads for cotton fabrics are made from cotton, linen from flax, wool from animal hair, silk from the cocoons of silkworms. The quality of the fabric depends on this: silk threads are thin, and the fabric is thin, airy, and wool threads are thick, so their fabric is dense and warm.
Photo No. 2 Fabrics are available in different colors.
Photo No. 3 We take a material that is larger in size than cardboard.
Photo No. 4 Place the cardboard on the material.
Photo No. 5 Using a stick or glue, we connect the cardboard with the material.
Photo #6 This is how we make removable business cards from different types of fabric.
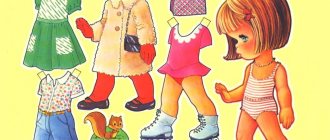
Photo No. 7 Cut out the model you like from Fashion magazine, moving a little away from the outline.
Photo No. 8 Take a horizontal sheet, fold it in half and glue the cut out template onto one half.
Photo No. 9 Then we cut out each detail on the model.
Photo No. 10 Now you can select the required material.
Photo No. 11 In the center of the album sheet we place cards with fabric, choosing those that are suitable in color and texture.
Photo No. 12 Thus, the game not only introduces the profession of a stylist-designer, but also contributes to the aesthetic and sensory development of the child. I hope this guide helps you organize your Atelier roleplaying game. Thank you for your attention.
What else to read: Fairy tales about geometric shapes, interesting facts about mathematics
We recommend watching:
Didactic game for the younger group in kindergarten Didactic game for children from 6 to 9 years old. Fun vegetable garden Educational game in mathematics for preschoolers Didactic manual for the development of sensory abilities of children 4-6 years old
Similar articles:
Educational game for children 5-7 years old “The world around us”
Educational game for children 4-7 years old “Fairy Hotel”
Game model for children 4-7 years old “My City”
Summary of the role-playing game "Atelier"
Type of activity: Socialization.
Objectives: introduce the professions of fashion designer and secretary; fix the names of the profession of people who make clothes (seamstress, cutter, ironer); develop the ability to work with information; plan and carry out its activities; cultivate respect for the work of studio workers.
Goals: to form a culture of behavior in public places; help create a play environment; establish interaction between those who have chosen certain roles; develop the ability to play according to your own plans; stimulate creativity and friendliness.
Preliminary work: video presentation “Journey to the Atelier”; looking at illustrations in magazines on the topic “Atelier” and “How clothes are sewn”; drawing “Decorating a sundress for a young lady” (Dymkovo painting).
Materials for the lesson: ironing board, iron, sewing machine, fabrics, doll clothes of various accessories (men's, women's) on demonstration hangers, models of paper dolls and their clothes, mannequin, measuring tape, thimble, notepad, telephone, dolls.
Progress of the lesson
Pupils stand around the teacher.
Educator
: Guys, today we will play with you in the studio for our Thumbelina dolls. Let's get acquainted with the new professions of fashion designer and secretary. The secretary, guys, is the person who takes orders and answers phone calls, he will meet our visitors. The fashion designer creates the style of clothing, i.e. offers you, the customer, a sketch of what the finished product will look like, taking into account your wishes.
Tell me, please, what professions related to tailoring are you already familiar with?
Pupils' response
: seamstress, ironer, cutter.
Educator
: Please remind me of the tools and what is the work of each of these professions?
Pupils' answers
: A seamstress sews fabrics on a sewing machine, an ironer irons clothes on an ironing board using an iron, a cutter takes measurements with a measuring tape and cuts them on fabric using scissors.
Educator
: Well done boys!
Now let's distribute the roles:
Educator
: I will be the director of our atelier, monitor the work of all workers so that our visitors are satisfied.
(Then there is a choice at the request of the students.)
Secretary - Bogdan.
Fashion designers - Polina, Taisiya, Diana.
Cutters - Marina, Kirill.
Seamstress - Yesenia.
Ironer - Danil.
Educator
: All jobs are occupied and we are opening!
Welcome to our atelier! Please come in, our secretary will take your order!
(Visitors enter with dolls.)
In the meantime, we invite the rest of the waiting visitors to sit comfortably near the coffee table and look through the new season's items in fashion magazines.
(Pupils who have placed an order go to the fashion designers, who offer to choose a sketch of a particular product, at the customer’s choice, select the fabric, then go to the cutters to take measurements. The cutters, having cut out the clothing details on the fabric according to the pattern, take them to the seamstress, and then to the ironer.)
Educator
: Dear customers, while your order is being processed, we invite you to visit our display of finished products. (The students show various outfits on paper dolls to the “clients” located in a semicircle.)
Invite the students to continue the game themselves, changing places if desired.
Educator
: Your order is waiting for you. Thank you for visiting our studio!
Where to begin?
Before you start decorating a group in a kindergarten and creating various thematic corners in a kindergarten, you should definitely take care of the general decoration inside the group. When painting, you should not use a lot of bright colors. It is better if the tone of the main paint is light and “warm”:
- beige,
- peach,
- pearl and so on.
Photo wallpapers with characters from fairy tales and cartoons, as well as stickers with children's themes, look good in children's groups.
It is better to decorate all the group’s rooms in the same style and think in advance about a theme that will tie together the bedroom, reception area, study area and play corners in the kindergarten. Before you start designing specific corners, you should consult with your parents, discuss together and get acquainted with possible options for children of different ages. Here are some corners that can be organized in a kindergarten; for an example, see the photo.
Developmental environment
Play space
Traditionally, each group has a separate room for a bedroom, and the common group room is divided into an activity area and a play area. Play corners for kindergarten are designed differently depending on the age of the children in the group, free space and the creative scope of the organizer. For example, in the play area, a separate place is often allocated for a mummering corner in a kindergarten.
The location for it must be chosen with special care, it must be easily accessible and constantly open to children. The purpose of its design is to create conditions in the group for the creative activity of children, the development of imagination, the formation of gaming skills, the implementation of gaming plans, and the cultivation of friendly relationships between children. You can decorate such a place in the form of a model house, a stylist’s office, or a small screen with a variety of outfits:
- professions,
- animals,
- artists,
- fairy tale heroes and so on.
Once the location has been determined and the design option has been selected, you can begin the practical part. The boundaries of the corner are formed using furniture. This could be: a low rack with shelves, drawers and a crossbar for clothes hangers. For convenience, a table and chairs can be located in the corner. A mandatory attribute in the mummers' corner should be a mirror where children can examine and evaluate their appearance. You can paste pictures of various suits, hats and other items of clothing on the wall.
Design options
Sometimes a hairdresser’s corner in a kindergarten fits harmoniously into such a corner. Here everything is ready to equip the hairdresser’s workplace - a table, a chair for the client, a mirror. On the table you can put bottles, combs, hair decorations, etc. You can glue pictures of scissors and combs on the wall. The apron for the master can be located on one of the hangers on the crossbar.
If space allows, the hairdressing salon corner in the kindergarten is designed separately, as an independent area for the role-playing game “Barbershop”. First, the necessary furniture and shelves are also installed. Instead of a rack with outfits, you can place a bedside table or mini-wardrobe with hairdressing supplies. You can also sew wall pockets for them. Then game items are added. Usually such a place is made as a children's corner for a girl, based on an interest in hairstyles, jewelry, and so on.
Progress:
1. To prepare this manual, you must prepare:
Scraps of various types of fabric, white cardboard, scissors, paper for making templates , glue.
2. Folding a sheet of paper in half, you need to draw the outline of the intended clothing.
3. Using scissors, cut out the silhouette of the clothing to create a stencil.
4. Using a stencil, draw the silhouette of the clothing on white cardboard and cut it out.
5. Glue a piece of fabric onto another white cardboard.
6. Glue the cardboard with the cut out silhouette of the clothing onto the cardboard with the fabric.
7. Everything is ready! The product can be used!
8. You can use various stencils and fabrics.
"Mushroom Teremok" Master class on making a manual for a didactic game Good day, friends, colleagues and guests of my blog! Today I would like to present to your attention a master class on making a manual. Photo report on the master class on the production of the didactic manual “Interesting stories from pictures.” An important task in older preschool age is to prepare the child for school. Therefore, we, educators, need to teach.
Master class “Creating visual and didactic aids using ICT resources” Compiled by: Yulia Andreevna Abramova. Educator of MBDOU "D/s No. 1 Ladushki" Goal: To teach methods of mastering ICT resources. Objectives: Show.
Master class on using the teaching aid “Multifunctional Screen”. . Master class on making a didactic manual “Butterflies on a Magic Flower” (training the power of an air stream) I would like to present to you, my dear MAAM members, the author’s development of my game (I apologize in advance for the confusion in the choice of photographs). I. Master class on making a didactic manual for the musical and didactic game “Bird and Chicks” The game “Bird and Chicks” is most suitable for introducing children to high and low sounds. I used to show the children a picture, on. Master class on making a teaching aid “Musical Cubes” Music occupies a special place in the education of preschool children. Practice shows that the full development of children's musicality.
Atelier Corner
Ekaterina Egorova
Atelier Corner
For the screen you will need:
- 3 pieces of large plywood and 3 pieces of small
- satin ribbons of different widths,
- mini set of threads,
- screws for fastening,
We connect large pieces of plywood with loops. The result was a screen. Then we paint with gouache (to prevent the gouache from cracking, mix it with PVA glue, after drying, cover with water-based varnish.
Then we glue pieces of fabric, ribbons and fabric with buttons sewn onto small pieces of plywood.
For boys
However, there must be a place for boys to play in the play area. A children's corner for a boy may take up a little more space than for a girl. The main requirements for its location also remain convenience and accessibility for children. Such corners are created to take into account the gaming interests of children of different sexes, their differentiation and the development of gaming activities in general.
Design options are chosen based on the interests of the majority of boys in the group and general “boy” themes. For example:
- car showroom,
- nautical theme (ship),
- workshop,
- military base,
- or a corner of space in kindergarten.
Outer space will be interesting and useful for children of senior preschool age. With its help, children will gain basic knowledge about space, planets, and spaceships in a playful way.
The color scheme of such a corner is determined by the theme.
- blue,
- purple,
- white and yellow colors.
It would be good if the furniture for the corner was made in the same colors. If the group’s budget does not allow you to buy new furniture, you can use self-adhesive film of the desired color and texture. On the floor you can place a rug with a space theme (lunar surface, meteorite). A simple model of the solar system must be present - either as a poster on the wall, or paper planets in volumetric form, hanging from the ceiling.
Color solution
The locker room or reception area is the first thing a child and his parents see when they bring their child to kindergarten. Therefore, its design must be taken seriously. For children, there is usually a mood corner in kindergarten. The purpose of such a corner is to create a favorable emotional environment in the group. Thanks to it, children learn to understand not only their own mood, but also the mood of their peers.
In the design of such a corner, ready-made stands or home-made models can be used. The principle of their design is the same: in several pockets there are pictures with different emotions (their number depends on the age of the children), pockets for photographs of children are attached to the bottom. Coming to the group, the child, together with a parent or teacher, determines his mood and places his photo in the pocket under the corresponding emotion.
If the mood changes during the day, the photo is rearranged. Emotions can be depicted in the form of emoticons and cartoon characters. An approximate list in the older group could be: joy, fun, calm, surprise, sadness, anger.