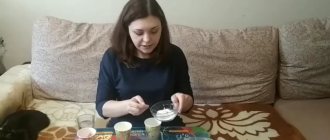
Preparing to paint an autumn still life
The teacher asks the children what time of year there are many bright and rich shades of warm colors in nature; nature literally breathes warmth. This time of year has always attracted artists, poets, and composers with its luxurious beauty; they admired this time of year and conveyed their admiration to people through their vision of the beauty of nature. How many famous people have left us their masterpieces in painting, poetry and music! What time of year do you think it might be? (autumn). What time of year is it now? What autumn months do you know?
What is the difference between early autumn and golden autumn? (In September, autumn is just beginning. The first yellow leaves appear on birches, maples bloom with yellow and red foliage. They say about such an autumn - early autumn. In October, all the trees dress up in autumn outfits, the leaves begin to fall. They say about such an autumn - golden, lush autumn ).
How do we know that late autumn has arrived? (In November, there is almost no foliage on the trees, there are frequent cold rains, frosts set in, and the first snow falls. This is called late autumn).
Autumn has its own colors. What colors of golden autumn do you know? (Red, yellow, orange, green, purple, warm, crimson, golden).
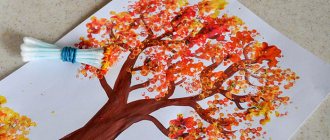
More useful materials for talking with children: A selection of poems about the colors of autumn for drawing classes with preschool children can be found here in the article about drawing an autumn forest using the technique of leaf prints on paper.
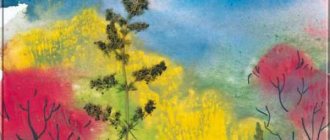
The teacher invites children to draw an autumn still life and shows how adult artists and children who are learning to be artists draw still lifes.
How to analyze these still lifes with children: The teacher shows the children a table with warm and cold colors and the still life invites them to think through what color palette the artist tells us about autumn in his still life. Does this painting have more warm or cool colors and shades?
At the end of the conversation, the adult asks: “What colors will you use to tell your story about autumn in your future still life? Think about it, and you and I will begin to draw an unusual autumn still life.
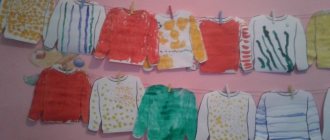
The still life will consist of maple leaves that stand in a vase. We will draw maple leaves using our palms.”
Materials and tools for work
Appliques and various crafts made from outlined palms are a separate technique. To create them you will need the following materials:
- colored paper, it is better to take thicker paper, intended for printing;
- multi-colored cardboard;
- PVA glue;
- scissors and a simple pencil;
- oilcloth to protect the table surface;
- markers;
- corrugated paper;
- decorative elements;
- wooden sticks.
Ideas for original handicrafts made from palms
The options for crafts for children aged 10-12 are already becoming different. They come up with more ideas that are original. They even depict algae using palms. Interesting things you can do:
- symmetrical palms are used to create spiders and crabs;
- the fan position can be used to recreate a peacock;
- fish from an aquarium with bubbles;
- They even make caterpillars and centipedes.
There are a lot of ideas, even the same object can be made in different ways.
Octopus
To make a colored octopus you need to prepare: a sheet of album, colored paper, pencil, glue and scissors. Now you can move on to the craft:
- from any color, outline and cut out a palm template;
- the place where the palm ends is made rounded;
- the blank is glued onto a landscape sheet;
- the hair is made from a strip of orange or brown paper, many lines are cut along the perimeter on one side;
- draw a hat, cut it out;
- Hair is glued to the top of the rounded part of the palm, fringe down, and then a hat is attached to it.
Eyes, mouth and nose can be drawn or cut out of paper. For beauty, the craft is decorated with beads glued at the base of the fingers. The completion will be the creation of the seabed: yellow sand, algae, small pebbles. All this is cut out of paper and glued onto a white sheet with an octopus.
Heart
For Valentine's Day, you can create a gift with your own hands:
- The palms of each hand are traced, only the fingers should be connected.
- Then this outline is cut out. The color chosen is red or orange.
- Then each palm is connected with the thumbs inward towards the side where the thumb is located.
- It turns out that the base of the hands are connected together, and on top the fingers diverge to the side. You should get a heart shape.
- Glue the palms together with a thin strip from the bottom and a little from the side. A pocket is created inside where you can put a flower.
- The outside of the palm is decorated with flowers cut from paper of a different color.
Hare
A flat craft made from palms in the shape of a bunny will look original in a children's room. Completing of the work:
- The base is cut out in a round shape, and the saucer is outlined if there is no compass.
- A palm template is made from cardboard so that all the parts are the same.
- 14 palms are traced and cut out.
- Then they are glued in a circle onto the base, first along the edge, then in the middle and below.
- Carrots are cut out of orange paper, and two leaves are cut out of green paper and glued together.
- The base for the eyes and the pad for the mustache in the shape of a figure eight are drawn and cut out of white paper. The eyes are an elongated semi-oval, 2 larger blue parts, two smaller black ones. Glue by placing a smaller element on top of a larger one.
- The nose and mouth are red.
- They assemble the muzzle and fasten the elements together.
- Long ears in the form of drops, the middle is made yellow. Upper and lower legs.
- All parts are placed on the workpiece. The carrot is inserted into the folded foot.
Tulips
Another interesting flower idea is tulips. A child's handprint of any color is made on a sheet of thick paper.
After drying, the templates are cut out and glued to the cardboard.
The stem and leaves are drawn on a green leaf, also cut out and glued to the palm. Then the entire flower is cut out along the contour.
You can make several tulips this way, put them together like a bouquet and tie them with a ribbon.
Sunflowers
Such crafts offer an unusual design. Children like to play with their hands in water, and even more so in paints:
- First, prepare the blanks of the palms.
- Children dip them in yellow paint and make prints on a white sheet. After drying, they are cut out.
- You will need a lot of blanks, 20-25 pieces.
- Next, cut out 6 leaves from green paper, and 3 circles with a diameter of 15 centimeters from yellow paper.
- The palms are glued with the base along the edge of each circle. Draw a circle in the middle of the craft with a pencil and coat it with glue.
- Sunflower seeds are poured in one layer into a circle and pressed lightly with your hand.
- The stem and leaves are made of colored paper.
- Form an applique on a sheet of cardboard and attach it to the shape of sunflowers.
Flower in a pot
Making a flower in a vase is very simple. Cut out a vase in the shape of a trapezoid and glue it to colored cardboard. A green palm is glued above the vase. Flowers for every finger. The core can be made from beads.
Pigeon
This is a beautiful craft made from palms and is very easy to make. The palm blanks are made of white. An eye can be replaced by a beautiful button.
Assembling the bird starts from the bottom. First, palms are placed in the form of a tail, then they are glued together. Next the eye is attached. That's it, the dove is ready.
Swan
Step-by-step instructions for performing the work:
- A child's palm is outlined and cut out from a white sheet. Then you can take a template and make a few more pieces to make fifteen for lush plumage.
- The swan's head and neck are drawn with a pencil and also cut out. The beak is painted yellow, the eyes are painted with a black marker.
- The feathers from the palms are attached in the opposite direction from the head.
Ninja turtle palms
Your favorite cartoon characters can also be made with your own hands. On white cardboard, dipping your hand into a bowl of green paint, put a palm print:
- After the workpiece has dried, draw an elongated oval with a marker on top of the base of the thumb. It should look like a knotted, folded scarf.
- The nodule is located on the side.
- The eyes are also marked on the bandage; the rest is painted red.
- A mouth is drawn above the fingers with a black marker.
- Then the craft can be cut out.
Butterflies
The child will work with interest on creating butterflies. They begin their creativity by making two palms of each color. Further:
- the beige body is an elongated oval, the head is a circle, connect them;
- wings are placed two on each side (fingers up) on top and bottom. You need to glue your palms under the body;
- thin antennae are cut out and glued to the head.
The butterfly will be decorated with ribbons, plasticine, and felt-tip pens.
Christmas tree
The applique for the New Year is its attribute, a green Christmas tree. It’s good to do it in a whole group, because you need a lot (at least 10 pieces) of paper palms. The assembly goes like this:
- lower part: 4 palms, fingers down, arranged in a fan and glued to the cardboard;
- then the same, only three blanks;
- then two palms, and the top is already one.
The result is a lush triangular-shaped Christmas tree.
You can glue a gold star to the top of your head. Decorate the branches with balls and ribbons.
Wreath
The Christmas wreath will also interest children. First, blanks of palms are made from shades of green. For the base, cut out a ring of the required size from cardboard.
Decorations: bow, ribbon, berries in the form of small circles.
For fastening, you can use double-sided tape. They glue the palms to the ring, fingers along the ring.
When the wreath is complete, mark a place for the bow and attach it. Three berries are placed symmetrically on the wreath.
Hedgehog
This small animal is often found on forest edges, in parks, and in gardens. Children really like hedgehogs, so every child wants to make such an animal with their own hands. Work plan:
- a palm (4 pcs.) will be needed in black;
- arrange the blanks in a fan so that it looks like the back of an animal;
- glue parts;
- a body with a nose is cut out of cardboard and glued onto the prickly back;
- Use paint to draw a mouth, eyes, paws.
You can attach a paper apple or mushroom to the thorns.
Crafts made from palms can vary in complexity, so this should be taken into account when working with children. Kids can only take part in creating applications and drawings. Older children create interesting crafts themselves.
Progress of the lesson:
1. A sunbeam and asks for help.
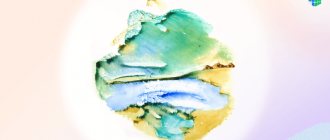
2. Children are ready to draw a lot of rays from the sun to make it lighter, warmer, and the snow to melt faster. Showing a method of applying gouache to the palm and imprinting it on paper.
4. Evaluation of work. Reading poems
“
Sunshine , sunshine ” Sunshine , sunshine , Look out the window, Shine a little light, I’ll give you some peas!
Olga Chusovitina “Me and the Sun ”
The sun is shining through my window in the morning, which means it’s time for me to go to kindergarten. I quickly wash my face, brush my teeth myself, and I can hear the cheerful noise of birds outside the window. The birds are happy that spring has come,
5. Games with a sun bunny .
Synopsis of the physical education lesson “Let's go on a flight” (first junior group) Synopsis of the physical education lesson 1st junior group. “Let's go flying.” Venue: on the street. Objectives: 1. Strengthen the ability to perform.
Summary of the integrated lesson “Grandfather Frost’s Birthday!” (first junior group) Summary of the integrated lesson “Grandfather Frost’s Birthday!” (1st junior group) Tasks: Introduce children to the main character of the New Year. Summary of the integrated lesson “Needles for a hedgehog” (first junior group) Integration of educational areas “Artistic and Aesthetic”, “Speech Development”, “Cognitive Development”, “Physical Culture”. Synopsis of the integrated lesson “Oh, the red rowan tree” (first junior group) Synopsis of the integrated lesson “Oh, the red rowan tree” (first junior group). Program content: Expand your understanding of trees.
Abstract of the educational activity for drawing "Balloons" (first junior group) (2-3 years) Abstract of the educational activity for visual activities (drawing) "Balloons" First junior group (2-3 years) Objectives:.
GCD summary for drawing “Let's decorate a plate” (first junior group) GCD summary for drawing “Let's decorate a plate.” (first junior group) Integration of educational areas: • cognition • socialization;.
Summary of the modeling lesson “Mother Duck and Ducklings” (first junior group) Purpose: To arouse in children the desire to depict, sculpt; Develop fine motor skills and creative abilities; Continue to master some. Summary of the lesson on plasticineography “Ladybug” (first junior group) Program content: • Form children’s ideas about the inhabitants of their immediate environment, teach them to recognize and name animals by their bright colors.
Source
Progress of the lesson.
Organizational moment: children stand in a circle.
Educator: Guys, show your palms , stroke them, clap your hands , close your eyes with your palms , rub your cheeks with your palms . palms can do . also draw birds with your palms . (Children sit at tables.)
Educator: Guys, why did the birds fly away ?
Children: It’s getting cold, the birds have nothing to eat .
Educator: Well done, guys! Guess the riddles about what birds they are talking about!
He steals hemp. (sparrow)
Blue scarf, dark back.
Little bird , call her. (titmouse)
Children: These birds are wintering birds.
Educator: Well done! Let's draw a bird . Before drawing we must do finger exercises.
on your palm ,
Feeding the cute titmouse
The bird pecks the grains,
Sings songs to children:
I fly all day.
Educator: Look at my palm , it seems to me that it looks very much like a bird. And what do you think? Where is the bird's beak? Where's the neck? Show the body of the bird. What a wonderful fluffy tail. (The teacher shows on his palm , the children on theirs).