Sculpting cats and kittens is always interesting; these cute pets are well known to every child, so he can calmly create without being distracted by trying to find out how the animal looks or moves. At the same time, you can create not only realistic figures, but also characters from your favorite games, fairy tales or cartoons. A cat made of plasticine will be a good gift for a mother, grandmother or teacher to make the craft look prettier; it can be easily supplemented with beads, rhinestones or other decorations.
- Basics of working with plasticine: how to get started
- Step-by-step instructions with photos on how to make a sitting cat from plasticine
- Video master classes on how to sculpt a sitting cat
- Modeling kittens from plasticine is easy: instructions for children and toddlers
- Black kitten made of plasticine
- Cute pink baby
- Craft for the little ones
- Reclining figurine
- Adorable kitty
- A simple figurine made from one piece
- Mobile craft
- Egg figurine from Kinder Surprise
- Black catfey
- Examples of ready-made crafts
- Video lessons for children on sculpting cats and kittens
- Cat and cute kittens from plasticine: making a family
- Other examples of sculpting cat families
- Detailed and intricate animal figures
- Video tutorial on sculpting beautiful and realistic figures from plasticine
Basics of working with plasticine: how to get started
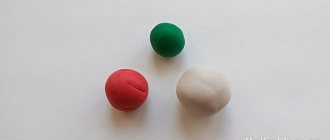
Before making a cat out of plasticine, you should prepare the material of the desired color; if such a block is not in the box, you can mix several different pieces.
The most convenient way to start sculpting any parts is by rolling balls, which are subsequently given the desired shape. To draw fingers or fur on a plasticine craft, it is better to prepare toothpicks in advance - the stack may be too thick for neat lines (it is also convenient to attach the figure’s head to them so that it holds more securely). Antennae can be easily made from pieces of wire or pine needles, and beads can be installed instead of eyes.
If you mix pieces of different colors (for example, orange, black and white), not completely, you will get the original three-color color of the animal.
Modeling in the preparatory group: how to make the lesson interesting
Ways to motivate children
Children’s own drawings can be used as visual materials.
This is interesting. Russian Soviet writer, classic of Russian literature K.G. Paustovsky wrote: “The impulse to creativity can fade away just as easily as it arose if it is left without food.”
How effective the entire lesson will be depends on the way in which the teacher insists that children work. Techniques for motivating children can be different - an adult combines them depending on the specific modeling task, the level of development of the children, their temperament and interests.
Conversation and visibility
These two ways to interest little creators go together because without a visual image it is difficult for children to imagine a picture, and without dialogue it is impossible to rationally organize work. So, as visual materials you can use
- pictures and photos of kids playing with pets;
- individual images (can be enlarged) of animals, in particular, faces, figures of a boy/girl;
- presentations, cartoons showing moving objects;
- posters, toys, etc.
The conversation can be built solely on the basis of what is seen (“Who is shown in the picture?”, “What is the animal/child in the photo doing/in what position is it standing?”), but you can also preface it with a few questions regarding what type of animal the cat belongs to/ dog, do the kids have pets, what kind, do they like to play, etc. Kids can answer either individually or in chorus. The main thing is to stay within the time frame - you shouldn’t spend more than 5-6 minutes on motivation.
Poems
Children love to listen to poetry, since the structure of their memory is such that they memorize rhymed lines faster and easier than adults.
- No, it was in vain that we decided to take the cat for a ride in the car: the cat was not used to riding - he overturned the truck.
- Paws and a tail, and funny ears that stick out in corners on the top of the head, fluffy fur, mischievous eyes... Listen, you didn’t come running to us from a fairy tale? Again the ball unwound around the apartment - There is no better entertainment in the world!
- My cunning-eyed puppy, Woolen paws... Who is it that chewed on our brand new slippers? I see the answer in the eyes: No, it’s not me, no, no! The slippers went into my mouth on their own and accidentally came apart...
Songs
This technique not only motivates the children, but can also be a good accompaniment for physical education or finger gymnastics.
| SONG ABOUT KISSANKA Lyrics: B. Bryansky Music: L. Lyadova Performed by Maria Lukach 1 Kisanka, Kisanka, Purring Kisanka, You and I are together all day. We chase the ball, we play hide-and-seek, and we play “Cat House.” We watch TV together, we eat cutlets, we drink milk together. 2 We will become adults, We will fly for the stars, I will take you with me. How you want to become a pilot as soon as possible, But no one talks about it! We need to prepare first - Maybe even a whole month will pass or two!..> |
Scheme for developing lesson notes
The teacher must definitely think about how to seat the children so that they do not interfere with each other
In order for a modeling lesson on creating a figure of a person playing with an animal to be successful, drawing up a work plan should begin with the formulation of goals and objectives.
Goals:
- teach how to compose a complex composition consisting of 2 objects in dynamics;
- continue to work on developing the ability to maintain proportions;
- cultivate patience and independence.
Tasks:
- repeat the basic geometric shapes - the basics of blanks for figures;
- develop the ability to convey the movement of objects using design;
- continue to practice sculpting techniques;
- consolidate the skill of conveying the dynamics of the human and animal body in plastic material;
- continue to develop the skill of working with a stack to create relief of elements;
- develop fine motor skills and eye;
- cultivate aesthetic taste and accuracy when working with plastic materials.
The development of notes should include clear timing of each stage of the lesson.
- The introductory part (5 minutes) is the time to involve children in work, that is, for motivation.
- The main stage (20 minutes) is sculpting a composition, as well as finger gymnastics and physical education.
- Final stage (5 minutes). The teacher praises the children’s productive work, the kids exhibit their compositions at an impromptu exhibition, evaluate their crafts and the crafts of their comrades, answering a number of questions (“Did I work well?”, “What did I do especially well?”, “What figures do I like?” more than others?”, “Why?”, “What did I like/dislike during the lesson?”).
Examples of writing lesson notes
The first example describes how to create a craft in a constructive way. If a human figurine is made with its help, then parts of the body can be moved and given the necessary pose. The main thing is to adhere all the parts well to each other.
Mikheeva Nina “This is Masha.” Sculpting lesson notes. Parts of the human body" (fragment)
| <...Examination of the nature that the children will sculpt. On the board there is a picture of Masha - what Masha has: A big teddy bear rolls quickly from an icy mountain Keeps our Masha (fur coat) well warmed up Masha loves to dream When there is blue in the sky... And for this Our Masha needs... . (head) Masha takes berries, two or three at a time. And for this we need Our Masha. (hands) Masha runs cheerfully along the path towards the river. And for this we need Our Masha. (legs) Masha looks at the cat, at fairy tale pictures. And for this we need Our Masha. (eyes) Stage 3 Show what technical techniques to use We look at the example made by the teacher Masha - Guys, look at how we will sculpt Masha We take a large piece and sculpt a torso from it like a carrot The head is like a ball We make the arms from a flagellum We make the face into a stack And then we proceed to decoration of the head and long coat. Making a white collar. On the head is a hat with a white pompom. Stage 4. Carrying out work by children Under the pronouncement of actions by the teacher. Stage 5 analysis of work - What a great fellow you all are...> |
Glukhova Vera “Summary of productive activities in the senior group. Modeling on the theme: “Kitten” (fragment)
| <...So we got to our modeling table. We have already sculpted a horse. Let's remember where to start sculpting (knead the plasticine and divide it into parts). What shape is the kitten's body? Head? Tail? (oval, elongated head, long tail." We will sculpt from a whole piece of plasticine. Dasha, tell us how we will sculpt (we need to roll out a thick sausage, cut it into a stack on both sides - these are the legs. Then we roll out the ball - draw out the muzzle and ears. We attach muzzle to the body and smear it well. The tail should be thin and long). Guys, so that our hands warm up before work, we will do finger exercises. Cunning, little Kitten (the ball is squeezed between the palms) Just got out of the diapers, (palms open) He did a lot of things: (close his palms) ate a fish from a raccoon, (circular movements between his palms) started a fight with a hamster, (squeeze the ball in his right hand) Only got scared of the dog. (squeeze in his left hand) An ill-mannered child (circular movements on the table with one hand ) This little Kitten. (circular movements on the table with the other hand) Let's start sculpting. The children sculpt, the teacher helps individually as needed. During the lesson, physical education is held: Here the window opened (arms to the sides) A cat came out onto the ledge (cat's smooth gait) Looked the cat went up (he threw his head up) The cat looked down, looked to the left, followed the flies with her gaze, stretched, smiled, and sat down on the ledge. Well done guys, you all coped with the task. The teacher calls 2-3 children for analysis...> |
Step-by-step instructions with photos on how to make a sitting cat from plasticine
A cute sitting cat that will be interesting to sculpt for children in the older group or even younger.
How to make a plasticine cat for children with your own hands step by step:
- Roll and flatten the ball a little - the head and shape the muzzle.
- Make two triangles - ears.
- Add wire whiskers.
- Form a large cone for the body.
- Roll two balls for the front paws and two drops for the back paws.
- Assemble the body and draw the legs and claws.
The animal's paws are outlined with three rather than two lines.
Video master classes on how to sculpt a sitting cat
Summary of GCD for sculpting “Cat”. Senior group
Khadizhat Zalimkhazhievna
Abstract of the NOD for sculpting “Cat”. Senior group
Nod's summary of sculpting " Cat "
.
Senior group
Goal: creating conditions for developing the ability to sculpt a cat from a whole piece of plasticine, conveying the proportions of the animal.
Equipment: cat , plasticine, stacks, oilcloths.
Cat and cute kittens from plasticine: making a family
How to make a cat with kittens from plasticine:
- Cut a long sausage at both ends to highlight the legs.
- Bend the workpiece into the shape of the body.
- Attach the ponytail.
- Roll out a ball-head, use your fingers to separate triangles-ears from it and slightly extend the nose part.
- Decorate the muzzle with voluminous details or paints and add a mustache.
- Form small kittens from plump sausages, outlining the neck line and extending long tails.
For kids in the older group, for whom it is easy to sculpt such a figurine, it is worth offering to invent and make an older cat and kitten.
Other examples of sculpting cat families
To make plasticine kittens and cat figures more accurate, the surface of the parts is smoothed with wet fingers.
On the topic: methodological developments, presentations and notes
Date: February 21, 2012 Participants: children of the preparatory group Conducted by: educational psychologist Panova M.M. Purpose: to promote formation.
Introduce children to number and figure 6. Improve counting skills and comparison of subject aggregates. Form children’s ability to distinguish between the concepts of yesterday, today, tomorrow. Consolidate knowledge about geome.
1. Conduct classes to teach children to notice changes occurring in nature.2. Conducting classes, teaching children to group objects by color and shape.3. Conducting classes, Develop holistically in children.
Detailed and intricate animal figures
Modeling a cat family from clay
If you want to make a real figurine, then instead of plasticine, take another material. For example, clay. This is a popular mass for sculpting souvenirs; it is very easy to work with. Polymer clay (plastic) for crafts is sold in handicraft, art and online stores. This material has its own characteristics:
- Self-hardening clay hardens in air. This may take 2 days.
- Baking clay hardens when heated. It is kept in the oven for 10-30 minutes.
- Clay can be tinted, that is, mixed with paint to obtain all kinds of colors.
- To reliably fasten clay fragments, you need to moisten them with water.
Clay cat
First, make the simplest figurine . For the master class you will need:
- clay;
- modeling board;
- toothpick;
- water in a bowl;
- brush and paints (acrylic or watercolor).
Take the amount of clay with the expectation that you will get a craft of the required size. Let's get started with some fun sculpting:
Divide a piece of clay in two. One segment will make a body. From the second part, sculpt the paws, tail, ears and cheeks.- The body should be shaped like a rounded cone. Press the bottom of the shape onto a flat surface to make it stable.
- Break off fragments from a smaller piece of clay to form ears. These will be two pointed triangles. Moisten these parts with water and connect them to the body.
- In a similar way, mold the remaining elements for the muzzle: voluminous cheeks, eyes, nose. Don't forget also about the last important detail - the tail. Moisten all this in water and secure it to the body.
- Add details to the finished figurine using a sharp toothpick. You can make pupils, a charming smile and dots on the cheeks. The mustache will be made from wire or fishing line.
- Wait for the craft to dry for a couple of days and paint the cat to your taste.