Interesting ideas and design schemes
For older preschoolers, the greatest pleasure comes from activities that contain a play element. To maintain interest in paper design among students, it is necessary to select unusual topics for classes, use a game form of learning, and select objects for design that will be suitable for children’s play activities.
Photo gallery: templates for paper construction
Sample
Sample
Sample
Sample
Sample
Sample
Sample
Sample
Sample
Photo gallery: examples of ready-made paper crafts
Example of paper construction Example of paper construction
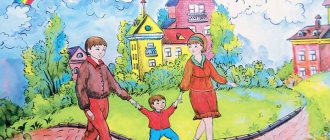
An example of design from paper An example of design from paper with additional drawing according to plan
An example of a paper design using the origami technique (applique)
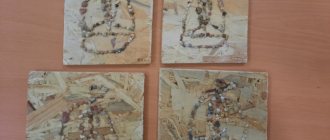
An example of a paper design using pasta to complete the design
An example of designing from paper using the origami technique and simple drawing. An example of designing from paper. An example of designing from paper. Using crafts in the game
Options for completing the task
Example of paper construction
Example of paper construction
Example of paper construction
Example of paper construction
Example of paper construction
Example of paper construction
Example of paper construction
An example of a paper design using the origami technique
An example of designing from paper using drawing techniques An example of designing from paper using drawing techniques
Video: paper construction lesson on the theme “Gift for Dad”
Video: paper art design in kindergarten
Video: open lesson on paper construction on the theme “Aquarium”
Video: paper construction on the theme “Year of the Rooster”
Summary of a lesson on manual labor in the senior group on the topic “Kittens.”
One two three four five!
Come visit us guys
Look and count.
(S. Mikhalkov).
- Look how happy she is. After all, little kittens feel warm and comfortable next to their mother cat.
Sad music is playing.
- Guys, it seemed to me that someone meowed pitifully on your tables. Turn over your sheets of paper and see who it is? (Cat Mom).
- Why do you think your cats are sad? (Their little kittens are lost, they are not with their mother cat).
- Let's help cat mothers find their little kittens and construct little kitten faces out of paper.
- Look how I do it. (Showing methods of action).
— We will construct the kittens’ faces from a square. You have squares of different colors on your trays, so you will get kittens of different colors: one is white, the other is brown...
- Look how I make the face of a ginger kitten.
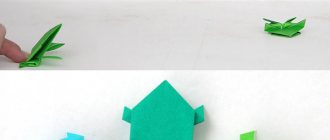
— I’ll bend the square in half with a “scarf.”
— I will bend the resulting triangle in half. I'll unfold it.
This is how we marked the middle of the triangle.
— I raise the corners from the middle of the long side, but do not bring them to the top of the upper corner. These are our ears.
— I raise the bottom corner a little up.
— I’ll bend the side corners a little bit towards the center line. Turn the workpiece over. I'll lower the top corner a little.
— It turned out to be the face of a kitten.
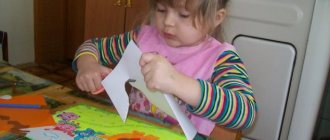
— If you bend the upper corner in the other direction, the muzzle will turn out a little different. Here it is. Anyone who wants to do it this way will also be fine. Using felt-tip pens I draw in the eyes, nose, mouth and mustache and my kitten becomes as if alive. To make the work neat, I will smear the cat’s face with glue on the back side, put a little glue on the brush, and remove the excess glue on the edges of the jar. I glue my kitten to my mother cat. I remove excess glue with a cloth. Look, he is also hidden in her fluffy fur, so that only one head is visible. And I'll call him Shustrik.
Consolidation.
- What will you do? (kitten faces).
—Where will you start working? (let's bend the square into a scarf).
— How do we mark the middle of the triangle? (let's bend it in half).
- What then? (Raise the corners, from the middle of the long side without bringing them to the top of the upper corner).
-Where should we bend the side corners? (slightly towards the midline).
- What then? (Turn the craft over and lower the top corner).
- How else can you bend the top corner? (Without turning the craft over, immediately the corner is down).
- Where can we put glue on the face? How?
-Where should we stick it?
— What needs to be done to make the kitten “come to life”? (complete the nose, eyes, mouth, mustache).
— When the work is ready, think about the name of your kittens, what kind of character they are.
a lion
The sleeve becomes the body, and the head can be made from a thinner sleeve or specially rolled cardboard.
Glue a paper mane to the side closer to the edge, and a head to it. The ears are also made from oval paper, which is folded in half for a characteristic shape.
The tail and paws are cut out and glued onto the “tummy”.
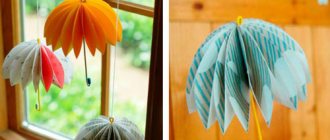
Crafts from paper rosettes
Rosettes are the molds in which cupcakes are sold. They can be found in most retail or specialty food stores.
If you can’t find the right color, then you shouldn’t quit this activity ahead of time, since this material can be painted well without losing its main characteristics of shape.
Goose
On the main sheet of paper that will serve as the background, sketch out the outlines of the bird to make it easier for the baby to navigate the space of the sheet.
It is better to use thick paper or cardboard, since regular office paper will begin to bend from the weight of the seeds.
The wing can be made from pumpkin seeds, the beak and legs from orange napkins, previously divided into small pieces and rolled into balls, and the plumage itself from medical cotton wool. The materials must be glued to the background using PVA glue.
Eagle
First you need to pluck the lump using pliers. These types of crafts for moms and dads in the older group may not be easy, so it's just worth trying again if it doesn't work out.
The body of the bird itself can be made from plasticine or using the methods indicated above in the instructions for the golden birds.
As a base, you can use ordinary thick cardboard or a plastic base, or prepare a real piece of driftwood or a wooden block.
You can take a plastic bottle, fill it with something heavy, like sand, and decorate it to look like wood. Attach the body of the eagle on top.
In the direction from the tail, glue the scales from the pine cone onto superglue or hot nails.
Crafts for kids: ideas on how to make cool crafts with your own hands (125 photos and videos)- Crafts for boys: 130 photos of original and beautiful options for creating stylish and beautiful crafts
Plasticine crafts for children - video + 135 photos of beautiful options for creating original crafts
Instead of a feather cone, you can use seed shells.