Making various crafts from plasticine is a favorite pastime of all children. They especially like to create figurines of animals, because plush animals, cartoons, fairy tales, games - everything is related to animals. At the same time, children of any age can make figurines of animals from plastic mass due to their capabilities. Both toddlers and older children can make a horse from plasticine.
- Step-by-step instructions: how to make a horse from plasticine
- Video master classes on modeling a horse from plasticine
- Simple crafts for kids and beginners
- Features of sculpting the Dymkovo horse
Step-by-step instructions: how to make a horse from plasticine
This is a step-by-step modeling of a simple version of a plasticine horse, accessible to children of kindergarten age. For the craft, prepare material of brown, black and light beige color, matches and a glass to cut the bars into pieces.
How to make a horse:
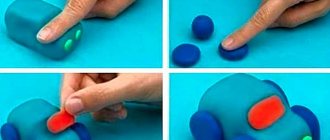
- You need to start working from the head. To do this you need to sculpt an oval part. Then give it the shape of a horse's head.
- Make small “cakes” and form them into triangular ears, stick them on your head. Make small round blanks from white and attach them in place of the eyes. Stick small black balls on top - these will be the eyes.
- Make a horse's body from a large piece of mass, rolling it into an oval. Insert a match on one side.
- Cover the match with a large amount of plasticine and attach the head to it to form a neck.
- Roll up 4 identical strands and glue them to the body - these are the legs.
- Attach black round flat pieces to each leg - these are hooves.
- Roll thin flagella from a light color and attach them to the neck in rows on top of each other - this is the mane. Several strands form the horse's tail.
A plasticine horse stands in front of you.
The child should be helped if something does not work out for him.
Video master classes on modeling a horse from plasticine
You can sculpt a horse in different ways, using different colors, using other materials, making complex crafts from sculptural plasticine. Plasticine horses can be used to decorate children's rooms or as gifts for friends and family.
A cute plasticine horse is an interesting and beautiful toy:
Wild West horse. Toy - a beautiful horse made of plasticine:
And this is the Angry Lanky Horse made of plasticine, one of the creations of the Universe, which was created by Trevor Henderson:
Manufacturing technology
The famous toy is made in stages. And these stages are represented by modeling, mandatory drying, firing, whitewashing and painting itself.
Making a Dymkovo toy step by step:
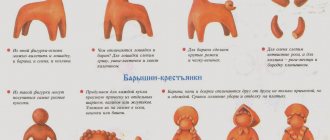
- Modeling. The figure is sculpted in parts. Take oily, washed clay, diluted with sand. Balls of different sizes are rolled out of it. Then they are flattened into a flat cake. The body of the toy is made from them, and small parts are attached to the body. The joints are thoroughly moistened with water, and then the joints are smoothed with a wet cloth. For example, a horse consists of a cylindrical base, four short cone-shaped legs, and a curved neck with a muzzle.
- Drying and firing. The drying stage is required. How long to dry depends on the size of the craft, and on the characteristics of the room too. Previously, firing was carried out in a Russian oven; toys were literally heated red-hot and left to cool in the oven. Today, figurines are fired in special modern equipment, thanks to which the process is no longer so labor-intensive and, of course, less dangerous.
- Whitewash. After being in the oven, the toy turns red-brown. You can’t apply patterns to such a base, so the craftsmen always bleach it. This happens using a solution of chalk powder and milk. When the milk sours, the solution hardens and an even casein layer forms on the surface. Surprisingly, numerous ways to simplify the whitewashing stage led to nothing. And today they whitewash a toy in the same way as many centuries ago. Only children in class can paint the figure with white gouache.
We invite you to watch a video on how to sculpt a toy body and attach parts using the example of a horse.
The processing continues with one of the most interesting stages – painting.
Simple crafts for kids and beginners
Any child can make a horse from plasticine. Young children do this with the help of adults; older children can work independently. There are a lot of options for sculpting horses. Here are selected photos of crafts that can be created by the hands of small children and novice sculptors. As an example, it is recommended to look at photos of finished horse crafts.
A beautiful toy - a brown horse with a yellow mane.
A simple craft - a horse made of brown plasticine with a yellow mane and tail. It can be sculpted from light plasticine. This is a soft and pliable mass, easy for small children to work with. The mass holds its shape well, it is easy to knead it with your hands and form any part. But it hardens faster than usual, so it’s better to immediately attach small parts to the base of the figure:
The step-by-step modeling of a horse from plasticine for children in grade 2 is presented as follows:
- The body of the animal must be made from a ball, which must be stretched out a little to form a pear-shaped part.
- For the legs you need to roll 4 identical plasticine balls of the same color as the body. Attach them to the base of the craft - the body.
- For the head, roll into a smaller ball. Stick a pink ball to it and form a muzzle.
- Make small ears from cakes and glue them to the head. Using a stack, cut out the nostrils on the horse’s muzzle.
- The eyes need to be created from white small blanks and black balls.
- The mane and tail should be made of thin black flagella. Attach them to the head and body of the animal. Connect them together.
The fancy horse is ready.
Here children can show their imagination and make a horse with a light mane, with tan marks on its sides, in “apples”.
A beautiful horse craft made from light plasticine with a brown mane and “apples”:
Complex coloring pages with a lot of small elements
Dymkovo toys (templates for drawing, as well as drawings for coloring, are freely available on the Internet), due to the variety of their options, can be used in work with older children.
For schoolchildren attending grades 3–5, it will be interesting to paint more complex patterns with a lot of small details.
Teachers recommend drawing parents’ attention to the following pictures:
| Sketch for coloring | Description of the drawing and the principle of working with it |
| "Walk". This picture for coloring is a complete artistic composition. It depicts a man and a woman floating in a boat on a river. The task facing the child is to make colorful not only people’s costumes, consisting of small parts, but also the objects surrounding them. These include the celestial bodies, the pattern on the ship and the waves. The main colors that the student will work with are red, blue, white, black and their derivatives. | |
| "The Bears". This sketch shows a family of bears. Animals are depicted in human form: they wear clothes and jewelry. The difficulty in coloring this drawing lies in the large number of small details of the characters' clothing. To complicate the task, you can invite the child to make the picture as realistic as possible (paint the bears in the appropriate colors, as in life, and their clothes in the shades most often found in adult wardrobe items). Typically, children work with this image using blue, red, black, yellow, brown and white colors. | |
| "Rider". This is one of the most popular pictures for coloring, used by teachers when working with them. It depicts a boy standing on a horse. In this case, the child will need to carefully paint the smallest details of the image of the young man, as well as reproduce the color of the animal and surrounding objects. It is recommended to work with brown, black, red, blue, yellow, orange, blue and green. |
Features of sculpting the Dymkovo horse
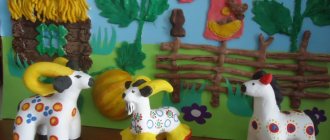
The Dymkovo toy is a symbol of joy and vitality, so it is created only from bright colors of the mass. These toys look elegant; our ancestors used them to decorate their homes and give them to each other on holidays. They were sculpted mainly from a mixture of clay and sand, dried, fired in an oven, and then painted in bright colors. The peculiarity of such crafts was that the toy must make some kind of sound: it squeaked, rang, crackled and hummed.
The Dymkovo horse craft will be bright, but will not be able to make sounds. How to make a Dymkovo horse from plasticine for a child with your own hands, step by step:
- Choose the color of the mass for the body and head and divide it into two parts of different sizes. The larger part will be used to make the torso and legs, and the smaller part will be used to make the head and neck.
- Making a horse in the style of a Dymkovo craft means making a craft with short cone-shaped legs and a short neck. For the legs and torso, roll into a thick “sausage”. Cut it on both sides to form the legs of the animal. The “sausage” needs to be bent in an arc, this should be done until the legs stand on the surface of the workplace.
- Roll the remaining mass into a roller and divide into two parts and form them into an oval and a cone. This will be the horse's head and neck.
- Connect the head to the neck, attach it to the body and smooth out the joints.
- Make two small cones - these are the ears of the figure.
- Create the mane and tail from thin flagella, attaching them to the right places. You need to use a bright color of plasticine to make the horse look elegant. Select the hooves at the feet, cut out the nostrils and mouth in stacks, and glue on eyes made of white and black balls.
- The Dymkovo horse made from plasticine is gradually completed by gluing white or other brightly colored blanks onto the body.
To make the horse figurine as close as possible to the Dymkovo style, you can use templates and pictures to work with, which can be used to easily mold any model of the toy.
Plasticine crafts are available for children of any age. They happily sculpt animal figures. The horse is considered one of the popular figures in children's creativity, because it symbolizes kindness and endurance. And this is very important for every person.
Manufacturing secrets
It is easier for children to make a Dymkovo toy from plasticine. But real masters use local red clay for their work, mixing it with river sand. All parts of the figures are molded separately and then connected. The joints are smoothed using liquid clay.
The resulting toys are first dried in air and then fired in a hot oven. The surface is whitened. In the old days, for this purpose, they took chalk and diluted it in milk. The paints were made from chicken eggs mixed with kvass. The patterns were drawn with a pen. They were simple: circles, dots, wavy lines, zigzags. Moreover, each element had its own meaning. The circle symbolized the sun. Dots depicted human footprints. The wavy line reminded of water, the crossed stripes indicated a well.
The colors used were bright and festive. To give the finished toys a shine, they were coated with beaten egg white.
Manufacturing technology
The process of creating a clay toy consists of several stages:
- Modeling.
- Drying.
- Burning.
- Whitewash.
- Painting.
How to sculpt a Dymkovo toy
To create the product, clay or sand is taken from the river. According to classical technology, this should be Vyatka red clay. Each element of the figurine is created separately: a body is formed from a ball, onto which the remaining parts are attached. All parts are connected with a smooth transition to avoid chipping the finished product. Also, the joints are carefully treated with a damp cloth.
The main detail when sculpting is the body. First, a ball is created from a piece of clay mixed with fine river sand. Next, the required shape is pulled out of it. The smoother the process, the more beautiful the figure will turn out.
The creation of appendages (arms, legs, head, etc.) is also done from balls, but their volume is smaller. The “parts” are attached to the body, and the joint is treated with water and clay. Craftsmen sometimes use rings, grooves, and sausages as decorative elements.
For example, to make a lady, the first step is to mold a cone-shaped skirt. Next, a body with an elongated neck is attached to it. The next step is to attach the head and arms. The final stage is dressing the young lady in a beautiful scarf and hat.
Male figures are created a little differently. The torso and head are attached to the legs, which are two thick sausages. If you slightly bend their lower parts you will get legs.
| The body of the animal in the blank resembles a cone. The head and neck are attached to the sharp end. The limbs are most often large, slightly tapering downwards. The tail and horns are attached last. |
Drying and firing of Dymkovo toys
After modeling is completed, the product is dried. The duration of the procedure depends on the size of the figurine and the climatic conditions of the room. Humidity, temperature and other parameters must be taken into account. Depending on these indicators, the process takes from several days to three weeks.
After drying, the figurine is fired. Previously, a village stove was used for this. The toys were placed on a metal baking sheet and placed on firewood. After the figurine became heated, it was cooled in the same oven.
Nowadays, innovative equipment is used that not only saves time, but also makes the calcination process safe.
Whitewashing (whitening) of the Dymkovo toy
After drying and firing, the figurine acquires a red-brown tint. Therefore, before painting is applied, it is bleached. The figurine is coated with a special composition of chalk powder and milk.
After the drink sours, the solution becomes solid and a uniform white layer forms on the product. The procedure not only smoothes the surface, but also adds incredible brightness and richness to the colors.
Many attempts were made to change the composition of the mixture, but each experiment ended in failure. As a result, the figurine turned yellow or acquired an uneven surface. For this reason, even today whitewashing is carried out according to the old recipe.
History of the craft
Clay is a material that is plastic in its raw form and acquires fairly high strength after firing. Thanks to the combination of such characteristics, clay products have been incredibly popular from ancient times to the present day. In the old days, dishes and clay figurines were made in almost all regions of our country. At the same time, each locality developed its own forms and original traditions of painting and decoration. The village of Dymkovo (Kirov region) has become famous throughout the country thanks to its craftsmen who make small, bright figurines capable of making a variety of sounds. Interestingly, the traditional Dymkovo toy was invented not for the amusement of children, but for protection from evil spirits. In the old days, it was believed that evil spirits were afraid of loud sounds. That is why in ancient times all Dymkovo toys could rattle or whistle; they were traditionally made for the festival of Pandemonium, during which it was supposed to drive out evil spirits and have fun with the whole world.
Preview:
Master class “Making the Dymkovo horse”
– Today we have an extraordinary master class, we will create a small sculpture of a small miracle horse. We will work carefully and carefully to make it truly fabulous.
Look: what tools do we need for work?
Step 1. Mixing the clay.
Take a piece of clay and soak it in a small amount of water. Place a bowl of clay for 3-4 days. Then mix the clay. If the clay is still viscous and sticks to your hands, it should be wrapped in a wet cloth and set aside for another 2-3 days. During these days, the moisture will leave the clay and you can start working.
Step 2. Modeling the toy.
2. Bend the column in an arc. Where the clay has cracked, lubricate it with water. We cut the stack on one side exactly in the middle, and on the other. The legs of the future horse are visible. Using fingers moistened with water, we smooth each leg and body of our horse.
3.Next we proceed to sculpting the head of our horse. We roll a sausage, narrowed on one side (this will be the horse's muzzle). Smooth it with fingers dipped in water.
All that remains is to make a mane and tail from thin rollers, using the technique of turning 2 rollers.
6. The tail is molded in the same way as the mane.
Attach the mane and tail, lightly dipping with a wet brush at the attachment points.
So our clay horse is ready!
Step 3. Drying the toy.
Place the toy in a well-ventilated and warm room for 3-4 days.
Step 4. Painting and painting the clay horse.
We take ordinary white gouache and PVA glue in a 1x1 ratio and paint the toy white.
Then, when the gouache dries, we paint with the Dymkovo pattern (circles, stripes, dots).
This is how beautiful it turns out. I wish you creative success
Thank you for your attention
