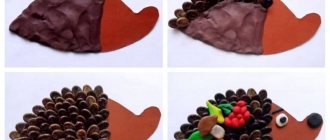
Hedgehog with sunflower seeds
As you have seen from the previous instructions, sculpting a hedgehog is not that difficult. There is a slight problem with small parts, because children under five years old often cannot make them. But using seeds instead of thorns is an original solution.
As in previous master classes, we will need plasticine and a board. Sunflower seeds complement this list.
Let's look at how to make a hedgehog from plasticine and seeds:
- Knead the brown plasticine until it is completely pliable for modeling. Form a ball. We pull back the material to make the nose. The rest of the body can be left unchanged, because the hedgehog often rolls into a ball to protect itself from the enemy. Attach a small brown drop to the sharp end. Add eyes.
- Now you can do what little children love so much - attaching seeds. They need to be carefully inserted with the wide part into the body. You don't need to press hard. Start laying out the first row at the muzzle. The second row must be placed between the gaps of the first so that all the empty space is filled.
This simple plasticine modeling for children will interest your child. Offer to decorate the craft with additional elements, for example, gifts of autumn, which the child already knows how to sculpt.
The first method of sculpting
Before making a cute hedgehog from plasticine, prepare:
- soft, children's plasticine;
- scissors with pointed edges;
- knife for working with plasticine;
- board;
- skewer.
Get ready to learn how to make a hedgehog from plasticine:
Hedgehog according to the first method (Step 1)
- The first thing we will do is make a face for the future hedgehog. For it, it is better to use plasticine with a very light shade and hints of brown. If you don't have this in your set, don't worry. Take a brown shade and white. Connect these two pieces and crumple until the streaks disappear. The resulting mass must be rolled into a ball. Give the ball a cone shape. The muzzle can be considered almost ready. Set the workpiece aside.
- Let's start sculpting the body. It should be dark. Take the color you want, knead the material and roll into a ball. Gently press the resulting ball on the sides to form an oval.
(Step 2) - Take the muzzle and body blank and connect them. In the joint area, add teardrop-shaped pieces in a brown shade (they should resemble spines) to hide the joint.
- We return to the light brown color again, we need to make the ears. Roll small balls, flatten them and connect at the bottom. Using a skewer, carefully secure the ears to the hedgehog's head. In the space between the ears, place the same drop-shaped parts as in the previous paragraph.
- The time has come for the formation of spines on the future hedgehog. For this purpose we will use scissors. Using the tip of the scissors, make small cuts in the plasticine. Use a skewer to press down the middle of the created needles. You can make a couple of additional cuts on the needles that we made on the hedgehog’s head.
(Step 3) - All that remains is to design the face. To do this, use a stack to make indentations in the place of the eyes. Roll out small black balls and insert into the recesses. We attach the spout in the same way. Finally, we decorate the hedgehog’s mouth.
You learned how to make a hedgehog from plasticine step by step. To make the hedgehog look even brighter, add a couple of elements to it. These could be apples, pears or mushrooms. They can be attached to spines. And one of the ears can be decorated with a small flower.
Having such a hedgehog and a few other plasticine animals, all you have to do is make a car out of plasticine, put the whole company in it and go on a trip. You will learn how to make a car from this article.
How to make a hedgehog from plasticine
If your child likes to create animal figures from plasticine, invite him to make a hedgehog. This cute, prickly animal will add to your baby's collection of products. To make a little animal, we suggest you choose one of the instructions below. You will learn how to make a hedgehog from plasticine in different ways.
If you have already sculpted a cat from plasticine, which we talked about in the previous article, then making a charming hedgehog will not be difficult. We have selected several options for making a hedgehog for you. The first two will be based only on the use of plasticine.
The second method of sculpting
The following modeling from plasticine is especially relevant for children. Unlike the previous option, the spines of this hedgehog will not be cut out, but will be made from the same basic material. This means that work will be done with small details, which will successfully affect the child’s fine motor skills. What you need for work:
- plasticine (take several colors, one for the spines, the other for the face);
- napkins;
- board;
- plastic knife.
How to make a prickly hedgehog from plasticine step by step:
Hedgehog according to the second method (Step 1)
- The first thing to do is to prepare the material for work. Plasticine should be pliable for modeling, so warm it up well in your hands and knead it. Prepare a light color for the body, a dark color for the needles.
- Let's start with a light color. You need to make a long cone out of it. The sharp end needs to be highlighted so that the hedgehog’s curious nose is always visible. As you understand, the sharp part will be the muzzle, and the wide part will become the body; you do not need to make the head and body separately.
- Attach a small black ball to the spout. This nose definitely loves to look for treats. Glue on the eyes.
(Step 2) - We continue working with the light color. You need to roll four balls. Gently press them so that they acquire an elongated shape (if possible, use a special spatula). Using a knife, cut out the fingers on the resulting paws. We attach the paws to the previously made cone. Make sure they look the same.
- It's time to add some needles to our hedgehog. We take a dark color, tear off small pieces from it, stretch them out and sharpen them. We attach the spines to the body. We make a lot of needles to cover the hedgehog completely. Try not to allow voids to appear.
The hedgehog is ready. This type of plasticine modeling will be very interesting for children. And with a little effort, the finished hedgehog turns out very beautiful.
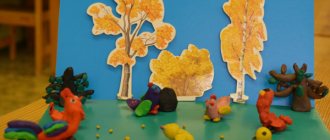
Plasticine crafts for children may include foreign components, such as pine cones, seeds, real pine thorns, leaves and acorns. When looking at plasticine hedgehogs, study crafts using seeds, because these are natural spines.
Ready-made examples of complex and detailed plasticine hedgehogs
Experienced craftsmen can try to make a complicated version of a hedgehog from plasticine, where the detail increases and becomes more complex, for example:
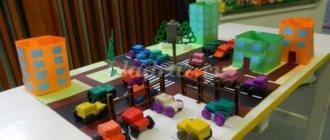
You can create original mini-compositions:
Applications with a plot look very beautiful, natural and decorative. Such a composition, placed in a frame, will enliven a child’s room, give a cheerful mood and warm memories from work (possibly together with the child).
A plasticine hedgehog is easy to make, and the various forms of production make you want to make a new version. Ready-made crafts can be used in games, decorate the interior of children's rooms, or used for themed parties in the garden.
You can make a Hedgehog from Smeshariki, detailed instructions here.