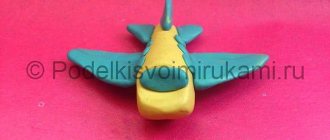
Origami fighter
A three-dimensional military fighter is also being created using the origami technique. For this craft you will need a regular sheet of office paper.
Execution order:
1. Bend the sheets from both sides up and down. Intersecting diagonal lines are formed.
2. Roll the sheet horizontally. Fold part of the sheet to the left along the vertical axis. Place the right corners inside the workpiece.
3. Turn the sheet over along the horizontal line and fold a vertical strip towards the middle.
4. Bend the corners along a horizontal line. Place them inside the part. Bend the workpiece so that there is a triangle.
5. Bend the lower part of the outer layer to a horizontal line. Flip the folded portion up and split it in half. And straighten the bottom part up.
6. Straighten the folded corners and fold the workpiece along the drawn lines like this: the blue lines are a “mountain”, and the red lines are a “valley”. The top and bottom parts should move towards the horizontal line.
7. A blank similar to an arrow has formed. Flip it horizontally and you get a tail unit.
8. Fold the top corner down along a horizontal line. Bend the wing upward through the horizontal axis. Do the same with the second wing.
9. Sharpen the nose of the plane by bending the corners horizontally. Bend the entire piece to make an airplane. Raise the tail vertically and tuck the corners of the wings inside.
The origami fighter is ready to fly.
Airplane model with propeller
This is an ideal model for outdoor games with your baby. To work you will need a sheet of paper, scissors, a pencil and a pin with a bead at the end.
The sequence of actions is as follows:
- Roll a regular sheet lengthwise and fold the sides towards the center.
- Fold the resulting corners inward again.
- Fold the sides inward again and press the folds well.
- The propeller is made from a 6 cm square of paper. You need to draw it diagonally. Cut along these lines, moving 1 cm away from the center.
- Fold the propeller, directing the corners to the center alternately. Secure in the center with a needle. To prevent the craft from falling apart, you need to glue its parts.
Place the propeller at the tail of the plane, it is ready to fly up.
DIY PAPER AIRPLANE FOR CHILDREN
In fact, what we are doing today is origami. We will make a complex structure from a simple sheet of paper. So let’s bend it, fold it here, and in the end the plane will fly!
1. Place an A4 sheet of paper vertically in front of you. And bend the 2 side corners so that the sides meet exactly in the middle.
2. Bend the sheet along the bottom side of the resulting triangle.
3. We connect the upper side corners of the workpiece at the middle of the sheet so that a small triangle remains under the connection point, which we bent a little earlier.
4. We bend this triangle upward and press down the bent edges.
5. Turn the workpiece over and fold it in half. Connecting the sides.
6. Bend the wings in half so that the top side is level with the bottom of the workpiece.
Advice from the author of this design option is to launch the airplane easily, without effort or tension.
Then the structure will float for a long time, catching air currents with its wings.
Boomerang plane
How to make an interesting airplane - a boomerang out of paper, step-by-step instructions:
- Fold a regular sheet in half twice and fold the corner.
- Fold one side of the rectangle to the middle.
- Then bend it inward to create a triangle.
- “Flatten” the resulting triangle, as done in the video.
- Turn the workpiece over and place a piece of the triangle inside.
- Fold the wide side of the workpiece towards the “pocket” on both sides.
- Lift the top of the “pocket” and roll it horizontally.
- Place the corner in the “pocket”. Do the same with the other side.
- Fold up the side of the large “pocket” on both sides.
- Unfold the craft and place its outer part inside.
- Turn the craft and bend its front part.
- Fold the craft in half.
- Create the fuselage: Fold the side down along the fold on both sides.
- Fold a small portion of the wing upward on both sides.
- Unbend the craft. Using your fingers, make a bend line on the front of the wings.
Playing with such a plane will be interesting and fun.
Gliding airplane
Another criterion by which paper airplanes are evaluated is the ability to stay in the air for a long time.
The maximum recorded record is 29 seconds. But maybe you can overcome it. To do this, you can use a model developed by engineer Can Blackburn.
Let's now look at the assembly step by step:
- Take a sheet of A4 format. We fold the edges of the sheet towards the middle, and the distance between the corners should be about 3 cm.
- Bend the top edge 2 cm.
- Unfold the workpiece and repeat the procedure again. At the same time, we increase the distance between the corners slightly.
- Unfolds the workpiece and bends it 8 more times. It should look like a kind of accordion.
- Bend 3 cm of the top edge and fold the workpiece in half.
- We bend the wings, wrap the tips up.
- To make it more clear, you can use the step-by-step diagram below.
Very fast plane
How to create a model of a cool airplane that flies fast. This is a supersonic bomber and is very easy to make:
- Fold a regular sheet of paper in half lengthwise.
- Bend the side parts inward.
- Fold the paper inward along the dotted lines.
- Then fold along the axis, and the corners should be on the outside.
- Fold the wings of the bomber as shown in the diagram.
- The angle between the wing and the fuselage must be right.
- It turned out to be a cool supersonic airplane.
Airplane diagrams
We present to your attention the 12 best origami patterns. Choose the best option for you and use the step-by-step diagram to make an airplane. We wish you success and creative mood!
Cardboard airplane
You will need: colored cardboard, a simple pencil, scissors, an empty matchbox, a ruler, PVA glue.
Master Class
- Cut a strip of colored cardboard 21 cm long and 1.5 cm wide.
- Cut 2 identical strips of cardboard measuring 17x4 cm, then round the corners.
- Fold the long strip in half and glue it exactly in the center of the matchbox.
- Apply glue to the top and bottom of the box and immediately glue the wings.
- Cut out the remaining parts: 2 strips measuring 5x1.5 cm; propeller and chassis.
- Cut and round the corners of one of the strips.
- Glue 2 strips to form the tail of the plane.
- Glue the propeller and landing gear to the plane.
- An airplane made of cardboard and a matchbox is ready!