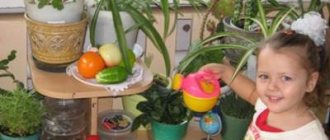
Appliquéing a person is a very exciting and creative job. Its advantage is the variety of techniques used and varying complexity. Such work is suitable for very young children, preschoolers and elementary school students. Using the application, you can study geometric shapes, colors, parts of a person’s face, and his emotions.
Application of geometric shapes
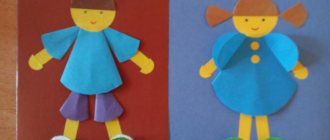
The simplest version of a person’s appliqué is made from geometric shapes. This technique helps develop a child's imagination. The main elements used are square, triangle, circle, and rectangles.
For the application you will need:
- patterns of triangles, circles,
- cardboard;
- glue.
The complexity of the work depends on the number of parts and elements used. The simplest option is to invite the child to arrange the figures so that they form a body, head, arms and legs. A rectangle (boy figure) or a triangle (girl figure) is used as a body. Instead of a head there is a circle. The arms and legs are made from thin rectangles.
They complicate the work with various details - pigtails, a hat, highlighting the hands and feet. Small details indicate the eyes, mouth, nose.
MAGAZINE Preschooler.RF
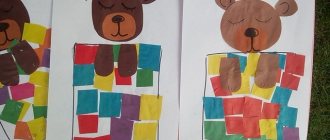
Educational field “Artistic creativity” (Lesson type: final)PROGRAM CONTENT: 1. Create conditions for successful motivation of practical activities. 2. Teach children to invent and portray fantastic people. 3. Develop and improve the skills and abilities of constructive and design creativity, using the tearing method. 4. Express the character of the characters in the application with gestures and movements. 5. Develop children's creative activity, independence and initiative. MATERIAL: 1. Toy Bon – Bon (made of cardboard, candy wrappers, candies). 2. Models (take a candy wrapper, fold the candy wrapper crosswise in three, iron the fold and tear it into three parts. From the middle part we get the head and torso. We bend the side parts lengthwise and tear them in half. We bend the resulting parts in half again and also tear them. We got two “arms" and two “legs” that can bend and unbend. We put together a “candy man” from torn pieces). HOD: Guys, what are you in the mood for? Show how cheerful you are (crying is heard behind the doors) Guys, you are all cheerful, but who is crying then? I'll go and have a look (I bring in the Bon-Bon toy) Bon: Hello, guys, my name is Bon-Bon. Educator: What happened to you, why are you crying? Bon: I lost my Caramel Country. Educator: Look, this is not your country? Bon: No, but I like her too, but I’ll be bored alone. Educator: Guys, why will Bon be bored? Do you like to play alone? Why? How can we help Bon-Bon? Only I have nothing (at this time there is noise). What sounds? I don’t know, maybe you know? What could be rustling like that? Oh, look, there’s some beautiful box lying here. Let's open it. That's where the noise was coming from. These are candy wrappers. Do you think candy men look just like people? That's right, like real people, they have all the parts of their body that should be in their place. What parts of the body do you know? How many arms and legs? Can your head tilt and can your arms and legs bend? Move your head, arms, legs. Now let's go to the tables, and put Bon - Bon here, he will watch how you make little men. Look how an ordinary candy wrapper turns into a little man (I show models). Before we start, let's play with our fingers. One, two, three, four, five Let's count fingers Strong, friendly Everyone is so necessary. Now let’s start creating our own caramel man (to instrumental music). Our most delicious caramel country is located on the table, come up and stick your sweet inhabitants. Do you like our caramel country? With what? What mood are your people in? Do you think Bon-Bon will like her? Let's call him. Guys! Look, Bon—Bon smiled. Bon: What a beautiful caramel country. I like her, I'm so happy. Thank you very much. I also want to give you a gift. Here's a sweet caramel for you. Educator: Oh, there are many of us, but there is only one candy. Wait, there's something in it. Let's see (I'll treat you to caramel). Let's dance with caramels (to music). Guys, now you know that you don’t need to throw away candy wrappers, but you can make many, many funny caramel men out of them and play with them. Thank you.
| Next > |
Face: studying the senses and emotions
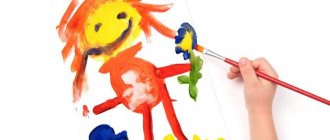
Appliquing a person's face from paper is not just an interesting creativity, but also an opportunity for a child to develop in different areas. To get acquainted with the senses and emotions, children are asked to do a simple job - stick eyes, mouth, nose, ears on a template.
Classes can be divided into 2 types depending on age:
- familiarization with the location of organs;
- game of emotions.
Getting to know the location of the senses
Familiarity with the location and purpose of the senses is necessary for children aged 2-3 years. During this period, work is performed with the help of an adult.
For the application you will need:
- face template;
- templates of mouth, eyes, nose, ears;
- glue.
To begin with, the child is shown a template of a face and told that the sense organs are located on it. They show the organs one by one, explain their purpose and location, and let you look at them. The child applies glue to the template and sticks it to the face. The actions are repeated with each sense organ.
Getting to Know Emotions
The application of a person's emotional face will be of interest to children aged 4-5 years. To work, you will need to prepare in advance templates of the eyes and mouth, expressing various emotions - anger, joy, sadness. Also, for the applique you will need a person's face made of paper. It may have a nose drawn on it in advance.
- Work begins with one emotion. It is described in detail. They tell how this feeling is expressed through the eyes and mouth.
- They invite the child to choose from a general set of templates that are suitable in meaning and place them on his face. If it turned out correctly, move on to the next emotion.
- If a child has made a mistake, then it must be discussed and helped to correct it.
Playing with emotions is interesting not only in the form of applique, but also with magnetic templates or Velcro parts.
APPLICATION. “DESIGN A FUNNY ANIMAL”
Software tasks.
Develop imagination and creativity (the ability to independently assemble an animal from circles and semicircles of different sizes and colors); continue to practice children in cutting circles from squares and semicircles by cutting the circles in half along the fold; compose an image from parts in a certain sequence, placing first the large parts in the middle of a sheet of paper, then the small ones.
Material.
The teacher has a decorated box for the didactic game “Funny Animals”, cardboard circles and mosaic semicircles (see lesson 8). Children have sheets of thick paper or cardboard the size of 1/2 a landscape sheet. Squares of three or four sizes for cutting circles and semicircles and ready-made small circles in one box for two children; scissors, glue.
Progress of the lesson.
Remind the children that they made various funny animals from a mosaic. To say that today everyone will come up with a little animal and compose it on a piece of paper from circles and semicircles. Children will cut out large circles and semicircles from squares, and keep small circles in a box. If they need small half circles, you can cut the small circles in half.
In conclusion, say: “Then we will make a board game “Funny Animals” from your applications and play it. I have already prepared a box for cards with animals. Here she is".
During the lesson, remind, if necessary, how to cut circles from squares. Ask some children what kind of animal they are going to depict, from which figures they will make this or that part of the body. Encourage those who decide to depict an animal in motion (sitting, running, etc.). Make sure that the children first lay out the large parts of the animal (torso, head), and do not rush to stick them on right away until they select the most suitable shapes and sizes for certain parts of the body. You can invite individual children to replace some figures with others and see if it works better. We should approve of those children who add interesting details to their images and decorate them with small details.
At the end of the lesson, put children's applications on the stand and examine them. When pointing to a particular work, ask what kind of animal is depicted on it. If identical animals are named, draw the attention of all children to their differences, emphasizing that the children portrayed the same character in their own way. Mark original works with characters that children had not previously created while playing with mosaics.
If time permits, conduct several play exercises with children's appliqué:
1. Place one of the cards in front of the children and offer to pick up cardboard figures - circles and semicircles of the same size and the same amount as it took to draw the animal on the card. The color of the figures is not taken into account.
2. Place another card in front of the children and ask them to count how many circles and how many semicircles went into the image of the animal, and determine which figures were used more.
3. Find figures of the same color as those used in the image of the animal. If the color was repeated in several parts of the animal, then it is enough to select one circle of this color.
Note. Game exercises should be carried out with children in their free time, giving each a card with an image of an animal. You can select other game actions.
LESSON 10
APPLICATION. “FUNNY PEOPLE FROM CLUBS”
Software tasks.
Continue to develop children’s imagination and creativity, the ability to independently invent human figures from circles and semicircles; convey simple movements of the arms or legs of the figures; make human figures starting from the head.
Material.
The teacher has 3-5 samples with images of different people made from circles and semicircles. Children have several squares: 7.5x7.5 cm;
6 × 6
cm
and 4 × 4
cm
and ready-made small circles (see mosaic figures made from material for the lesson in different colors, including squares and ready-made figures in pink or light orange to depict a face and palms; sheets of thick paper 1/2 in size 2 album sheets; scissors, glue.
Progress of the lesson.
The teacher addresses the children:
— In the last lesson, you yourself came up with and depicted various funny animals from circles and semicircles. What do you think, children, is it possible to use circles and semicircles to depict something other than animals?
- So I decided to make little men out of circles and semicircles. Look what funny little men I came up with. (Shows 3-5 images.) Are these people different or the same? Why did they turn out different, since they are all made up of circles and semicircles? Yes, all parts of the human body are made up of circles and semicircles of different sizes, colors and numbers. One man’s body is made up of two or three small circles, another’s is made up of one large circle, the third’s is made up of a circle and a semicircle. (You can also compare their heads, legs, arms, costume details and movements.)
— All these little men are made up of circles and semicircles of different colors. And who will notice which parts of the body all the little men have the same color? (Pink face and pink palms.) These little men want you to invent and portray friends and girlfriends for them, but only so that each new little man is different from the others. They will not accept the same people into their company.
The teacher removes the samples and invites the children to start working.
If necessary, reminds the children that they will cut out large circles and semicircles themselves from squares, and they have small figures ready in boxes.
During the lesson, the teacher makes sure that the children first make a figure of a man, and then stick it on, starting from the head. It suggests that the head should be glued a little away from the top edge of the sheet of paper so that hair, a cap, etc. can be depicted on the head.
Encourages to depict various details on the costumes of the little men: collar, pockets, buttons, bows. This will help give the characters expressiveness and variety.
At the end of the lesson, you can put samples on the stand and say: “Little people have come to meet their new friends. But first they want to see if the new kids are different from themselves and from each other.” Invite four or five children to place their images separately from the samples, and everyone to see how the characters differ from each other. Then place them next to the samples.
Carry out the same work with the applications of other children. In conclusion, it is very interesting to look at these little men, because they are all different, and each child came up with and portrayed a funny little man in his own way.
LESSON 11
Man in motion
The appliqué of a person in motion helps develop a child’s creative abilities and imaginative perception. The difficulty of this task is that rectangles and squares of different sizes are used for the work.
For the application you will need:
- blanks of squares and rectangles made of paper;
- cardboard;
- glue.
The work consists of several stages:
- The child is asked to choose cardboard - the base on which he will stick the figure.
- The adult pronounces the pose that will be depicted in the form of an appliqué. He explains how the arms and legs are positioned in this pose, and what features there are. For example: a person runs, bends over, jumps.
- The child takes the prepared templates and lays them out in the desired position on the cardboard. If you have completed the figure correctly, then glue the rectangles with glue.
- If mistakes are made in a pose, the adult tells you how to correct it.
The application of a person in motion will be useful for children of primary school age and art students.
Text of the book “Lessons in visual arts in kindergarten. Middle group"
LESSON 7. INTRODUCTION TO ART – ILLUSTRATIONS BY E. RACHEV FOR RUSSIAN FOLK TALES
Software tasks.
Introduce children to E. Rachev’s illustrations for the fairy tales “Kolobok” and “Teremok”; help to notice characteristic features in the depiction of fairy tale characters (humanization, poses, clothing), in the landscape; develop attention to details that enrich the content of the work and help to better imagine what is happening.
Material.
Books of fairy tales (“Kolobok”, “Teremok”, “Masha and the Bear”) with illustrations by E. Rachev and books with illustrations by V. Lebedev.
Progress of the lesson.
Show the children V. Lebedev’s illustrations to S. Marshak’s books “Mustachioed and Striped”, “The Tale of a Stupid Mouse”, then add to them one or two more books by the same author, for example “The Multi-Colored Book”.
Help you remember who drew the illustrations for these books. To say that today children will see illustrations by another artist - Evgeny Rachev.
Show the illustrations on the covers of the books “Teremok” and “Kolobok” and ask what these fairy tales are called.
- How did you know, children, that this is the fairy tale “Kolobok”, and this is the fairy tale “Teremok”?
Confirm the children's answers that on the cover of each book are those about whom this fairy tale is drawn.
- Here is a sly smiling fox holding Kolobok on his paw. He opens his mouth wide and sings his boastful song. On another cover, the artist painted a mansion with happy animals looking out of it. Contentment can be seen by the expression of their faces.
Next, slowly look at the images of animals in the fairy tale “Kolobok”:
- Here is a bunny in a white embroidered shirt. What do you think, children, where did the bunny come from? (From the garden.) How did you guess about this? (The artist drew him with a carrot under his arm.) Look at his face. How does he look at Kolobok? (The bunny is surprised and delighted.)
– This illustration shows a wolf. How does he look at Kolobok? (Evil, staring with yellow eyes.)
– How did Rachev portray the bear? (The bear holds a log in which bees live and eats honey with a spoon. He opened his mouth and rolled his small eyes with pleasure, he likes honey so much. It is clear that the bear is clumsy, and it will not be difficult for Kolobok to run away from him.)
- Let's look at the fox. See how elegant she is. What's on her head? (Kokoshnik with patterns.) What sundress did Rachev draw for the fox? What's on your neck? (Beads.) What is the fox doing? Why is she holding her ear with one paw? What kind of face does she have?
– The artist depicted the fox in such a way that we see what a cunning deceiver she is. Rachev drew each animal differently. But they are all dressed like people, and the expressions on their faces are the same as people have (joyful, surprised, angry, cunning). His animals are completely different from those in the pictures of the artist Lebedev.
Then you can look at the illustrations again and draw the children's attention to the landscape.
– Where did Kolobok meet the bunny? (In the spruce forest, on the path.) And where with the wolf? (In a dense forest.) Where did the meeting with the fox take place? (At the edge of the forest.) The evening sky is visible through the trees.
– So, the artist Rachev shows us different places where Kolobok met with animals. But the artist Lebedev draws animals and people, but does not show where this happens. His illustrations are done on white paper.
You should also point out the decoration of pages with the text of fairy tales with decorative patterns.
When looking at the illustrations in the book “Teremok”, you should invite children to tell what these or other characters look like (what they are wearing, what they are holding in their paws, what expression is on their faces). Ask if the characters from this fairy tale are similar to people, what are the similarities.
Then it is advisable to see in the pictures how, as the pot is populated by residents, it changes and becomes more and more like a small house.
– First a window appeared. It was probably made by a fly and a squeaking mosquito. And to make the pot more stable, they propped it up with sticks.
- What new appeared when the frog-frog approached the tower? What else will be new at the tower? Let's take a look (ladder, roof).
– How did Rachev manage to show us that there was a stove in the mansion? (There is a chimney on the roof, smoke comes out of it.) This means that the hare, fox, and wolf no longer saw a pot, but a real house-teremok, and they also wanted to live in it.
When looking at the illustration with a bear, you need to draw the children’s attention to the bright red, crimson color of the sky, as if there was a fire. This color is disturbing and disturbs those who look at the picture. Something bad is about to happen. And indeed, a misfortune happened. The bear crushed the tower, and all the animals fled.
In conclusion, ask the children if they liked the illustrations by the artist E. Rachev. Show the cover of the book "Masha and the Bear". Ask which artist, in their opinion, drew the pictures for this fairy tale (Rachev). To say that children will look at this book for themselves and see how the illustrations are similar to the pictures for the fairy tales “Kolobok” and “Teremok” and how they differ.
LESSON 8. GAME EXERCISE WITH MOSAIC “ANIMALS FROM CIRCLES”
Target.
Give children an idea of how to transform a real image into a stylized one, preserving several characteristic features by which a specific animal can be recognized; develop creative imagination; learn to independently choose animals to lay out their images from circles and semicircles.
Material.
Subject pictures with realistic images of animals: dogs, cats, squirrels, foxes, bears, elephants, giraffes, tigers, etc.; cards with images of several animals made up of circles and semicircles (in fewer numbers than realistic pictures); circles, semicircles made of colored cardboard of different sizes (diameter of circles 8 cm,
6
cm,
4
cm,
2.5
cm,
1.5
cm
); chips.
Progress of the lesson.
In the first part of the lesson, children gather near the board. On the top shelf of the board, place subject pictures with realistic images of animals at some distance from each other. On the bottom shelf are cards with stylized images of animals made of circles and semicircles (in fewer quantities than subject pictures).
Ask the children who is in the pictures. Add to the children’s answers the names of any characteristic features of this animal: “Yes, this is an elephant. He has a long trunk and thick legs"; “The squirrel has a big fluffy tail”; “The giraffe has a long neck and long legs,” etc.
Draw the children's attention to the cards that depict animals made of circles and semicircles, and give the task: “Guess what animals are depicted on the cards, and place them next to the pictures that show the same animals, but real ones.” Children complete the task one by one, or the teacher gives them one card each, which they each place next to the picture. Ask each child: “Why do you think this is a dog (giraffe, elephant, squirrel, etc.)?” Or: “How did you guess that it was a fox?” The child names one or two signs characteristic of this animal. You can give children chips for completing the task correctly and giving the correct answer. At the end, ask which animals were left without a mate. Say that animals can be depicted in different ways: the way we see them (point to the pictures), or made up of circles and semicircles, or something else. But in order to be able to find out what kind of animal it is, it is necessary to preserve in it what distinguishes it from other animals. For example, if an elephant does not have a trunk, and a giraffe has a long neck, then no one will recognize them.
…
Rice. 61.
Approximate images of animals made from circles and semicircles
You can do the “Correct your mistakes” exercise. The teacher asks the children to turn away or close their eyes and rearranges pairs of animals or places next to those animals from the circles that remained on the bottom shelf of the board.
Those whom he called must place identical animals next to each other: two foxes, two elephants...
The second part of the lesson is held at tables that are arranged so that the children can see each other's work. Boxes with circles and semicircles are placed on the tables.
Remove stylized images of animals from the board, leaving substantive pictures. You can add one or two new pictures (lamb, horse) and invite children to draw any animal from circles and semicircles, selecting them by size and color.
At the end, each child turns to his friend by name and asks him to guess who he is. If the answer is correct, the “artist” takes the chip from the tray and gives it to his friend. If no one can guess the image, the teacher asks the author who he depicted, and the children - why it was impossible to guess who it was. Invites those who want to change something in the image to highlight a characteristic feature so that the animal becomes recognizable.
Say that in the next lesson the children will again make up whatever animal they want from circles and semicircles and stick it on a piece of paper.
Leave the mosaic and pictures for the free use of children for independent exercises.
LESSON 9. APPLICATION. “DESIGN A FUNNY ANIMAL”
Software tasks.
Develop imagination and creativity (the ability to independently assemble an animal from circles and semicircles of different sizes and colors); continue to practice children in cutting circles from squares and semicircles by cutting the circles in half along the fold; compose an image from parts in a certain sequence, placing first the large parts in the middle of a sheet of paper, then the small ones.
Material.
The teacher has a decorated box for the didactic game “Funny Animals”, cardboard circles and mosaic semicircles (see lesson 8). Children have sheets of thick paper or cardboard the size of 1/2 a landscape sheet. Squares of three or four sizes for cutting out circles and semicircles and ready-made small circles in one box for two children; scissors, glue.
Progress of the lesson.
Remind the children that they made various funny animals from a mosaic. To say that today everyone will come up with a little animal and compose it on a piece of paper from circles and semicircles. Children will cut out large circles and semicircles from squares, and keep small circles in a box. If they need small half circles, you can cut the small circles in half.
In conclusion, say: “Then we will make a board game “Funny Animals” from your applications and play it. I have already prepared a box for cards with animals. Here she is".
During the lesson, remind, if necessary, how to cut circles from squares. Ask some children what kind of animal they are going to depict, from which figures they will make this or that part of the body. Encourage those who decide to depict an animal in motion (sitting, running, etc.). Make sure that the children first lay out the large parts of the animal (torso, head), and do not rush to stick them on right away until they select the most suitable shapes and sizes for certain parts of the body. You can invite individual children to replace some figures with others and see if it works better. We should approve of those children who add interesting details to their images and decorate them with small details.
At the end of the lesson, put children's applications on the stand and examine them. When pointing to a particular work, ask what kind of animal is depicted on it. If identical animals are named, draw the attention of all children to their differences, emphasizing that the children portrayed the same character in their own way. Mark original works with characters that children had not previously created while playing with mosaics.
If time permits, conduct several play exercises with children's appliqué:
1. Place one of the cards in front of the children and offer to pick up cardboard figures - circles and semicircles of the same size and the same amount as it took to draw the animal on the card. The color of the figures is not taken into account.
2. Place another card in front of the children and ask them to count how many circles and how many semicircles went into the image of the animal, and determine which figures were used more.
3. Find figures of the same color as those used in the image of the animal. If the color was repeated in several parts of the animal, then it is enough to select one circle of this color.
Note. Game exercises should be carried out with children in their free time, giving each a card with an image of an animal. You can select other game actions.
LESSON 10. APPLICATION. “FUNNY PEOPLE FROM CLUBS”
Software tasks.
Continue to develop children’s imagination and creativity, the ability to independently invent human figures from circles and semicircles; convey simple movements of the arms or legs of the figures; make human figures starting from the head.
Material.
The teacher has 3-5 samples with images of different people made from circles and semicircles. Children have several squares: 7.5x7.5 cm
;
6 × 6 cm
and 4 × 4
cm
and ready-made small circles (see mosaic figures made from material for the lesson in different colors, including squares and ready-made figures in pink or light orange to depict a face and palms; sheets of thick paper 1/2 in size 2 album sheets; scissors, glue.
Progress of the lesson.
The teacher addresses the children:
– In the last lesson, you yourself came up with and depicted various funny little animals from circles and semicircles. What do you think, children, is it possible to use circles and semicircles to depict something other than animals?
– So I decided to make little men out of circles and semicircles. Look what funny little people I came up with. (Shows 3-5 images.) Are these people different or the same? Why did they turn out different, since they are all made up of circles and semicircles? Yes, all parts of the human body are made up of circles and semicircles of different sizes, colors and numbers. One man’s body is made up of two or three small circles, another’s is made up of one large circle, the third’s is made up of a circle and a semicircle. (You can also compare their heads, legs, arms, costume details and movements.)
…
Rice. 62.
Figure options
– All these little men are made up of circles and semicircles of different colors. And who will notice which parts of the body all the little men have the same color? (Pink face and pink palms.) These little men want you to invent and portray friends and girlfriends for them, but only so that each new little man is different from the others. They will not accept the same people into their company.
The teacher removes the samples and invites the children to start working.
If necessary, reminds the children that they will cut out large circles and semicircles themselves from squares, and they have small figures ready in boxes.
During the lesson, the teacher makes sure that the children first make a figure of a man, and then stick it on, starting from the head. It suggests that the head should be glued a little away from the top edge of the sheet of paper so that hair, a cap, etc. can be depicted on the head.
Encourages to depict various details on the costumes of the little men: collar, pockets, buttons, bows. This will help give the characters expressiveness and variety.
At the end of the lesson, you can put samples on the stand and say: “Little people have come to meet their new friends. But first they want to see if the new kids are different from themselves and from each other.” Invite four or five children to place their images separately from the samples, and everyone to see how the characters differ from each other. Then place them next to the samples.
Carry out the same work with the applications of other children. In conclusion, it is very interesting to look at these little men, because they are all different, and each child came up with and portrayed a funny little man in his own way.
LESSON 11. COLLECTIVE APPLICATION. "RESIDENTS OF THE ROUND CITY"
Software tasks.
To develop in children the ability to independently, based on previously acquired knowledge and skills, choose the content of their work and carry it out independently; continue to develop an interest in teamwork and a desire to do one’s part well; strengthen the skills of cutting circles from squares.
Material.
The teacher has a screen with the image of a “round city”, at the bottom of which there is a narrow pocket for children’s work and separate small screens with two or three pockets. Children have sheets of thick paper the size of 1/4 of a landscape sheet or cardboard; colored squares 6×6 cm,
ready-made mugs; scissors, glue.
Progress of the lesson.
The teacher says:
– In one fairy-tale country, they built an extraordinary city and called it the City of Circles. Everything in it was round (he puts a screen with a picture of the city on the table): round houses with round windows, stairs and balconies near the houses were also made of small circles. The trees and flowers were also round. Such a city should also have special residents. What do you think children should be like?
Confirms that in the City of Circles the inhabitants must also be special - consisting of circles. These can be people, animals and birds. He says that today everyone will decide for himself what kind of resident he will invent and portray for the fairy-tale city - a little man, an animal or a bird.
At the end of the lesson, you can say: “The City of Circles began to be populated by residents.” Take ready-made applications from children and insert them into the pockets of the screen and into separate screens, giving each character one or another characteristic. Gradually create a panorama of the city - in the background there is a screen with the image of the city and several residents at the bottom of the screen, in the foreground (table) there are residents placed in small screens (animals should be placed in a horizontal position if they are depicted on the cards in this position).
From some applications you can create plot groups (a man with an animal, etc.).
Invite the children to the table, listen to their statements, move certain screens with characters at their request and summarize: “Today you all together populated the fabulous City of Circles with extraordinary inhabitants. Everyone came up with their own resident, and together they got the population of the whole city. All the residents in it are different, although they are all made of circles.”
Leave a panorama of the city for a few days in a group for children to play with.
Studying anatomy
Older children will be interested in studying human anatomy using the applique as an example. This game will not only develop fine motor skills and perseverance, but will also introduce children to the structure of internal organs.
Depending on age and level of training, the number of organs may vary. To play you will need:
- template (contours of the human body);
- organs (brain, stomach, lungs, liver, heart, intestines and others);
- diagram with the location of organs on the template and their names;
- glue.
The essence of the game is to introduce the child to internal organs.
- Each organ is taken in turn. Its name is clearly pronounced and shown on the diagram where it should be located. For older children, the purpose of this organ is explained.
- The child takes the organ shown and glues it onto the person’s stencil for appliqué.
- The actions are repeated with each organ.
If this is not the first time an acquaintance with the internal structure of a person occurs, then the child can be asked to independently glue the organs onto the template.
Movable little man
Patterns of human body parts can make applique more interesting for children. With their help, it is possible to achieve a realistic, bright picture or give it dynamics. Surely older children will enjoy the dynamic applique.
To work you will need:
- templates of body parts (arms, legs, torso, head);
- screws and nuts from a metal constructor;
- cardboard;
- glue;
- scissors.
The work is carried out in several stages:
- Templates printed on paper are cut out and glued onto thick cardboard. This makes them stronger. Then the parts are cut out of cardboard.
- Place your hands on the body and use sharp scissors to make a through hole. A screw is inserted into it and a nut is tightened. I repeat the operation with my legs.
- The head is attached to the body in a similar way.
The little man gains mobility and is ready to play. To complicate the work, you can create additional connections at the elbows and knees.
Applications are a fascinating creativity that develops imaginative thinking, perseverance, and fine motor skills. Working with paper is suitable for children of all ages. Having mastered the skills of appliqué on paper, you can move on to more interesting and complex activities - for example, creating a reusable game with felt Velcro.
Summary of GCD for modeling in the middle group “Merry Men”
Methodological development of direct educational activities according to the Federal State Educational Standard in educational areas
“Speech development” and “Artistic and aesthetic development”
for children of middle preschool age
"Merry Men"
"Merry men."
Goal: developing children's ideas about body proportions.
Tasks:
Educational:
Teach children to see the proportions of the human body and compare body parts.
Educational:
Develop skills in sculpting sequence, sculpting techniques: rolling, pinching; compare the proportions of body parts; develop communication skills.
Educational:
Develop initiative, cooperation skills, continue to learn how to decorate your crafts.
Integration of educational areas:
Social and communicative development, speech development, cognitive development, artistic and aesthetic development.
Equipment:
A box with different human body parts with different proportions and colors, a box of plasticine for each child, a plasticine board, stacks, room layouts for little people.
GCD move:
| Educational areas | Tasks | Sequence of activities | Expected responses and actions of children |
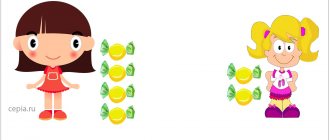
| Social and communicative development | Create a positive emotional mood, take advantage of a surprise moment | The teacher enters the group with a beautiful box. - Guys, look what our schoolchildren gave me! Let's see what is there? The teacher's box accidentally falls to the floor. - Guys, I think I broke something. The teacher opens the box and shows it to the children. - What is this interesting? | Children approach the teacher and look at the box. Children put forward their versions. |
| Speech development | Activate children's vocabulary, continue to teach how to conduct a dialogue and answer questions, suggesting your own versions. | — Hands of different colors and sizes; - the legs are also not all the same; “I’ll try to collect them now.” The teacher puts the large torso of a man to the small head and asks: Did you connect the parts correctly? What's wrong? Is there a head, is there a torso, are the arms and legs attached? | Children watch the teacher’s actions and answer questions. |
| Cognitive development | Teach children to see the proportions of the human body and compare body parts. | So he sorts through the parts of the man from the box until the children agree that the man is assembled correctly and his body proportions match. The teacher invites the children to try to make a similar person. Choose a piece of plasticine for yourself, take a stack, divide the piece of plasticine in half, and then in one half separate 2 equal parts for the body and head, and the other half for the legs and arms of the person. | Children agree or disagree with the teacher. |
| Artistic and aesthetic development | Develop skills in sculpting sequence and sculpting techniques: rolling, pinching. | The teacher helps children in sculpting and decorating little people. Offers a choice of room layouts for little people, prepared in advance by children and their parents. | Children sculpt their little people and decorate |
| Social and communicative development | Develop communication skills. | Game activity of a teacher with children. | Independent play activities of children. |
Author: Sycheva Oksana Yakovlevna Position: teacher of the 1st qualification category Place of work: MAOU "Komsomolskaya Secondary School" (Komsomolsk kindergarten) Location: Komsomolsky village, Perm region
Date modified: June 23, 2021 Date published: June 23, 2018