Why do you need this kind of drawing?
- Unlike traditional drawing, a child has much more opportunities to show and develop his creative abilities, fantasy, and imagination.
- The child learns to work with different materials.
- By feeling materials and textures, he develops fine motor skills.
- In the process of work, the child becomes familiar with volume, texture and space.
- The child works with color, learns to mix and match colors, and develops artistic taste.
- Unconventional drawing calms and captivates, promotes the development of perseverance, and encourages the search for non-standard solutions.
- There is no word “impossible” in this type of activity. We saw cones, leaves, berries, a tea bag - all this can be useful.
- Drawings using non-traditional techniques are obtained much faster than conventional ones. This plays a huge role for young children when they lack perseverance and patience to complete their work.
- Such activities add confidence in yourself and your abilities, and simply bring great pleasure.
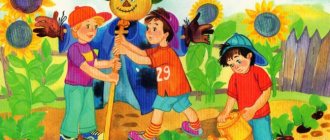
Collective drawing in non-traditional techniques in the second junior group “Goodbye, summer!”
Yulia Mishchenko
Collective drawing in non-traditional techniques in the second junior group “Goodbye, summer!”
Collective drawing in non-traditional techniques in the second junior group “Goodbye, summer!”
Goal: create an emotionally positive mood, develop the imagination and creativity of children.
Tasks:
— Develop children's fine motor skills.
— Develop children's creative abilities.
— Develop an aesthetic perception of the surrounding world.
— Learn to work in a team.
Materials: a sheet of whatman paper, gouache of different colors, a brush, pokes, plastic forks, stamp pads, a glass of water, a simple pencil, a small piece of napkin.
Progress of the lesson:
- One palm, two palms
We became a little friends,
Let's smile at each other!
Voss: Tell me, please, what time of year is our warmest, most affectionate, sunny and cheerful?
Voss: Yes, guys, it’s summer! And why?
(the sun is warming with its rays, flowers are blooming, butterflies are flying, we go to the forest to pick berries and mushrooms)
Demonstration of illustrations about summer, conversation.
Summer. What it is?
This is the freshness of the breeze.
This is the sun in the clouds.
These are insects running.
These are lilies of the valley in the forest.
Voss: Guys, it’s time for us to say goodbye to summer. Why are you sad? (children's answers).
Would you like to keep a piece of summer as a souvenir?
Me too. Look what I came up with.
(I show a blank sheet of Whatman paper.)
You and I will draw our summer, everything that you remember.
I think flowers and butterflies will remind me of summer all year long. I suggest you paint a picture in different ways. But first, let's get our fingers ready for work.
“I paint summer”
I draw summer: (Draw with a finger on the table)
Sun, (Draw “sun” in the air)
There are roses on the lawns, (They clench and unclench their fingers)
Blue paint – the sky (Paint “clouds” in the air)
And a singing stream. (They draw a “stream” with their finger on the table)
(I invite the children to choose for themselves what they would like to draw).
Sunny - with fingers and palm.
Weed - with a plastic fork.
Flowers - with a finger and stamp pads.
Butterflies are made from napkins.
Voss: Guys, look at what a beautiful picture it turned out to be.
Well done, you all did your best.
Thank you for your attention!
Photo report “Collective drawing with palms in the second junior group “We draw Summer” Photo report “Collective drawing with palms in the second junior group “We draw Summer” Goals and objectives: We continue to introduce children to non-traditional things. Abstract of the GCD on drawing in a non-traditional technique “poke” in the second junior group “Autumn Tree” Drawing “Autumn Tree” using a non-traditional technique (poke method) Integration of educational areas: HER; PR; RR; SKR; FR. Notes on drawing using non-traditional techniques in the second junior group “Summer Mood” Goals and objectives: We continue to introduce children to the non-traditional method of drawing. To develop the ability to draw with palms and fingers. Develop. Abstract of GCD on drawing in the non-traditional technique of blotography in the second junior group “Flowers” Topic: “Flowers” Goal: development of creative abilities. Objectives: To introduce parents and children to one of the non-traditional drawing techniques. Summary of a lesson on drawing in an unconventional technique in the second junior group “Thorns for a hedgehog” Summary of a lesson and photo report of work in the second junior group on the development of children’s artistic creativity using non-traditional techniques. Summary of a lesson on non-traditional drawing techniques in the second junior group “Summer Glade”. Drawing with soap bubbles LESSON SUMMARY ON NON-TRADITIONAL DRAWING TECHNIQUES IN THE SECOND JUNIOR GROUP TOPIC: Collective work “Summer Meadow” Drawing with soap bubbles. Master class on drawing in non-traditional techniques in the second junior group “Flower” Children’s master class on drawing with elements of non-traditional drawing “Flower” Second junior group. Educator: Slepova Galina Nikolaevna.
Source
Drawing with fingers and palms
Usually this is the first technique with which children begin to draw even before going to kindergarten. The drawing comes out very quickly, and this is extremely important when working with very young children. Dip your child's hand into the paint and let your child make an imprint on the surface. See what it's like. Perhaps it is some kind of animal? Ask your little one what needs to be completed to get the finished image. Maybe ears, nose or tail? the missing details can be drawn with your fingers. It is much easier to control your fingers and palms than a brush. And therefore more interesting for young children.
For this you will only need finger paints. If your child is still very small, don’t even doubt that he will be covered in paint. Therefore, it is better to immediately send him to the bath and give out the paints there. Don't worry about repairs. Good finger paints will be easily washed off both the bathtub and the tiles.
These paints are good, but expensive. One package costs about 500 rubles. He grabs her several times. After all, children do not stand on ceremony with any materials and scoop up not as much as they need, but as much as they can fit into their hand.
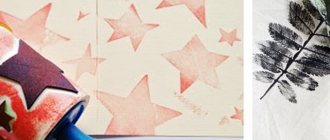
Stamps
Also quite a popular technique for early ages. You will need any object that you don’t mind and gouache or any other paint (but it’s better not to take watercolor). The technique is simple - dip an object in paint and make an imprint on paper.
Stamps can be made from apples, potatoes, wine corks, threads, pine cones, shells and many other materials. The easiest way to make this is with potatoes if you have metal cookie cutters. Simply press the mold into the potatoes and carefully trim the excess pieces around the edges with a knife.
It can be made even simpler. Take a small box, sponge or cork, glue various materials to the side surface or wrap it with threads in a chaotic manner.
Rollers with a pattern are also of interest. They are sold in construction and craft stores.
The leaf prints are especially delightful. Select leaves of various shapes, paint them and press them onto the paper. The entire texture of the sheet will be clearly imprinted on the paper.
Planning the activities of an early age group in art
Author: Trachuk Liliya Mindakhirovna
| OCTOBER | ||
| № p/p | Title of the lesson | Target |
| 1 | "Rain" | teach children to paint with gouache using their fingers; learn to draw rain, highlighting its character: small, droplets, heavy downpour, using dots and lines as a means of expressiveness, develop interest and a positive attitude towards drawing, develop everyday skills. |
| 2 | "Leaf Fall" | continue to teach children to paint with gouache using their fingers, introduce them to color, develop interest and a positive attitude towards drawing. |
| NOVEMBER | ||
| 3 | "Footprints" | continue to learn to draw with the pad of your finger, learn to draw with the side of your fist, applying it to a sheet of paper, consolidate the idea of color, and be happy with the result. |
| 4 | "Patterns for dresses" | Strengthen the skill of drawing with gouache using your fingers, continue to introduce them to color, develop an interest in drawing, and teach them to enjoy the result. |
| DECEMBER | ||
| 5 | "Let's hide the mouse" | |
| 6 | New Year's party | |
| JANUARY | ||
| 7 | "Let's decorate the Christmas tree" | teach yourself to draw with gouache using your fingers according to a model; clarify and consolidate knowledge of colors; develop interest in drawing; develop everyday skills. |
| FEBRUARY | ||
| 8 | "Icicles" | teach children to draw with gouache using a stamp, clarify and consolidate knowledge about color (white); develop interest and a positive attitude towards drawing. |
| 9 | “Drawing strings for the ball” | teach children to draw with gouache using a stamp using wooden figures; navigate on a sheet of paper; clarify and consolidate knowledge of colors and shapes; develop interest and a positive attitude towards drawing. |
| MARCH | ||
| 10 | "Flower Glade" | continue to teach children to draw with their fingers; navigate on a sheet of paper; clarify and consolidate knowledge of colors; develop interest and a positive attitude towards drawing. |
| APRIL | ||
| 11 | Drawing on wet paper. | |
| 12 | "Tower" | continue to teach children to draw with gouache using a stamp using wooden cubes; maintain rhythm when using two colors; navigate on a sheet of paper, position the prints in a certain way relative to each other; clarify and consolidate knowledge of colors and shapes; develop interest and a positive attitude towards drawing. |
Lesson No. 1 “Rain”
Draw a picture in advance - trees, grass, and a cloud above them. Show your child how to draw rain with simple sweeping lines, and also draw raindrops with your fingertips, and invite him to try it too. Say that soon it will rain from a cloud, draw it with your child, water everything around, Invite the child to draw rain with his fingers so that large grass and trees will grow. For drawing, use finger gouache (it is easily washed off both from hands and from clothes).
Lesson No. 2 “Leaf fall”
Tell your child about autumn, that at this time the leaves on the trees turn yellow and fall to the ground. Draw a tree, invite your child to dip his finger in yellow paint and apply strokes to the paper. These will be your leaves. Do not limit the baby’s movements - let the leaves swirl through the air and lie under the trees.
Lesson No. 3 “Traces”
Dip your child's fingers in paint and make prints on the paper. You can place one, two, three fingers at once. Show how you can also make a print with the back side. Let the child clench his hand into a fist and try to do the same. Tell them that these are traces of different animals. Think about who might leave them - a dog, a bunny.
Lesson No. 4 “Patterns for dresses”
For decoration, prepare dress templates in advance. Tell your child that this is Masha's doll's dress. But for some reason it turned white. Offer to decorate it. Remind us what different fingerprints can be made (using a fingertip, drawing a line with your finger, etc.)
Lesson No. 5 “Hide the mouse”
A mouse is drawn on a piece of paper. Show it to your baby. Tell your child a short story.
— Once upon a time there lived a mouse. This mouse loved cheese. And to get to the cheese, you had to run past the cat every time. The mouse was very afraid of the cat. And the cat was just waiting for the mouse to go get the cheese. So our mouse is going to get some cheese, and the cat is hiding and waiting. The mouse sneaks around quietly, but you can’t fool the cat! Oh, now the cat will catch up with the mouse! Where should our mouse go?
- Let's help the mouse and hide it.
Give your child paint the same color as the mouse, and offer to paint over the entire mouse (shade). But first, show me how it's done. When the mouse is completely shaded, tell your child that he did a great job saving the mouse from the cat.
Lesson No. 6 “Let’s decorate the Christmas tree”
Each child has a sheet of paper with a Christmas tree drawn on it, and several paints. Show how we decorate the Christmas tree for the New Year. Invite your child to decorate the Christmas tree with multi-colored balls and lights (fingerprints).
Lesson No. 7 “Icicles”
Cut icicles out of white paper in any shape and stick them on a sheet of paper of a different color (to the top edge of the sheet). Give your child a foam rubber stamp and white gouache. Let him draw droplets that flow from the icicles. We will draw droplets by applying the stamp to the paper. You can tell your child that our stamp will happily jump on a sheet of paper: One jump, two jump, you get droplets!
Lesson No. 8 “Drawing strings for the ball”
Inflate the balloon and, without tying it with a thread, give it to the baby. As soon as the baby takes the ball, it will immediately deflate. Explain to your child that in order to prevent the balloon from deflating, you need to tie it with thread. Inflate the balloon again and tie it with thread. Show the multi-colored balls without strings drawn in advance on a sheet of paper. Invite your child to add strings to the balloons. But first, show me how to do it. Place your finger on the “tail” of the ball and move it down. Now invite your child to try to draw the strings himself. And don’t forget to praise your child for his efforts and perseverance.
Now play with the baby with a balloon. You can knock the ball up, or you can throw it to each other.
Lesson No. 9 “Flower meadow”
Before starting the lesson, prepare paints: red, yellow, blue. Prepare a jar of water in which the child can rinse his fingers. Today you and I will go to the clearing to admire the flowers. Place a sheet of light green cardboard on the table.
But what is it? The flowers did not bloom in the clearing. Let's help them.
Remind your child how to paint with his fingers: dip the tip of his finger in the paint, then touch it to the paper, then dip it in the paint again, etc. Remind that flowers come in different colors.
Give your child the opportunity to draw on their own.
Lesson No. 10 Drawing on a wet sheet
Your child will get an unforgettable and unusual feeling while painting with paints on wet paper. The child gets the opportunity to simply tinker with paints. When drawing on a wet sheet, we are not talking about drawing something specific. Place an oilcloth on the table or floor. Wet a thick sheet of watercolor paper (dip it in a basin of water) and place it on the oilcloth, smoothing it with a wet sponge. Dip your finger into any paint and run it across the paper. Do the same with paints of other colors. Draw the child's attention to the fact that the image is blurry, as if in fog or rain. And if you tilt the sheet, the paint will flow down the sheet and you will get a new pattern. When the paints have dried, invite the child, with the help of his mother, to come up with what the drawing looks like.
Lesson No. 11 “Turret”
Build a tower with cubes of two colors with the kids.
Leave it for clarity. Offer to build a turret on a sheet of paper using stamps (cubes with a smooth surface, without varnish or paint are used as stamps). You should start “building” from the bottom up, placing the prints next to each other, alternately using two colors. comments powered by HyperComments
Drawing with watercolors on wet paper
To do this, you will need a sheet of thick paper (preferably watercolor), the watercolor itself and a brush. Moisten the entire sheet evenly with water so that it is thoroughly wet, but not so that there are no puddles. Put some paint on your brush and start creating. Any stroke spreads one to two centimeters across the paper. Now is the time to show your child how colors are mixed and explain what shades are.
If the paint does not want to spread, then the sheet is dry; if it spreads in all directions, it is too wet. We need to find a middle ground. In this lesson, show your child that all movements are made easily and smoothly. There is no need to press the brush into the paper, as many children like to do. A light touch is enough.
The web in the right picture was drawn using a wax candle. Read about this below.
This technique works well for drawing backgrounds. Especially water. And after drying, you can continue to draw fish and algae as usual.
"Blotography" and "spraying"
In the "blotography" technique, children take a large amount of paint onto a brush, splash it on the drawing in a chaotic manner, then try to understand what it looks like. With a sufficiently developed imagination, you can get a whole plot. Details are completed with colored pencils.
The spray technique is similar. Only spraying is done using a toothbrush and a ruler. Put paint on the brush and run it with a ruler towards you. If you do everything correctly, there will be no paint splashes on yourself. But there may well be around the leaf. Therefore, you need to think in advance about what the sheet will be attached to and how to secure the space around it.
Collage
This is not really drawing, but only an intermediate stage. Surely, you have old postcards at home that you don’t need, but it’s a shame to throw them away. It's time to use them. Cut out individual elements and let your child arrange them on the paper. Newspaper and magazine clippings are also suitable for this purpose. After the child decides on the location of the objects, hand him a brush and glue and give him the opportunity to glue everything himself. Ready-made elements will be very useful for children under three years of age. After all, they still don’t know how to draw complex objects, but they will definitely be able to add details to them.
Preview:
Abstract of GCD in the second junior group in art
Strengthen the ability to draw simple objects and phenomena
reality. Using straight, round, inclined, long,
Identify knowledge of primary colors and shades as a means of transmission
variable attribute and emotional and moral characteristics
Strengthen the ability to use paint, brush, napkin, stand
under the brush, rinse the brush in a glass of water, dry
Continue to cultivate an interest in drawing and a love of beauty.
Preliminary work: Drawing straight, round, long, short
lines. Coloring contours with colored pencils and paints. On
classes in art activities, outside of class, individual work.
-The teacher brings in a large beautiful tassel decorated with a ribbon
and paint. Guys, do you know who came to visit you today? Right,
This is a brush, but not a simple one, but a magical one. She can draw very beautifully.
Can your brushes paint? We'll check this now. My brush
dipped in paint. Which one? That's right, green. What can you draw
green paint? Of course, grass. Here is my magic brush painting the grass
(short vertical lines) – teacher’s display. And now your tassels
They will draw exactly the same grass (children draw on their own).
— After painting with green paint, the brush got dirty. What do you need
do? (Rinse, dry).
- Help your tassels, well done (children put their tassels on
The flower goes to bed
— What other paint do you have on your table? That's right, red.
— What can you paint with red paint? Berries, flowers (show
teacher of drawing with round lines). - We draw flowers by touching the brush.
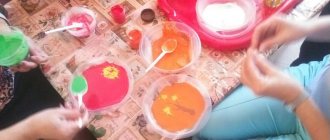
Drawing using sand, grains or sawdust
There are different options for drawing in this technique.
- Cover the entire sheet with glue, sprinkle with sand or grain and paint with your fingers or a brush on the rough surface.
- Apply glue only to those areas where the elements will be drawn. Sprinkle everything with sand and paint after drying.
- Paint bulk materials in advance, dry them and apply the design in parts. To prevent colors from mixing too much, you need to apply glue at a time only to those parts that should be painted the same color. After each such coloring, excess sand and grains must be thoroughly blown off.
"Scratch"
This is a more complex and completely unconventional type of drawing, which will require preliminary preparation. You will need a sheet of thick paper, wax crayons or a candle and mascara. First you need to evenly cover the entire sheet with wax, then with ink. You can also use gouache, but it crumbles and gets dirty during further work. Therefore, when using gouache, you need to add a little PVA glue.
When everything is dry, you can start drawing. In this technique, the drawing is created not by applying paint, but rather by scraping it out. Take a thin non-writing pen refill, an awl, a knitting needle, a stack or a stationery knife. Start by drawing the basic outlines, then move on to shading the surfaces. Depending on the type and intensity of the stroke, the object acquires its “character”. Children really enjoy the process of gradually developing a drawing.
If you want to make children's work more interesting, it is better to use colored wax (regular colored wax crayons). If you don’t have such crayons, then colored pencils or paints will do. After preparing the background, the sheet must be covered with colorless wax (rubbed with a candle). The best effect is achieved when the entire sheet is chaotically covered with strokes of different colors or spots with smooth transitions. The technology is surprisingly addictive for children, but I would recommend getting acquainted with it no earlier than 4 years old. Still, the tools are sharp and require extreme caution.
Abstract on artistic and aesthetic development in the early age group “Tender Sun”
Branch of the Municipal budgetary preschool educational institution kindergarten No. 110 of the city of Penza “Country of Childhood”
Author: teacher Rycheva Irina Viktorovna. Goal: To develop children's imagination, interest in drawing, develop drawing skills with a stamp and cotton swabs, and develop fine motor skills. Objectives: - To arouse interest in the image of a cheerful spring sun.
— To develop in children the ability to notice the beautiful in life around them.
— To develop the ability to combine different shapes and lines in one image: draw a large circle using a stamp and several rays - straight lines, using cotton swabs.
— Develop a sense of shape and color, visual-motor coordination.
— Foster independence and creativity.
Preliminary work: examining images of the sun in children's books. Watching the sun while walking. Reading of the poem “Sun” by V. Shipunova: The sun is smiling - Golden rays. The sun is swinging on a curly cloud. The sun throws golden balls. Sunny bunnies dive in puddles.
Materials, tools, equipment : gouache paints, cotton swabs, foam swab, flat image of the sun, clothespins, sheets of white paper (of different sizes), jars of water, napkins.
Progress of the GCD: The teacher asks the children a riddle: Who, with a radiant, bright light, ran through the objects? Does it release a hot ray that illuminates our Earth? Children: Sunny. Educator: Today the gentle sun came to visit us, look how beautiful it is, but trouble happened to it. It lost all its rays. We need to help him. The teacher shows clothespins and invites the children to replace the rays with them. Children attach clothespins to a flat image of the sun. Our sun has spread its rays. Why does the sun need rays? Children: To keep you warm. Educator: Who does it warm and how? Children: It warms us with rays. He strokes his head. Educator: Guys, in winter the sun rarely peeked out from behind the clouds. What time of year is it now? Who knows? Children: Spring has come! Educator: Correct. Spring has come. The sun shines on us every day and warms us with its warm rays. It became warm from the sun.
Sunshine, Bell, Rise early, Wake us up early: We should run to the fields, We should greet spring.
A finger game is being played on the carpet: We extended our palms and looked at the sun. Give us, dear sunshine, some warmth so that we can be strong! Our little fingers don’t want to wait a minute. Clap - clap with hammers, Top - stomp with little paws. Jump - jump, like bunnies jumping on the lawn! This is how the sun rises Higher, higher, higher. By night the sun will set Lower, lower, lower. Educator: Guys, do you want to draw your own sun? Watch how we will draw it. The teacher on the easel shows how you can draw a beautiful sun using a stamp and cotton swabs in an interesting and unusual way.
I draw a yellow circle And there are a lot of sticks around - This sun is shining, Its rays are playing The sun ran along a golden path. And the sun came straight into our window! Educator: Look, guys, at my sunshine. What color is it? Children: Yellow. Educator: What shape does the sun have? Children: Round. Educator: What do the rays of the sun look like? Children: On sticks, on fingers, on stripes. Educator: This is what a beautiful and kind sun I got. Everyone needs the sun to grow and be healthy. Guys, let’s each draw our own sun.
The children sit down at the tables and get to work. At the end of the work, the teacher invites the children to look at the drawings of the suns, how different they turned out: bright, beautiful, ruddy. Educator: Did you like drawing the sun? Let's take our drawings, go to the window and show our sun in the sky what beautiful suns you have made. Good, good The sun is laughing And we all have fun under the sun! At the end of the work, the teacher notes what the children depicted, what color the sun is, how it shines. After the lesson: Design of the exhibition of children's works “Hello, sunshine!”
Drawing with plasticine on glass
This will require a little preparation - you need to place a drawing under the glass and use a marker to draw all the contours on it. After this we begin to “color”. To do this, softened plasticine is applied inside the contours, without going beyond the edges of the parts. To soften the plasticine, you need to warm it. This can be done by kneading it with your hands or simply placing it in the sun or radiator.
On the working side, everything doesn't look very neat. But on the reverse side there is a beautiful color drawing with clear contours. The finished picture is inserted with the reverse side into a frame with a background made of colored cardboard.
Before starting work, do not forget to seal the edges of the glass with tape to protect the child’s hands.
If the child has not yet mastered this technique, it is better not to spend money on frames. It makes sense to purchase a regular coloring book with a large pattern.
Painting with salt
We cover the entire sheet with watercolor paints and pour a little salt on different parts of the drawing. Salt absorbs excess water, sticks and creates a very interesting effect. Excess salt should be carefully shaken off after drying.
If you liked the selection of non-traditional drawing techniques for kindergarten, please share it on social networks.
Summary of a lesson on unconventional drawing in the senior group
Topic: "Hello summer"
Purpose of the lesson:
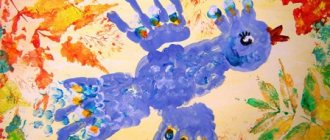
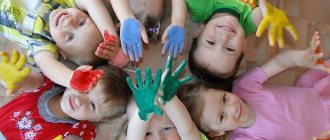
Photo report “Collective drawing with palms in the second junior group “We draw summer”
Yulia Mishchenko
Photo report “Collective drawing with palms in the second junior group “We draw summer”
Photo report “Collective drawing with palms in the second junior group “We draw Summer”
Goals and objectives: We continue to introduce children to an unconventional way of drawing. Develop the ability to draw with palms;
Develop creativity and ability to work in a team;
To cultivate neatness, interest in drawing, responsiveness, and a desire to help.
Equipment: Whatman paper, gouache, brushes.
Hand painting is a very simple and fun technique: the child dips his hands in paint or paints them with a brush, and then leaves a print on a piece of paper. This exciting process is like a fun game - children are liberated and reveal their creative potential. In addition, when drawing with your palms, a large number of nerve endings that are located on these parts of the body are activated. This leads to activation of the cerebral cortex, and, as a consequence, the development of mental processes. This drawing technique is also a good reflex massage: after all, on the palms there are points associated with various organs.
The kids and I took a sheet of whatman paper, I drew a silhouette of the sun with it, and the kids painted their palms with yellow gouache and stamped rays on it.
Then I drew the silhouette of a birch tree, and the guys completed the greenery.
And of course, what would summer be without flowers and berries?
This is what we got!
Thank you for your attention.
Photo report “Flowers for Mom”. We draw with palms with children of the second group of early age” We draw with palms with children of the second group of early age / I work with children of the second group of early age, the children are very cute, spontaneous. "Funny Octopuses" Lesson on drawing with palms in the second junior group Goal: - developing the ability to master non-traditional drawing techniques. Objectives: - develop imagination, the ability to distinguish colors; - create. Photo report “Collective drawing with plasticine “In the Blue Sea” (For World Seas and Oceans Day) World Day of Seas and Oceans (collective drawing with plasticine “Ocean from plasticine”) Collective modeling in kindergarten is always an activity. Photo report “Drawing with palms and fingers” Photo report. Drawing with palms and fingers. Drawing for a child is a joyful and inspired work that should not be forced. Exists.
Collective drawing in the first junior group “Sun - Bell” Goal: through play activities and didactic games to develop interest in visual arts. Objectives: To arouse interest in the image.
Collective lesson on visual arts in the second junior group on the theme “Autumn” COLLECTIVE WORK ON FINE ART. "A gift for Luntik." Purpose: • To introduce children to the technique of imprinting (impression); • Consolidate knowledge. Drawing “Fishes swim in the water” in the second junior group (photo report) I would like to present you with a photo report of the drawing lesson “Fishes swim in the water.” The lesson was conducted with children of the second youngest group. Determined. Drawing in the first junior group “Drawing grains for the birds” Authors of the works: Egor Masterenkov, Demyan Nikeev. Goal: To teach kids to draw sunflower seeds with strokes and peas with dots; cause in children.
Source