Choosing a piece
You will need to decide in advance on the characters of your theatrical production in order to find suitable templates for the paper finger theater. Most often, for the very first children's productions, teachers and psychologists advise taking simple, long- familiar fairy tales and stories.
On the Internet you can often find templates for finger theater made of paper for such fairy tales as Turnip, Teremok, Kolobok, Masha and the Bear, The Three Little Pigs and so on. In any case, you should take for the game a work or story from a book that is familiar to your child. Perhaps you have even been to a real puppet theater, have already seen some kind of play, and the child liked the plot.
Tabletop theater at home
So, what should you choose for home education and development for children from one to three years old? Of course, any activity at this age should be based on play .
Do you have an active child and dream of a quiet activity together? Then a tabletop theater can help you! It turns out that making it with your own hands is not so difficult. A puppet theater for kids can be made from many materials. The most difficult and labor-intensive option is to sew dolls or cut out figures from wood. The simplest and most suitable for a busy mother is to print from paper or cardboard at home.
Where to start if you want to make a paper theater for your child with your own hands? First of all, prepare your materials. You will definitely need:
- color printer;
- thickened paper or cardboard;
- scissors;
- glue;
- scotch;
- templates for crafts in electronic form or your own drawing.
A few final ways
A disposable product opens up new boundaries for creativity and creation. Plastic forks and spoons can be used as hangers, hooks or coasters. Crafts from such material can be made in two ways. The first method is based on the use of glue.
As a result, you can get a fan or an umbrella. Another method is to heat the feedstock. This way you can make flowers or a Christmas tree. These are unique New Year's crafts made from forks. The integrated use of different types of disposable tableware makes it possible to create complex designs.
Kitchen utensil masterpieces pave the way for unleashing creativity. The main component of success is improvisation and the desire to move forward. There are many video lessons and master classes on similar topics. Crafts made from disposable forks deserve special attention.
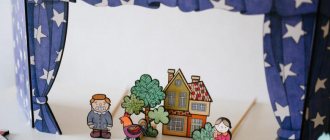
The first do-it-yourself puppet theater - printable templates
Traditional fabric dolls are more difficult to care for and are not suitable for all children. But any child can handle paper products. Place a cone with a picture on the finger, suitable for each child.
It is advisable to introduce the little ones to simpler fairy tales:
- Teremok.
- Kolobok.
- Chicken Ryaba.
- Turnip.
We will need:
- scissors;
- Printer;
- PVA glue.
All templates must be printed, cut out and connected together. Fairy tale “Teremok”.
An audio tale will make the task of voicing paper characters easier. You will only need to carry out what you hear.
Table theater for senior group
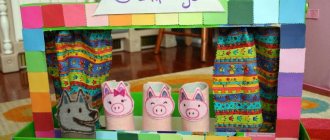
When a child is well versed in the plots of longer fairy tales like “The Three Little Pigs,” it is worth expanding the supply of theater sets.
The “Three Little Pigs” finger toys will surely be loved by little ones due to their bright design and ease of use. The set also comes with a script that will serve as a cheat sheet for older children.
The Masha and the Bear walker will save time on making additional decorations.
The Puss in Boots set comes with a script and the figures are reversible. This bright set will be a delight for your child or a great gift for friends.
For any paper puppet theater it is necessary to make a stage. For the finger version you will need a tall structure, which is easiest to make from an ordinary cardboard box. Make the design foldable, then it will be convenient to store.
A low stage is suitable for flat figures. It is best to store paper puppet theater kits in one place. A large plastic or cardboard box with a lid, divided into several sections, will greatly facilitate the storage and use of the figures. Such a “chest” is not convenient for everyone.
Replace it with a flat “case”. However, you won’t find a ready-made option; you’ll have to tinker with the cardboard yourself. But the result will be a convenient case that can easily fit under a bed, sofa, or in the gap between the closet and the wall. Cover it with self-adhesive paper or similar material, then it will not get too dirty.
Paper figures
Just make heroes out of cardboard. You can use colored paper. You can choose any product sizes. Kids will love creating a paper puppet theater with their own hands.
If a fairy-tale hero breaks, it’s easy to replace it with a new one. You will need special templates that need to be cut out. Two parts of one character are glued together.
Master Class
Preparing the foundation
Manufacturing stages:
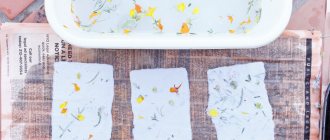
— Take a jar of cream - this will be a vase for snowdrops (photo 1)
.
— Cover the jar with double-sided tape (photo 2)
.
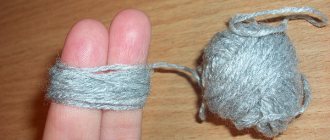
— To make the jar look original, decorate it with woolen threads. Wind twisted white and blue wool threads around it. And on the top and lid of the jar (it will serve as a stand), wind twisted white and brown threads (photo 3, 4)
.
- Make a round cake from plasticine (2-3 cm thick). Place it on the bottom of the jar and press down. With the help of a cake, the snowdrops will stay firmly in the jar (photo 5).
- The vase is ready! Well, let's start making snowdrops! To do this, take disposable plastic white spoons and scissors (photo 6,7)
.
Making snowdrops from spoons
— Cut off the handles of the spoons to make petals (photo 8)
.
- Using green plasticine, mold a receptacle (the base for the flower). Mold it in the shape of a cone (height 2 cm) (photo 9)
— Make a flower pestle by mixing yellow and white plasticine. Attach it to the receptacle (photo 10, 11)
.
— Plant 3 petals from spoons one by one (photo 12)
. Make as many of these flowers as you wish. (I have 7 of them.)
— Make the flower stem from cocktail tubes (green) (photo 13)
. If the tubes are transparent, then roll green colored paper into a thin roll and insert it into the tube.
- Connect the parts: the stem (tubes) with the plasticine base of the flower (photo 14).
— To make the bouquet lush and beautiful, it is best to make flowers of different heights (for this we cut the tubes) (photo 15)
.
— Place the flowers in the plasticine base of the vase. Cut out narrow long leaves from green cardboard (photo 16).
Glue them carefully to the snowdrop stems.
The bouquet of snowdrops is ready!
Plastic spoons
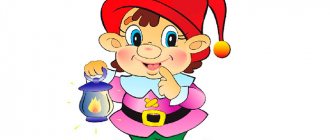
Dolls are often made from various available materials. It’s easy to make figures from plastic spoons. To do this, draw eyes, a mouth and a nose on the convex part.
If a female character is needed, then the spoon is wrapped in cloth and a belt is selected for it. For a male character, you can use a tie or bow tie. Hair and hat are made of paper. The parts are then glued to the base.
Flowers
Plants are a pleasant decorative element in a family nest, but they cannot live long, so they are replaced with plastic analogues, which are crafts from disposable spoons and are made with your own hands.
Tulips
Let's start with the simplest flowers - tulips. The product will require five spoons, a sheet of green paper, PVA, scissors, electrical tape, and cocktail tubes.
We cut equal squares, wrap spoons in them and seal them so that they look like petals. Then, we simply glue the ladle together and assemble a full-fledged flower.
To fix the result, attach a stem from a tube and cover it with tape. Glue the pieces of paper onto a tube and the masterpiece is ready! Such tulips made from disposable spoons will not leave anyone indifferent and are suitable as an element of decoration or a hand-made gift.
Lotus
Let's move on to a more beautiful, but also complex - lotus. You should have spoons of different sizes, a glue gun, hot glue gun, yellow watercolor, scissors and a plastic bottle on hand.
We completely cut off the handles of small spoons so that only the petals of the future lotus remain. We glue them together with a gun. In the same way, we make the next rows, using spoons in ascending order, then glue all the layers into one flower.
We create the core from bottle plastic. We cut the lid and paint it yellow, then glue it to the center. Take a green bottle, cut out the leaves and glue it to the flower. This is such a wonderful water lily made from plastic spoons that we made.
Rose
Rose, another craft made from disposable plastic spoons. Required: spoon, lighter, scissors, pliers, glue gun. Hold the spoon over the flame, giving it the appearance of a bud
It is important not to overexpose it, otherwise the plastic will start to drip.
We repeat the same with the rest of the scoops, but they will be petals, so we shape them more voluminous. Cut off the stems, leaving the stem with the bud. We stick all the petals to the bud, and then paint it in any colors.
Snowdrops
The next artificial plant will be snowdrops. To make them, you need spoons, plasticine, tubes, scissors, cardboard, colored paper, a jar of cream, woolen threads and double-sided tape. Cover the jar with tape. We glue woolen threads to the second side of the tape.
We make a cake from plasticine and place it on the bottom of the jar. Cut off the handles from the spoons. We make a receptacle from green plasticine. Using white and yellow, we sculpt the pistil of the flower. We connect the receptacle and pistil, after which we attach three petals to one base. We make the stem from tubes.
We connect everything together and then insert the resulting flower into the pot, fixing it tightly in plasticine. We cut out thin leaves from cardboard and place them next to the flowers. Snowdrops made from plastic spoons are ready.
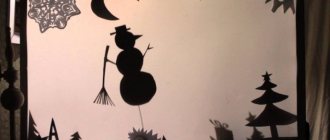
Screen
Beautiful design will only evoke positive emotions in children. A do-it-yourself screen for a puppet theater is made from fabric, cardboard, boxes, and plywood. You can cover the hole under the table with a blanket.
The base is made of plywood, which will last a long time. Before starting work, a drawing is made and all dimensions are noted. Then you can cut out the workpiece.
All elements are covered with fabric; you can use wallpaper that was left after the renovation.
The parts are connected with door hinges to easily close the screen. The same method is used to make a cardboard product. The parts of the workpiece are sewn together.
If there is absolutely no time, but there is a desire to immediately show the performance to the children, you can make a simple screen. A piece of fabric is attached to a rope and fixed in the doorway.Types of crafts
So, what can you make from unwanted plastic spoons? In general, these can be either flowers or all sorts of elements that can be used to decorate the house. Moreover, this type of crafts can definitely interest children.
Crafts made from disposable spoons can be very different, but first you should focus on creating a bouquet of flowers. This time we are talking about tulips. To create such a bouquet we will need electrical tape, corrugated paper, plastic spoons, glue and a brush.
The creation process should begin by cutting the paper into squares, wrapping spoons in squares and finally fixing the structure with glue. The blanks should come out, and then you need to collect the flowers.
Cut out leaves from paper. To complete our craft, we need to fasten the flowers and tie them with ribbon.
Felt doll
Will need
- Sketch of a puppet toy.
- Two sheets of felt, A4 size.
- Small pieces of colored felt.
- Thread and needle.
- Glue gun.
- A sheet of thin cardboard.
We start work by creating a pattern. To do this, draw the sketch onto a sheet of cardboard and cut it out. You will get the main pattern of the figure and individual small details: eyes, muzzle, palms, tummy, ears. The number of details depends on the choice of sketch of the puppet hero.
Then we transfer all the details onto felt. We select the color scheme according to our taste or the content of the fairy tale. The hare can be white, gray or pink, and the fox yellow or orange. If you are doing a craft with your child, let him choose what color the characters in your play will be.
We cut out the parts and pre-assemble the toy, placing all the parts in the places where they should be. If the result is satisfactory, we begin the final assembly. First, we make one main piece out of felt. We sew on all the parts that can be sewn. We sew with a buttonhole stitch. We glue small parts with a glue gun. We put all the parts together in accordance with the sketch.
If the toy has ears, we attach them last. To do this, we fold the two main parts with the right sides facing inward. We apply the ears in such a way that the edges of the part coincide with the edges of other parts, and the tips of the ears look inward. We sew all the details along the edge with a buttonhole stitch and turn the toy inside out. The glove puppet is ready, and the ears will stick out funny on the top of the head.
A garland of spring flowers and other flowers made from plastic spoons.
You will need:
- multi-colored plastic spoons (in this example, pink and blue)
- thick cardboard or fiberboard
- acrylic or spray paint
- brush
- pom-poms (you can buy them or make them yourself)
- super glue or hot glue gun
- thick thread.
1. Prepare cardboard or fiberboard and cut out three identical triangles. If you wish, you can color each triangle.
2. Cut off the top part of each spoon - these are the future petals of your flower. This can be done with scissors or by heating a knife so that it smoothly cuts the plastic - this method is dangerous, so it is better to have an adult handle this step.
3. For one flower you will need 6 spoons, and there are 3 flowers in total in the garland. Mark the middle of each triangle and begin gluing plastic petals in a circle.
4. Glue one pompom into the center of each flower.
5. Make two holes in each triangle and thread a thick thread through them to create a garland.
Sock puppet
Original dolls are made from ordinary children's socks.
To make it you will need a sock, cardboard, a small skein of thick thread or yarn, pieces of fabric for the mouth, sewing thread and buttons, and a glue gun. You can take a sock in a plain color or with a pattern, polka dots or stripes - all this will create the image of a future toy.
We make a blank for the mouth from cardboard. To do this, fold a cardboard rectangle 7 cm wide and 20 cm long in half. We round the corners along the width. From the fabric for the inside of the mouth we cut out a blank according to this template.
Trim the toe of the sock. We cut off the edges along the edge of the workpiece. Glue the cardboard blank inside the sock using a glue gun. At the same time, we fold the edges of the fabric onto the cardboard. Glue the fabric interior on top.
Making a hairstyle for the puppet. Take thread or yarn and wrap it around your hand several times. Tie in the middle and cut the ends. If you spread your fingers wide, you will get a long hairstyle. Sew the hairstyle to the sock.
Let's make eyes. We take two buttons and sew them to the sock, overlapping one on top of the other. You can use ready-made eyes or ones drawn and cut out of cardboard. You can complement the image with any details, make eyes from balls of cotton wool or add decorative elements.
Ladybug
What is needed: plastic spoons (3 pieces per ladybug), paints (white, black, red), plastic bottle caps (1 piece per craft), glue, scissors.
How to do:
- We paint the spoons (everything except the handles): one with black paint, two with red. Apply black dots to the red spoons:
- cut off the handles;
- we paint the bottle cap with black paint and draw eyes on it;
- Glue the wings onto a black spoon - red spoons, and glue the head - a prepared bottle cap - to the resulting structure.
As you can see, you can make many different beautiful crafts from the most ordinary disposable spoons. Take time for this activity and give free rein to your imagination - and your interior will noticeably transform.
Non-traditional types of theater
In addition to the usual materials for puppet theaters, alternative types can be used.
These can include plastic and wooden spoons. Images of characters are drawn or attached to them. When painting on plastic, you should use acrylic paint. If you have to paint with gouache, it is mixed with a small amount of PVA glue.
Interesting options are made from yogurt jars and plastic bottles. They are covered with colored paper, images of characters are attached and fragments of scenery are added. The results are voluminous mini-stories. Such figures do not require additional decorations and develop children's imagination.
Playing theater is a useful and interesting activity. It improves memory and develops oratory skills. The child learns to retell the text, highlight the main points, not be afraid of public speaking, and parents have the opportunity to discern the child’s talents.
Accessories
Photo stand
Crafts from plastic bottles
You need to have a fork and pliers with you. It can be done by separating the outer and inner teeth, thus we get excellent support. How can you make a phone stand out of a fork? To achieve this goal, you need to take a fork and repeat the same thing as when creating a photo stand.
You need to process it so that it looks like a handle, then attach it to the cabinet door.
You need to do one action. Cut off the stalk. The buffet fork is ready.
Egg cup
It is necessary to bend the device so that the fragment with the teeth takes a horizontal position. Next, use a tool to move the teeth in different directions and the accessory is ready.
Wooden puppet theater for children
Honestly, we have different types of theaters at home, for example this is a wooden one .
My kids love it very much, because it is so funny and exciting when I show them a fairy tale and they sit and listen. Now I have an older son, he can show and tell fairy tales himself. Just think, this is very cool, because while playing, a child learns to retell his favorite fairy tale, build a dialogue, etc.
I think that all preschool children, as well as most children of primary school age, will not remain indifferent to such theaters. And if you come up with your own fairy tales with a funny plot and an intriguing ending, then it can actually turn out to be a real holiday for a child.
The simplest version of a do-it-yourself puppet theater is a paper one. It's easy to make it yourself. Well, or together with the child.
Project “A Spoon is a Little Magical”
author: Bazhenova Angela Shamilevna
Teacher at MBDOU "Kindergarten No. 2 in Novy"
Project “A Spoon is a Little Magical”
EXPLANATORY NOTE
Author of the project:
Bazhenova Angela Shamilevna
Project name:
“A spoon is a little bit magical”
Project participants:
OU students, teachers, parents.
Project type:
creative and informational, collective.
Project duration:
short.
DESCRIPTION OF THE PROJECT IMPLEMENTATION
Relevance
Recently, interest and attention to folk art in our country has increased. People are increasingly talking about the need to introduce children to the origins of Russian culture, about the revival of folk holidays with their traditions, customs and beliefs. After all, by introducing children to folk art, we thereby introduce them to the history of the Russian people, to moral universal values, which are so lacking in our modern world. It is impossible not to note the role of folk culture in the spiritual and moral education of preschool children. Our ancestors left us a truly inexhaustible source of folk wisdom.
Folklore, as a part of folk culture, accumulates the spiritual and practical experience of the people. The picture of the world, reproduced in it through words, music, and action, transmits eternal moral values and gives the child reliable guidelines in the cultural space around him.
When working with children, turning to authentic forms of folklore is of particular importance. Natural rhythms, intonations, and colors that have come down from time immemorial, being inscribed in “the world and life of children,” best allow the realization of the sincere “search for the high joy of the children’s masses” (G. S. Vinogradov).
Why wooden spoons?
Wooden spoons are a reflection of the originality of our Russian culture and its cultural traditions. Wooden spoons have come to us from time immemorial, enchanting everyone with their uniqueness and color. Spoons were and remain one of the most popular percussion instruments among the Russian people. Back in the 18th century. instrumental ensembles and soldiers' choirs used spoons in their work. They played funny and humorous songs. The depiction of spoons in popular prints with scenes from folk life dates back to this time. Buffoons used spoons to rhythmically accompany the dances and complemented their sound with bells tied to the handles of the spoons. Currently, this musical instrument is a mandatory attribute of folklore and instrumental ensembles.
Problem
The question of building a model of the educational process based on the centuries-old traditions of the Russian people, their rich cultural heritage, is particularly relevant at present.
Preschool age is a period of a child’s life when he is emotionally open, and his imaginative perception of the world around him predominates. The history of a people is learned by a child as a source of positive emotions, which expands his life experience and stimulates him to be active.
Raising a child through familiarization with the best traditions of the Russian people, musical culture, prompted us to undertake project activities.
Objective of the project:
Creating conditions for the development of children's sustainable cognitive interest in the process of discovering new, unusual knowledge about a familiar object - a spoon.
Tasks:
| for the teacher | for children | for parents |
| To form children’s ideas about the life of the Russian people in the old days; Create conditions for children to be interested in ancient life, through the organization of cognitive-research, communicative, gaming, musical, visual, cultural and leisure activities; Give an idea of the history and variety of spoons; Develop attention, associative thinking, imagination, creative abilities of a preschooler; Expand children's vocabulary (parts of a spoon, material, folk crafts, etc.); To instill in children pride in their people, to develop respect for the traditions and customs of the country and region. | Promote the activation of cognitive activity; improve communication skills, facilitate interaction with adults and peers, develop creativity, imagination, speech; Expand children's vocabulary (parts of a spoon, material, folk crafts, etc.) | Promote the activation of cognitive activity; Promote the development of children's creative abilities, imagination, and speech; Participate in the educational and educational process. |
Expected Result:
| for the teacher | for children | for parents |
| Replenishment of the methodological piggy bank with the author's notes on educational activities; Increasing pedagogical competence and motivation in organizing the educational process within the framework of the project; Development of advisory and practical material for parents; Opportunity to broadcast accumulated experience (competitions, publications, conferences) | Demonstration of sustainable interest and respect for Russian folk culture and its traditions; Acquiring extensive knowledge about the history of the life of peasants; Enriching children's vocabulary with names of Russian everyday objects; Formation of target orientations of a preschooler’s personality. | Active participation of parents in events held as part of the project and the activities of the preschool educational institution; Joining the efforts of the preschool educational institution and the family for the successful socialization of the child. |
PROJECT IMPLEMENTATION MECHANISM
Project implementation stages | Activities of a teacher | Children's activities | Parents' activities |
| Preparatory | Presentation of the project at a teaching hour, discussion of possible events within the project; Choosing forms of work with children, parents, specialists; Involving children in project activities, formulating the problem; Preparation of card files of riddles, sayings, proverbs, photo albums, illustrative material for creating a developmental environment in preschool educational institutions; Preparation of information pages for teachers and parents (games, traditions, recipes); Preparation of consultations for parents (“Introduction to Russian folk art”, “The spoon is the nurse”, “Techniques for playing on wooden spoons”, etc.); Selection of CDs and DVDs for watching and listening with children to the sound of wooden instruments in recordings; Drawing up notes of educational activities and educational events. | Getting into the topic, creating a desire to learn as much as possible about the spoon; Getting used to the game situation | Motivation of parents to participate in the project; Purchasing and reading fiction to children on the topic of the project; Viewing and selecting entertaining material from the Internet. |
| Basic | Conducting a series of educational classes on the topics “History of a spoon”, “Butter porridge, painted spoon”, “Antoshka, Antoshka, quickly take a spoon”, “What is a spoon made of”, “There are different types of spoons”, “Spoon. Khokhloma painting”, etc.; Design of photo galleries, photo collages, creation of presentations on the topic; Designing a museum in a group with parents “Miracle Spoons”, “The Biggest Spoon”, “The Smallest Spoon”; Excursion, targeted walk to the museum; Organization of an exhibition of family crafts “The Most Unusual Spoon”, “Elegant Spoon”; Organization of an exhibition of drawings “A spoon turns...”; Support and presentation of family projects “Why does a person need a spoon”, “The road of the spoon...”, “The lady’s spoon is waiting for guests”, etc.; Cognitive and speech quiz “The spoon is the nurse”; Design of a book corner on the theme of the project: books, illustrations, works of art; Reading fiction, popular science literature (K. Pino “The History of a Wooden Spoon”); Conducting quizzes and comic competitions on the topic; Productive and constructive activity. Learning the simplest techniques of playing two spoons; Creating an orchestra from spoons “Our spoons are good” Making a theater out of spoons; Experimenting with spoons: measure a spoon, find a spoon that fits in your palm, guess (small, metal, wooden ones can float), Correspondence excursion to the Nytva Spoon Museum of History and Local Lore (https://spoonmuseum.com/) | Artistic and creative activity on the topic “My painted spoon”; “Writing a new fairy tale about the Spoon”, together with parents; Watching cartoons with a spoon starring “Zhiharka”, “Three Bears”, etc.; Learning and playing folk outdoor games; Learning poems, riddles, nursery rhymes, proverbs, sayings; Introduction to wooden spoons as a musical instrument, research activity: spoons feel different to the touch: (rough, smooth, cold, hot, dry, wet, etc.); Sensory activities: collecting, comparing, sorting, etc. | Assisting educators in decorating the Spoon Museum; Joint composing of new fairy tales about the Spoon; Consulting work; Assistance in creating the RPPS. |
| Final | Exchange of impressions and experiences between kindergarten buildings; Presentation of the results of the team’s work within the project; Posting work experience on the official website of the kindergarten; Leisure activities “A spoon is a little bit magical” | Design of the Spoon Museum; Participation in an exhibition of children's works; Participation in the holiday (round dances, songs, dances); Children will get acquainted with: oral folk art (fairy tales, riddles), various types of folk art (Khokhloma painting, Gzhel) | Visiting a holiday, museum, exhibition with children; Reviews about the project. |
CONCLUSIONS ON THE PROJECT WORK
The project “A Spoon is a Little Magic” is an example of the integration interaction of all participants in educational relations: teachers, children, parents. The project was implemented in joint activities with children, taking into account their age characteristics, sensory experience, interest and their parents. This allowed us to successfully solve and implement the tasks of moral and aesthetic education of preschool children, and also contributed to the formation of target guidelines for preschool age.
Project methods: visual, practical, game, verbal.
LITERATURE USED AND INTERNET SOURCES
- N.G. Kononov “teaching preschoolers to play musical instruments”, Moscow “Prosveshchenie”, 1990;
- N.F. Sorokina “Playing Puppet Theater”, Moscow, ARKTI, 2002;
- M.V. Tikhonova, N.S. Smirnova “Red Izba” - introducing children to Russian folk art, crafts, everyday life, St. Petersburg “Childhood-press”, 2004;
- T.A. Budarina, O.A. Markeeva “Introducing children to Russian folk art”, St. Petersburg “Childhood-press”, 2001;
- O.L. Knyazeva, M.D. Makhaneva “Introducing children to the origins of Russian folk culture”, St. Petersburg “Childhood-press”, 2002;
- https://avega.net.ua/avega/index.php/rukodelie/855-2011-03-29-10-48-42.html - wooden spoons
- https://nechtoportal.ru/istoriya-veshhey/istoriya-lozhki.html - history of a spoon
- https://www.slavyanskaya-kultura.ru/art/trade/stolica-derevjanoi-lozhki.html - Slavic culture
- https://video.mail.ru/mail/kln.55/6422/6463.html - video Khokhloma, Semenov and Gorodets
- https://www.samoffar.ru/lozhki.shtml - wooden spoons
- https://stranamasterov.ru/node/454664 - Spoon puppet theater. Wood painting.
APPLICATION
- The Tale of the Spoon;
- The Tale of the Wooden Spoon;
- Sketch for a children's play;
- Abstract “Chissed spoon - gilded handle”, admiration;
- Abstract “What was the spoon made of?”, cognitive activity (experimentation);
- Abstract “Beautiful Spoon”, applique;
- Consultation for parents “A Tale in a Spoon”
- An old man named Spoon-Glutton (Kolmyk folk tale)
- Fairy tale “How Spoon and Fork Quarreled”
- Fairy tale “As Vitya was taught to eat with a spoon”
- Riddles about a spoon;
- Poems about a spoon;
- Hot ten about a spoon;
- Nytvensky Historical and Local Lore Museum of Spoons (the only one in Russia)
- Multimedia guide “Wooden spoons”
- Multimedia manual “Spoon”
Paper puppet theater “Walkers”
This kind of theater is very popular with young children; for such a theater you need your favorite characters and a couple of holes.
Believe me, children will happily play such games.
And if you invite friends over, it will be even more fun to play.
You will also receive samples of walkers of your favorite characters to your e-mail address.
DIY glove puppet
In reality, there are a lot of puppet theaters that can be built. Even at almost no cost. You just need to use your wits and do it! You can sew it, for example.
Or you can learn to knit and knit these cute little characters:
Honestly, I used to knit well, but now I don’t have enough time for it all. But I never liked sewing. But, as an option, you can also create a theater for those who love this business.
Although here is the simplest master for you - a class on sewing a puppet theater from fabric using gloves. Anyone can do it, even those who do not know the art of sewing.
We will need:
- household gloves, knitted - 2 pcs., buttons for the eyes - 2 pcs., thread, scissors, braid, stationery knife
Stages of work:
1. Take the first glove and steam the seam thread on the cuff, it is usually red or yellow. Tuck the little finger, thumb and index finger in so that they do not come out, sew them up. You should end up with a head with ears and a hare neck. Sew the bases of the ears to prevent your fingers from getting in there.
2. Now take the next glove and hide your ring finger in it, sew up the hole. Place your middle and index fingers together and now place the hare's head on them.
3. Sew the head to the neck. To hide the seam on your neck, tie it with a bow or tie in the shape of a butterfly. Sew button eyes and embroider a muzzle, or you can draw it with a marker. You can decorate a bunny using fluff or knitted threads by gluing a cute forelock to his head.
Interior decoration
To make these decorations look better, you need to purchase colored devices or paint them only with spray paint. This way there won’t be streaks left on the spoons from the brush. Below are described in detail 2 options that are easy to implement.
Sunflower mirror
This craft is suitable for decorating a kitchen, bathroom or nursery.
What materials and tools are needed:
- small round mirror (10-15 cm in diameter);
- thick cardboard (a box from under household appliances will do);
- pencil;
- scissors;
- glue gun;
- glue Moment;
- yellow and black spray paint;
- 80 white spoons or 16 black and 64 yellow;
- screwdriver.
Step-by-step instruction:
- Draw 2 circles on cardboard: 25-30 cm in diameter and 5-7 cm in diameter. Cut circles with scissors. Determine the center of the large circle and glue the small one to this place, then find the center of the small circle and glue the mirror evenly.
- Paint 16 spoons black and the rest yellow. If the dishes are already painted, then simply cut off all the handles under the base.
- With the concave side up, the black petals need to be glued to the cardboard with a glue gun so that the bases of the spoons fit into the gap under the mirror, which was formed due to the small cardboard circle.
- Glue all the yellow spoons in a circle in a checkerboard pattern so that they cover the gaps between the petals in the previous rows. The bases of each of them should not be visible.
To hang a mirror on the wall, you need to make a hole on the back side with a screwdriver, closer to the center. The cardboard is thicker in this area due to the small circle. Now you can “stick” the mirror onto the nail.
Clock for the kitchen or cafe
For this craft, disposable utensils do not need to be cut or deformed. It is the original shapes that will help you create a kitchen-themed watch.
What you will need:
- a small round watch with a flat frame around the dial;
- A4 office paper;
- compass;
- pencil;
- scissors;
- 10 disposable forks, 10 knives and 10 spoons;
- glue gun;
- a handful of small pasta in the shape of a wheel;
- spray paint.
How to design a watch:
- First of all, you need to protect the dial glass from glue and paint. Using a compass on paper, draw a circle equal to the diameter of the glass. Cut out and apply to the dial.
- Glue cutlery to the frame in a circle, alternating them (fork, knife, spoon).
- Glue the pasta in a circle, separating the handles of the cutlery from the glass.
- Hold a piece of paper and spray paint onto the clock.
It is important that all parts are well coated with paint, so 2 cans may be required
Secrets of successful theater productions
How to make a paper theater more durable? After all, paper parts often tear and become unusable. And, most likely, this will happen after the first production of your play. Here is another option for making a theater at home, which, although more time-consuming, will last longer.
The first stage of production remains unchanged - we find templates (you can even draw them yourself if there are no ready-made ones). We print them on a color printer. Then we cut out the largest decorations, glue them to cardboard and additionally seal them with tape - this will add strength to them, and they will not get dirty.
Then we start making fairy tale heroes. At this stage we will need additional materials, namely:
- Small plastic jars for yoghurts like Rastishka or Agusha.
- Wooden ice cream sticks (if you don’t have them, plastic forks or spoons will also work).
- Stationery knife.
We cut out the characters and glue them onto a cardboard base. If your paper is quite thick, then you don’t have to do this. But most often, thicker paper is not “grabbed” by the printer for printing. Keep this in mind and try using different paper weights in your printer.
Be sure to tape it with tape to prevent the parts from fraying. Then we take ice cream sticks or plastic spoons and tape them with tape to the back of the paper blank so that the stick is “behind” the hero and has a free part at the bottom (3-4 cm). Using a utility knife, we make two cuts on the bottom of the yogurt jar - you should get a cross - and then simply insert the stick with the doll into this hole. All is ready! You can start playing!
As you can see, a home theater is a great way to diversify a child’s leisure time without much expense, because printing and cutting out the templates is not at all difficult. In addition, this is a good option for spending time together, which children always like, and also strengthens family relationships.
Fan of forks
This fan is suitable for decorating a room in an oriental style or for performances and masquerades.
What materials and tools are needed for work:
- 23 plastic forks;
- hot glue;
- thick cardboard;
- acrylic paint;
- wide artistic brush;
- marker or pencil;
- scissors;
- 45 medium size beads;
- satin ribbon 1 cm wide, 1.5 m long;
- 1.5 m of lace ribbon or ruffle of different colors.
How to make a fan:
- Cut out 2 rectangular blanks with sides 10x15 cm from cardboard. Draw a semicircle on each of them. For convenience, you can use a small saucer. It needs to be attached to the cardboard and circled with a pencil.
- Cut out the blanks and paint each one with acrylic paint on one side. Let dry.
On the unpainted side inside 1 semicircle, draw another, 1.5 cm away from the edge. No need to cut. This line will help glue the forks evenly to the cardboard. Using a glue gun, glue all the devices to the cardboard with the teeth facing up.
It is important that the end of each handle does not extend beyond the mark. When the entire workpiece is filled, you will need to hide the ends of the forks
To do this, you need to apply glue to the 2nd workpiece and place it evenly on top. Take the ribbon and thread it between the forks like a snake. There should be 1 cm ends left on each side. They should be folded and carefully glued. From above, between the teeth, thread lace or ruffles in a similar way. Apply glue to the teeth that remain visible from the front side and carefully place the beads. Thread a ruffle or lace of a different color between the forks, on top of the ribbon, in a checkerboard pattern. That is, this strip should cover those parts of the handles that remained open when the tape was threaded. Cut off the excess and glue the ends. By analogy, from above, thread 1 more piece of satin ribbon and secure the ends.
The fan made from plastic forks is ready. From the remnants of the satin ribbon, you can twist small roses and glue them to the cardboard along the edge.