Summary of a drawing lesson in the senior group on the topic “May 9 - Victory Day”
Alena Sharapova
Summary of a drawing lesson in the senior group on the topic “May 9 - Victory Day”
Goal: Development of artistic creativity in older .
— Learn to reflect in a drawing impressions of the Victory .
— To develop the ability to give an objective assessment of friends’ drawings.
— Develop artistic creativity and aesthetic perception.
— Foster feelings of patriotism, respect and pride for your great country.
— Foster a sense of pride in veterans.
Materials and equipment: coloring pages on the theme : “The Great Patriotic War”
DIY drawings for May 9th
On May 9, all of Russia celebrates a great holiday - Victory Day. To talk about what kind of holiday this is in a playful way, and at the same time prepare a gift for veterans, draw a picture with your child.
May 9 – children’s drawings
Drawing is an important element necessary for the harmonious development of a child. With the help of drawing, he learns about the world around him and tries to reproduce it using images that are understandable and accessible to him. Psychologists say that before the age of 8, you should not teach a child to draw or point out mistakes, thereby you are imposing your own vision of the world on him.
Before you sit your child down to draw, tell him about the theme of the upcoming holiday, the feat of the Russian people and the dedication of the soldiers, tell him about your relatives who fought and their merits.
Show photos from the front and listen to war songs, all this will help you gain the necessary mood.
Explain that on this day we always say “thank you” to veterans, and any veteran will be pleased to receive a sincere children’s drawing.
How to draw a picture for May 9?
The technique can be anything, for example:
- gouache
- watercolor
- colour pencils
- watercolor pencils
- felt-tip pens
- wax crayons
- crayons
For work, take small A4 or A3 paper; it is better if the paper is thick, then the drawing will look better and will last for a long time.
You can also draw a picture on a computer; there are many programs with which you can easily create an image and be able to make adjustments to it. A graphics tablet is also a great option for creating drawings using digital technology.
Drawing for May 9 step by step
Not only children, but also adults want to express themselves and draw, but not everyone has artistic talent. To make the drawing look like the picture, draw in stages, constantly checking the instructions. For example, to draw a St. George ribbon, repeat the following steps:
- Place in front of you a blank sheet of paper, a simple pencil, a ruler, an eraser and a black and orange felt-tip pen.
- In the center of the picture, draw two parallel lines at an angle of 60 degrees, the distance between the lines is approximately 2-3 cm, then you need to draw two more lines that will intersect the first lines at an angle of 45 degrees, as shown in the picture.
- Remove the extra lines, as shown in the figure, and connect the upper ends of the two outer lines with a semi-oval; the same semi-oval should also connect the inner ends of the lines. Connect the lower ends in pairs with a straight line, erase the extra contours.
- now draw 3 black thick lines along the entire length of the drawn tape
- Paint over the rest of the space with an orange marker and the St. George ribbon is ready. To complete the drawing, you can add the inscription “Congratulations on May 9!”
Military drawings for May 9
Since the holiday is military, the cards and drawings that are presented at the holiday are mainly on a military theme. You can depict a soldier, a tank, a helmet, a machine gun or an airplane.
To draw a military aircraft follow the instructions:
- Draw the body of the aircraft in the form of a lying cone, in the middle of the cone mark the line for attaching the wing
- Draw two wings from this line in different directions, erase the extra lines at the far wing, because part of it covers the body of the plane
- Draw a vertical stabilizer at the tail of the plane.
- Draw a streamlined cockpit that rises above the body,
- Draw a propeller in the front and stars on the wings
- Color the resulting drawing
Easy drawing for May 9
The easiest drawing for May 9 is a star. It doesn’t need to be drawn so much as it needs to be built using reference points:
- Using a compass, draw a circle and draw two lines through the center that will divide the circle into 4 even segments.
- Now on the circle you need to mark reference points, between which there is the same distance.
- Point 1 is located at the intersection of the line and the circle at the highest point of the drawing, to find points 2 and 3, place a compass at point 1 and draw a circle of the same radius as the first circle, mark the intersections of the circles with a pencil to find points 4 and 5 alternately draw two more circles from points 2 and 3.
- Erase the extra lines from the drawing, mark only 5 reference points on which the entire drawing will be built.
- Connect them as shown in the picture and erase the extra contours.
- To make the drawing bright, color the star.
Drawings on the theme of May 9
To make the drawing good, you can draw it in stages or use a transfer stencil. If you have a beautiful picture on hand, you can transfer it through glass and then simply color it.
To choose a theme for your drawing, look at popular pictures on the Internet, postcards, or use the most popular step-by-step diagrams for drawings for May 9, which are given in the article below.
Tank on May 9 drawing
To draw a tank you will need a simple pencil, an eraser and green and red pencils or gouache.
- Draw the body of the tank, which consists of an oval (caterpillar) and two truncated pyramids (cabin)
- Then draw the wheels of the tracks, the barrel of the tank
- Draw the chain on the tracks, the cockpit, the stars on the tank and small details
- Color the tank with a green pencil
Drawing of a carnation for May 9
The symbol of May 9th is, of course, carnations, which are very easy to draw if you follow the diagram:
- Draw a long stick for the future stem, a triangle and a circle for the future flower
- Draw small processes in the form of triangles on the stem
- On the head of the flower, mark the petals with smooth lines.
- Add detailing, make the petal lines zigzag
- Color the drawing with pencils or watercolors
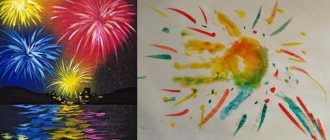
Drawing of fireworks for May 9
Children and adults, everyone is waiting for the fireworks, this is not just a symbol of the end of the holiday, but also a stunning sight. People gather together on observation decks and rooftops to admire the bright lights in the sky. Fireworks can be called one of the simplest drawings, because in essence they are just splashes.
- Draw a slanted line
- At the top end of this line draw splashes flying out from the center
- Add bright colors and stars and the fireworks are ready
You can follow a simpler scheme: apply paint (watercolor or gouache) to a brush and shake it over the paper; the scattered drops are very similar to fireworks. Use several different colors to make the design vibrant.
Little children can draw fireworks using air markers; all they have to do is blow hard and bright splashes will appear on the piece of paper.
Drawing of the eternal flame for May 9
The drawing of the eternal flame may seem more difficult to execute, but if you carry out the work step by step, you will succeed:
- Draw an oval, 5 rays of different lengths extend from it, as shown in the figure, these are the upper edges, the edges of the star
- Draw the lower edges between the rays and add semi-ovals in the center of the star
- Connect all the rays with straight lines to make a star
- To make the star voluminous, repeat the contour at a distance of half a centimeter and draw the folds with straight lines
- Draw the fire with smooth lines, as if blowing away in the wind; if desired, the drawing can be colored
What to do with the drawing for May 9?
There can be quite a few options for the future fate of the drawing:
- Give to your grandfather or grandmother, great-grandfather or great-grandmother who participated in the Great Patriotic War
- Give to veterans who gather in the main square of the city on May 9, along with a carnation
- Send to an exhibition of drawings, which are often organized by the local administration on the eve of the holiday
- Turn it into a beautiful card and give it again
- Decorate the wall in the room
- Save as a keepsake in an album with children's drawings
Drawing a picture for May 9 is a great way to spend time with your child in a fun and educational way. Come up with an interesting story and draw with the whole family!
Video: Drawing for a veteran on May 9
Source: https://thewom.ru/prazdniki/risunki-k-9-maya-svoimi-rukami/
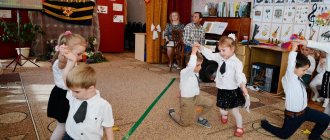
Drawing lesson in the senior group “May 9. Fireworks over the city"
Anna Shuklina
Drawing lesson in the senior group “May 9. Fireworks over the city"
Goal: to create conditions for maintaining interest in visual arts.
— Learn to draw festive fireworks with wax crayons ;
— Strengthen knowledge and skills in using two materials: wax crayons and watercolors;
— Cause an emotional positive response to the proposal to draw in an unusual way ;
— Develop independence, activity, and a sense of self-worth;
- Develop aesthetic feelings by highlighting means of expression in images created by other children;
- Foster love for your homeland and hometown ;
— Conversations about the holiday of May 9;
— Examination of photographs and drawings of fireworks ;
— Drawing fireworks with colored pencils;
Material for the lesson :
White paper, wax crayons, watercolors, brushes, illustrations of fireworks .
Drawing diagrams on the theme “Victory Day”
Let's look at step-by-step instructions for children of different ages.
How to draw a tank
Children's age is 4–7 years.
Toddlers may have difficulty drawing straight lines, so an adult may need help
Instructions:
- Draw an elongated oval.
- We add a trapezoid to it on top without a lower base.
- We add another trapezoid to this one.
- We show another line parallel to the base of the trapezoid - the thickness of the tank tracks.
- We finish drawing the cannon, wheels, and detailing the tank body.
- We draw a star, draw the details of the wheels.
- Color the drawing.
Video: drawing a tank
How to draw an airplane
The first option is suitable for children 3–5 years old.
In this airplane drawing, kids practice creating symmetrical elements.
Instructions:
- Draw a vertical oval, narrowed downwards.
- We finish drawing the wings on the right and left.
- Draw the porthole.
- We draw a line to the middle of the military machine.
- Let's detail the tail section.
- Color the drawing.
The second version of the airplane image is more complicated, so it is recommended for children 6–7 years old. The depiction of military aviation equipment is dominated by sharp angles and clear lines.
This is a complex version of an airplane drawing, as it contains many small details and symmetrical elements
Instructions:
- Take a ruler and draw the main lines of the car body.
- On the horizontal line we draw a small rectangle - the cockpit.
- On the wings we use additional lines to show the flaps.
- We outline the contours of the car.
- We make the contours of the “nose” curved and the cockpit rounded.
- We finish drawing the wings and rockets.
- Detailing the tail.
- Color the drawing.
Progress of the lesson
Guys, tell me what holiday do people celebrate on May 9? What holiday is it?
That's right, this is Victory Day for our country in the war over Nazi Germany.
On the morning of May 9, parades are held for veterans to put on orders and medals. People give veterans flowers. War participants, adults and children lay wreaths and flowers at war monuments.
Now I will tell you a riddle. If you guess right, you will find out what else happens on May 9, Victory Day.
"Bloomed in the dark sky
Bright red flowers:
It’s as if they melt in a haze, lying down on the water.” ( firework )
Educator: Well, of course everyone recognized the fireworks .
Who knows what fireworks ? (lights in the sky)
.
Yes, these are such multi-colored lights in the sky that light up and sparkle, and then go out. Very beautiful!
What colors did you see in the fireworks ?
Guys, when do fireworks : during the day or in the evening?
That's right, fireworks happen late in the evening.
And who knows why? (so that it is visible, the lights are then brighter)
.
On May 9, 1945 in Moscow at 10 pm a salute was fired with 30 salvoes from 1000 guns
A selection of drawings for Victory Day
Considering the fact that children of all ages receive creative tasks on the theme “Victory Day”, it is appropriate to divide the selection into three groups: for children 1.5–4 years old, 4–5 and 5+.
For younger preschoolers
When working with this age category, it is better to turn to ready-made plots that only need to be colored. That is, to coloring books. Pencils or paints are used for this. An important nuance: as in the case of drawings on other topics, you should not select pictures with small details or too colorful - it will be difficult for kids to focus on the plot. Typically, children of this age group are offered the following stories:
- postcard for Victory Day (with the number 9, helmet and/or star);
- St. George's ribbon, made with pencils (the task is not to go beyond the contours of the plot being painted);
- fireworks (usually using the finger technique).
Photo gallery: a selection of coloring pages on the theme “Victory Day” for children 1.5–3 years old
There should not be many colors in the drawing
Coloring books with inscriptions are best offered to older children, 3–4 years old.
When coloring a star, kids try not to go beyond the contours of the picture.
Photo gallery: examples of finished drawings for younger groups
Poking a cotton swab makes the salute less natural than drawing with your fingers
It is convenient for children to use the finger technique when drawing fireworks
Fireworks can be an element of a collective application on the theme of Victory Day
The basis of this drawing is a coloring template
For the middle group
For children 4–5 years old, coloring books are still relevant; felt-tip pens are added to paints and pencils, with which children not only color, but also trace the outlines of drawings, for example, the outlines of military equipment. To add brightness to the composition, wax crayons are added, for example, for coloring bouquets of lilacs and festive fireworks. Added to last year's stories:
- military equipment (tank);
- obelisk.
In the middle group, children practice creating collective drawings. And if the weather allows, then such a group drawing could be a postcard for Victory Day, made with colored chalk on the asphalt. The subjects chosen for such drawings are multi-colored but simple, for example, fireworks, St. George's ribbon. Complex elements - tank, inscriptions - are performed by adults.
Drawings on asphalt require the active help of an adult, since it is difficult for children to navigate the scale of the drawing; moreover, it is possible that the children only color the picture, and the teacher or parent draws the outlines
Photo gallery: a selection of coloring pages for the middle group
In the middle group, children learn to color people and their costumes
To color a picture with a dove and a star, you can use wax crayons
Coloring military equipment is especially attractive to boys
To color the Eternal Flame, children use gouache and brushes of different thicknesses: medium and thin.
Photo gallery: samples of finished drawings on the theme “Victory Day” in the middle group
Gouache is used to make a drawing of paratroopers
The drawing can be an assignment for a project on a topic; in this case, parents can get involved in completing the assignment, for example, to draw elements of the composition
Children can sketch with colored pencils, without first drawing outlines with a simple
Coloring with felt-tip pens requires strict adherence to the contour boundaries
For the older group
Children 6–7 years old draw more complex scenes, for example, a victory parade depicting military equipment and people. In addition, the children draw illustrations for stories about the Second World War, in particular, pictures of a battlefield with soldiers. It is the drawing of a picture of war that can become a design task for older preschool children on the eve of Victory Day.
During FEMP classes, an excellent way to practice counting would be to create a thematic drawing, for example, a tank, using the cells.
Photo gallery: examples of drawings by cells
The cell from which the drawing begins is indicated by a dot
It’s easy to draw an airplane, since the entire drawing moves in one direction from the starting square
To complicate the task, the drawing can be “composed” immediately in color
Photo gallery: samples of finished drawings for senior preschool age
If the drawing is made with wax crayons, then they can also be used to outline the contours of the image
It is important that children try to maintain proportions in the drawing.
Children come up with the composition of the drawing for a postcard for Victory Day themselves.
An additional task for the drawing may be to compile a description of its plot
Drawing on the theme of the Second World War is an effective way to consolidate acquired knowledge.
Children's drawings of Victory Day in kindergarten, ideas step by step
Red Star
- Using a pencil and ruler, draw an angle following the drawing.
- Draw another corner like in the picture.
- Connect the end of the segment to make a star.
- Erase any excess lines in the center with an eraser.
- Color the drawing.
Soldier
- Draw a circle with a small rectangle underneath it. Connect.
- Add legs to the soldier as in the picture.
- Draw two hands.
- Design the face, small details, color the drawing.
St. George Ribbon
- Draw the bend of the ribbon.
- Duplicate the resulting bend five times.
- Mark the tip of the tape and the fold line.
- Remove unnecessary lines.
- Add color to the ribbon.
Fireworks
- Draw a point in the center and curved lines coming from it.
- Gradually add lines, using different colors to make them more saturated.
Carnation
- Draw the stem with the base of the bud.
- Add leaves and petals.
- Draw in the details.
- Color the stem and leaves green and the petals red.
Necessary materials and equipment
Demo material:
- color pictures, clippings, posters with images of soldiers of various troops;
- plan - a diagram of a step-by-step drawing of a soldier's figure. It is better to depict each stage on a separate sheet of A4 format and hang it up for display during the lesson;
- cap (real, not a drawing);
- army belt, shoulder straps.
Handouts (for each child):
- a simple pencil;
- eraser;
- colour pencils;
- album sheet, 1/2.
Important! The teacher will need a computer or laptop with an interactive screen to view the presentation about military professions.
Analysis of the resulting works
The final stage of the lesson is analysis of the drawings with the children:
- What do you like about your drawings and those of your friends?
- what was the most difficult?
- what can you add to the background?
Important! To reinforce the patriotic theme, new concepts and words, you can play the didactic game “Get a ring - say a word.”
Work on honing human drawing skills, as can be seen, is carried out purposefully throughout the entire development process of preschoolers. In parallel and in a complex manner, additional educational and educational tasks are solved in accordance with the standards of preschool education. The main thing is to draw up a detailed outline of the lesson and clearly outline the stages of drawing.
Drawing “Soldier on duty”: senior group, lesson stages
Preliminary work in this lesson is aimed at patriotic education of preschool children, as well as motivation to create a drawing. This could be reading poems on a military theme and works in prose. The analysis of Russian folk proverbs solves patriotic and educational problems well:
- As a Russian takes a bayonet, so the enemy shakes,
- Russians don’t joke with rolls or swords,
- Russian soldier knows no barriers,
- The whole world knows: there is no stronger soldier than ours.
Note! The most complete picture of the Russian Armed Forces is given by an oral history of military professions with the display of illustrations or viewing of a presentation.
Schematic drawing of a cap
For your information! Types of military professions: border guards, tank crews, artillerymen, signalmen, sailors, pilots, submariners, paratroopers, sappers, snipers.
Before the next stage of the lesson, a physical education session on a military theme is held.
In the main part of the GCD, the task is announced (to draw a soldier at a post) and methods of action are shown. It is necessary to analyze the soldier, to make out what geometric figure each part of the body resembles: the head is an oval, the torso is a rectangle, the legs and arms are elongated rectangles.
Important! Before you start working, you need to remind the children that you should press lightly on a simple pencil, the lines should be thin, barely noticeable. This is done to make it easier to erase inaccuracies with an eraser.
Drawing the features of a military suit
Drawing step by step:
- Outline the location of the future soldier in the center of the sheet. Just above the middle of the page, draw an oval, a small neck and a rectangular torso.
- Draw the legs and then the arms.
- Examine the cap, analyze the shape, draw a triangle, erase the extra lines.
- Draw the details: weapons, belt, shoulder straps, buttons, pockets, boots, star on the cap.
- Draw facial features. Acquaintance with portraiture as a genre of painting is carried out in previous classes (portrait of father, mother, friend). At this stage, only consolidation of the material covered occurs.
- Coloring the finished image with colored pencils according to the sample.
Scheme for drawing a face
Important! It is worth recalling the rule of coloring with a pencil: painting within one contour occurs in one direction (top-to-bottom, left-to-right or oblique).
Drawing lessons by design for middle and senior kindergarten groups
During the lesson it is worth using the traditional technique of drawing with pencils, since the topic is already quite complex.