Ostrich
Another version of a bird made from cones and plasticine is the ostrich. To get this big bird, you need to get a fir cone. You will also need plasticine (black and brown), toothpicks and a couple of acorns.
Using an awl, make holes in the cone and insert toothpicks into them. These will be the legs of the ostrich.
Stick the acorn to an oval blank made of brown plasticine.
Fix the neck with the acorn on the upper edge of the cone. Attach the acorn caps to the ends of the toothpicks, after making holes in them using an awl.
All that remains is to sculpt the beak and eyes from black and white plasticine.
A tuft made from a miniature alder cone, which can be attached to the acorn using a heat gun, will look very good.
This is what a finished ostrich looks like!
You can decorate the edge of the cone with feathers or inflorescences of dry plants.
Swan
A swan - a bird made from cones - is quite simple to make, you just need to know the order of work. To make it, take a large semi-closed pine cone and white, black and red plasticine.
Use white plasticine to sculpt an oblong neck with a head, red for the beak, and black for the eyes.
Attach the plasticine blank to the blunt end of the pine cone.
The swan is ready!
If desired, the wings and tail can be made from dry grass or real feathers. To sculpt a black swan, you need to use black plasticine instead of white.
Crow
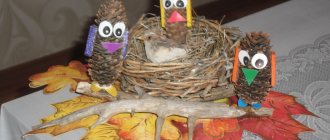
To create this bird, you need to take 2 small pine cones, acorn caps and plasticine in three shades (yellow, white and black).
Connect the cones together as shown in the photo.
Make legs from acorn caps. Natural material can be fixed using a heat gun.
Instead of hot glue, you can also try holding the pine cones together with plasticine.
Make a beak from yellow plasticine. Black and white plasticine is needed to make eyes. And pieces of black material are suitable for forming bird wings.
This is such a funny crow!
It can be placed on a branch that will imitate a tree.
How to make a craft correctly?
There are several important rules that should be followed when creating crafts:
- strictly follow the instructions if it is made on the basis of a ready-made solution on the network;
- if all materials are not available, then you should look for analogues that are similar in appearance and properties, otherwise all the work may be done in vain;
- It is recommended to make blanks that will help you make not one, but several crafts at once, and will also “insure” in case one of the birds is damaged while working on it;
- If you want to learn how to make a bird craft for the first time, then it is best to look for options using the corresponding request on the Internet.
How to make a bird craft yourself?
To remove bird crafts with your own hands well, you need to find suitable instructions on the Internet and decide what materials will be used.
To begin with, you should choose the most affordable and simple options for crafts, so that the materials for them are inexpensive and easy to find.
Next, you need to find suitable instructions on the Internet or rely on your own preferences and experience if you have previously made other crafts.
Peacock from bottles
You will need multi-colored plastic bottles, foil, thin plastic, a log, a metal rod, foam, a stapler and glue. The body of the peacock along with the head is formed from polystyrene foam. Small indentations are made in the intended places for the eyes.
The log will be used as a base; you need to attach the peacock's body to it using a metal rod.
Feathers are sold from cut plastic bottles of different sizes: the longest for the tail, the shortest for the neck and normal size for the rest of the body.
One part of the future feather is rounded, and notches are made on the other to give a more realistic look to the feather. The tail feathers can be decorated with cutouts made of thin plastic and foil.
Decorations can be attached with a stapler or superglue. A beak is cut out of a piece of red plastic. The “feathers” are glued with a slight overlap onto each other to the body with superglue. You can make the crest the way your heart desires, but it is better to use colored plastic to create it.
The recesses for the eyes are painted over with felt-tip pens of any color. It is convenient to use some kind of mesh to form the tail. Its collection begins from the bottom edge. The made tail is attached to the body.
Birdhouses made from milk bottles
Don’t rush to throw away milk bottles and Kinder surprise containers, because you can make an attractive craft out of them. Round holes are cut in milk bottles, clothespins are glued to the bottom of the bottles, and the birds themselves are on them in the form of kinder boxes. Just decorate the birds' bodies with down or feathers, colored paper, and also draw eyes on them with a felt-tip pen, then the craft will be completely ready.
